- REVIEWS
Camera Reviews 
More Reviews Mobile Reviews Photography Reviews - GALLERIES
- VIDEOS
- BUYER'S GUIDES
Why You Should Use Fill & Adjustment Layers in Photoshop (VIDEO)

Photoshop has so many capabilities that there are often several methods for accomplishing the same task. As a result, it’s common to wonder why you should use one tool instead of another.
In the quick explainer below, one of photography’s most adept image-editing instructors explains the importance of Photoshop’s fill and adjustment layers, and she provides five solid reasons for adding these tools to your image-processing workflow. Julieanne Kost is an expert in all things Adobe, and there’s plenty to learn in this two-minute episode.

Kost’s first reason is a big deal; namely, fill and adjustment layers are “non-destructive.” That means that, unlike other Photoshop tools that overwrite your original files, fill and adjustment let you start over and try again if you want a redo.
This point is so important that yesterday we devoted an entire tutorial to explaining how to avoid destructive editing in Photoshop, and we encourage you to take a look.
While explaining her rationale, Kost also provides some quick tips on how to employ fill and adjustment layers. The second reason she recommends these tools is they enable you to modify the blend mode. In the example she provides, this permits her to restrict the effect of a Curves adjustment layer to only modifying luminosity values.
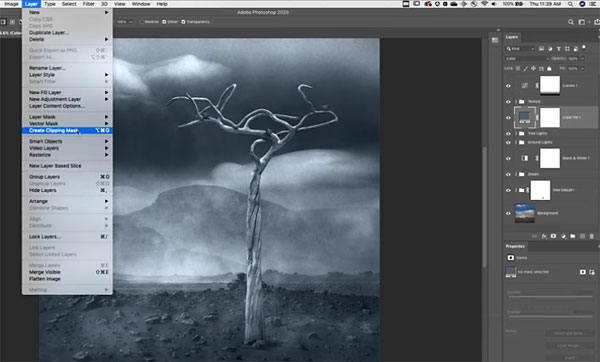
Kost also explains that fill and adjustment layers have their own layer masks that can be used to selectively show or hide the adjustment to an image. Another advantage is that you can change the opacity of fill and adjustment layers at any time. Her final reason is equally worth understanding.
You can find more quick tips and tricks on Kost’s YouTube channel, so be sure and pay a visit.
And don’t miss yesterday’s tutorial, explaining in detail how to avoid destructive editing in Photoshop by using a few simple workarounds.
- Log in or register to post comments


![]()
Get the Latest Photo Tips, News & Reviews from Shutterbug!
| Camera Reviews Other Reviews | Mobile Reviews Photography Reviews Columns | News | Features | How-To | Resources |
 © 2024 Shutterbug
AVTech Media Americas Inc., USA
All rights reserved