- REVIEWS
Camera Reviews 
More Reviews Mobile Reviews Photography Reviews - GALLERIES
- VIDEOS
- BUYER'S GUIDES
When Color Range Masks Are Better for Nature Photo Edits Than HSL Sliders (VIDEO)
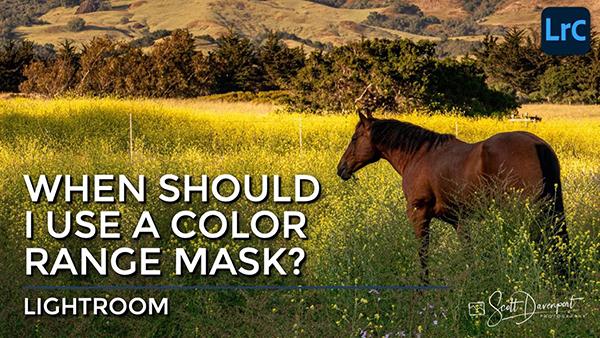
Photographers often turn to Lightroom's HSL sliders as the first step in editing landscape and nature photos. But what do you do when this technique falls short? As you'll see in the tutorial below, there's often a better solution that's very easy to accomplish.
Outdoor photographer Scott Davenport regularly posts shooting and editing tutorials that are popular among Shutterbug readers who appreciate his calm, reassuring approach. In this episode he explains why Lightroom's Color Range Masks often outperform HSL sliders when processing certain types of images.
HSL adjustments do provide some control over separating colors, but Color Range masks can be a far better choice when HSL sliders affect more colors than you want. Or as Davenport puts it, "To guarantee no impact outside of only the hues you want to impact, you need to reach for a Color Range mask."

The lesson begins with an overview of how both tools work, and Davenport discusses when one method works better the other depending upon specific attributes of the image at hand. His demonstration photo is a great example, with this as the overarching takeaway: "Sometime HSL enhancements have too much impact," especially if a natural looking photo with precise colors is what you're after.
Davenport's goal with this particular edit is to enhance green tones in the foreground, and the common approach would be to slide the yellow HSL slider to the right. Doing that does improve the greens, but it also causes an unwanted color shift to the yellow flowers among the grass. In essence, the problem is that the HSL approach is a global adjustment, that may impact the other important tones within the frame.
Color Range masks, on the other hand, work their magic selectively by targeting only the areas in the image that need to be adjusted—while leaving all other tones untouched. Davenport drops the Color Picker in the grass, and all green tones in the image (from foreground to background are immediately selected.

As you'll see, it's easy to refine the mask, for a greater or lesser effect. In this case Davenport backs it off slightly so the yellow flowers are unaffected. At this point he demonstrates a few simple steps to complete the transformation.
After watching the video, we suggest you take a look at Davenport's instructional YouTube channel, where there's much more to learn.
And don't miss the related tutorial we posted earlier from another image-editing expert, explaining how to achieve photos with pleasing natural-looking colors using Lightroom's White Balance tools.


![]()
Get the Latest Photo Tips, News & Reviews from Shutterbug!
| Camera Reviews Other Reviews | Mobile Reviews Photography Reviews Columns | News | Features | How-To | Resources |
 © 2025 Shutterbug
AVTech Media Americas Inc., USA
All rights reserved