- REVIEWS
Camera Reviews 
More Reviews Mobile Reviews Photography Reviews - GALLERIES
- VIDEOS
- BUYER'S GUIDES
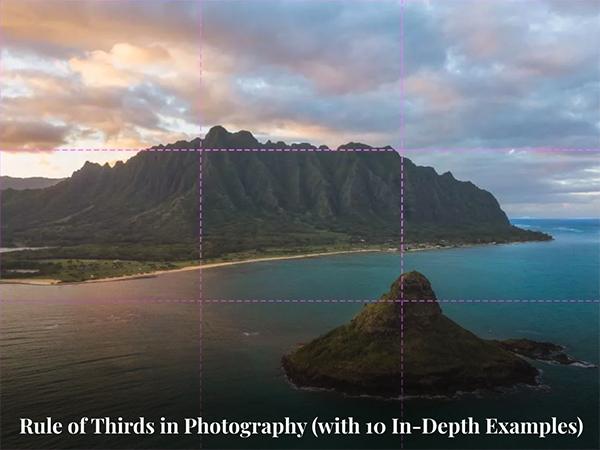
What Is the Rule of Thirds in Photography? An Easy Explainer with 10 Clear Examples
(Editor's Note: This guide to the Rule of Thirds in photography first appeared on Wit and Folly.)
The Rule of Thirds is a very helpful compositional guideline that is a great reference point for beginner photographers or seasoned professionals. As with any photography rule, they really are meant to be broken, so take this as more of a general guideline than a defined rule.
The rule is what the name sounds like: it breaks your image up into vertical and horizontal thirds. The nice thing is that nowadays it’s extremely easy to visualize the Rule of Thirds as many cameras have “Rule of Thirds” grid lines in the viewfinder.
If your camera does not have this in the viewfinder, don’t worry. All you have to do is to imagine breaking your image up into thirds like this.
Why Does the Rule of Thirds Work?
The main theory behind the rule is that if you place the main subjects in your composition along the imaginary lines or intersections which the Rule of Third creates, then your overall image will be more balanced and interesting.

So why does this work?
Interestingly enough, there are actually some deeper psychological reasons why this rule works. These are worth going over to give you a more meaningful understanding of how our mind perceives a composition. Here are just some of the reasons:
• Your mind is very powerful and will do everything possible to make order out of chaos. It does this by creating relationships between things to understand them.
• Odd numbers have more attention-seeking capabilities than even numbers as they take longer for our brain to process (Terrence M. Hines “An odd effect: Lengthened reaction times for judgments about odd digits”).
• Most people in western societies scan from left to right. So, if you place your main subject on the right third, it will make your image more pleasing to the eye.
Again, all composition rules are meant to be broken. The main strength of the Rule of Thirds and what makes it so helpful is that it’s a guideline that helps you to notice the compositional benefits of off-center framing. This is because many beginner photographers and even experienced photographers have a natural tendency to frame the subject of the composition in the center of the image.
How to Use the Rule of Thirds
As with learning anything new, learning how to use the Rule of Thirds will take some time. However, once you gain enough experience of using this rule in the field, you’ll be able to intuitively reference these guidelines without having to think about it. Most importantly, once you get comfortable with the Rule of Thirds, you’ll know when it’s the right time to break the rule and why the Rule of Thirds doesn’t work for a certain image you’re trying to create.
Here are some things you should think about when you’re first trying to use the Rule of Thirds as a guideline in your compositional technique.
• What aspect(s) in the scene are you trying to bring attention to? Once you figure out what the main subject is in your composition, try placing them on the different intersections or different lines to see what makes a better composition.
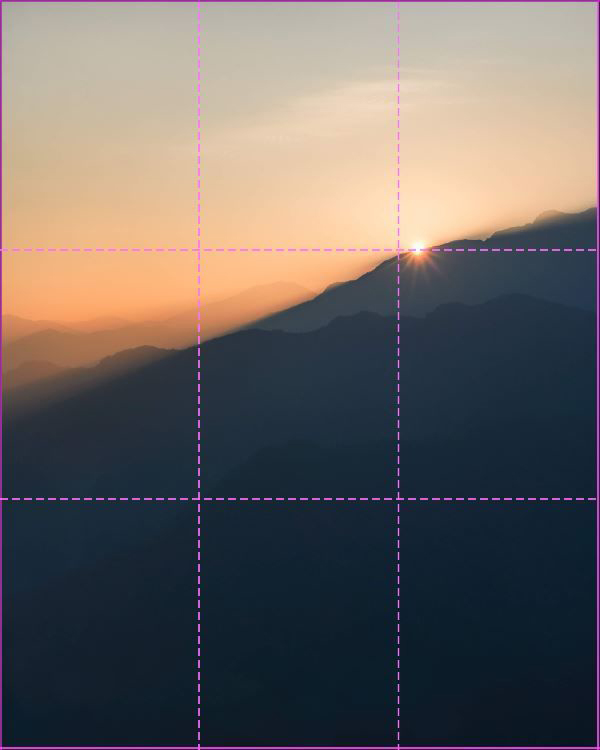
• Will your composition emphasize what’s below or above the horizon line? For example, if you want to emphasize the sky, try placing the horizon line on the bottom horizontal third line.
• What is the image going to be about and what should be excluded from the image? Sometimes, what’s excluded is more powerful than what’s included in the composition.
When using the Rule of Thirds, it’s important to remember that your main subject doesn’t have to be exactly on the intersecting lines or along the lines to work. Each composition you create will be different so you will have to adjust the rule for each image you’re making.
When Not to Use the Rule of Thirds
When you’re out shooting you will definitely run across a variety of different scenes and sometimes you will find it’s better to not use the Rule of Thirds like in these instances:
• When you want to emphasize the symmetry in an image.
• When it makes sense to center the main subject in your image.
• If you’re shooting with a shallow depth of field to separate your subject from the background.
• If it just doesn’t make sense to use the Rule of Thirds in the location you’re in.
10 In-Depth Examples of Using the Rule of Thirds
Instead of just talking about the Rule of Thirds, let me show you how I have used this rule to create photos. As you look at these examples, notice how the Rule of Thirds is not 100% exact when you use it in real-life situations. As I mentioned before, it’s a guideline, so if your main points of interest in the composition don’t exactly line up with the grid lines, that’s ok.
Example 1: View Over the Ngo Dong River
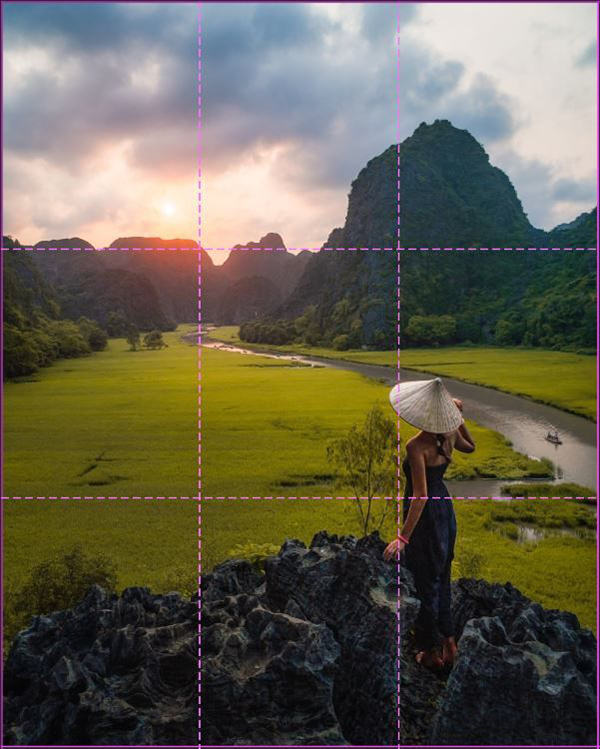
This photo was taken at sunset from a viewpoint over the Ngo Dong River in Vietnam.
In this photo, the primary subject in the composition is Melissa. To draw more attention to her, I placed her on the bottom right intersection of the image. Additionally, I aligned her directly under the tallest mountain which is placed on the top right intersection. Lastly, I tried my best to place the setting sun on the top-left intersection.
My goal in composing the image like this is to have the viewer’s eye travel from left to right and first stop on Melissa, who is the primary point of interest. Then, for the eyes to travel upward towards the tallest mountain and follow the river to the setting sun. I think there is a nice balance in this image by having points of interest on both the right and left thirds of the composition.
Example 2: Sunset Turtle at the North Shore
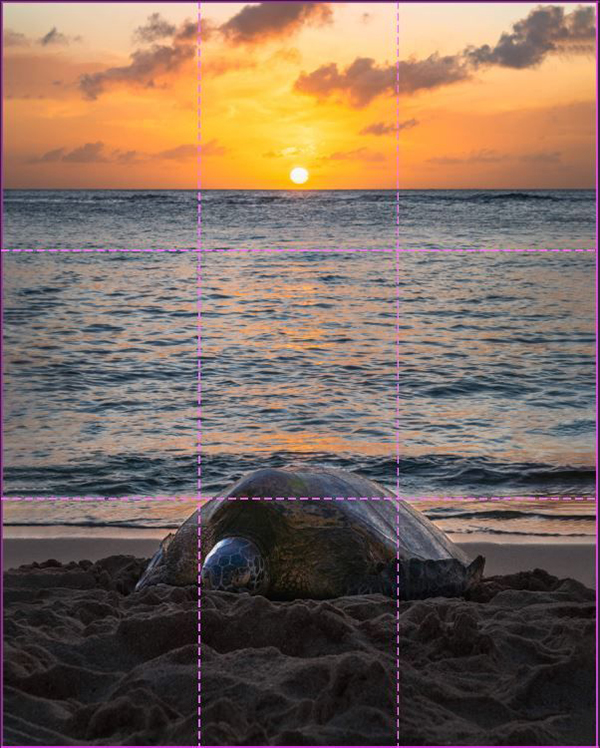
This photo was taken at sunset at the North Shore on the Island of Oahu in Hawaii.
This is a much simpler composition than the first example. In order to emphasize the sea turtle, I placed it on the bottom third horizontal line. I also tried my best to align the horizon line to the top horizontal third line in order to draw attention to the setting sun.
My goal in composing the image like this is to first draw the viewer’s eye to the sea turtle and then for their attention to drift upward to the setting sun.
Example 3: Magical Palm Tree at Sunset

This photo was taken at sunset on the island of Oahu in Hawaii.
In this composition, there are two main points of interest, Melissa in her yellow dress and the palm tree. Emphasizing Melissa was easy because of her yellow dress and how it moved when she twirled. However, I also really liked how the palm tree leaned over the water and how it seemed to be pointing downwards.
So, in order to show the same importance for both Melissa and the palm tree, I placed both of them on the left and right third of the image.
My goal in composing the image like this is to first draw the viewer’s eye to Melissa. Then for their attention to drift upwards to the palm tree branch pointing downwards over the water before following the palm tree down to the right of the image.
Example 4: Robot Restaurant Show in Tokyo
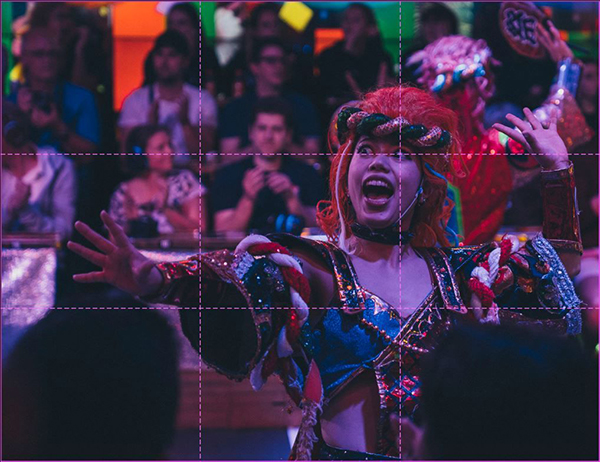
This photo was taken at the Robot Restaurant Show in Tokyo, Japan. I actually had to use Photoshop to crop the image in order to get the right composition as the performers were moving too fast to capture them exactly how I wanted to.
In this image, the performer is obviously the main point of interest. In order to further emphasize her expression and to draw attention to her eyes which are a natural point to focus on, I placed her left eye (viewer’s right) in the topmost intersection.
My goal in composing the image like this is to have the viewer’s eyes naturally follow her hand, up to her face, before finally landing on her eyes which are very expressive in this image.
Example 5: Mount Rainier with Wildflowers

Before I talk about this photo, I want to mention that no wildflowers were hurt while creating this image.
In my mind, there were actually 3 different points of interest in this image, the red Paintbrush Wildflowers, Melissa in her black and white dress and hat, and Mount Rainier. It was very easy for Melissa to be overpowered in this image with the colorful wildflowers in the foreground and majestic Mount Rainier in the background. So, to place more importance on Melissa and to balance out the right to left slant of the hill that we were on, I placed her on the left third vertical line in the image.
I then lowered the camera to the same level as the wildflowers to increase the depth and placed the summit of Mount Rainier above the top third horizontal line.
My goal in composing the image like this is to have the viewer’s eyes first notice the red wildflowers. Then for their attention to follow the wildflowers to Melissa before finally moving to the summit of Mount Rainier.
To see the rest of this story including the next five examples of the Rule of Thirds, visit the Wit and Folly website.


![]()
Get the Latest Photo Tips, News & Reviews from Shutterbug!
| Camera Reviews Other Reviews | Mobile Reviews Photography Reviews Columns | News | Features | How-To | Resources |
 © 2025 Shutterbug
AVTech Media Americas Inc., USA
All rights reserved