- REVIEWS
Camera Reviews 
More Reviews Mobile Reviews Photography Reviews - GALLERIES
- VIDEOS
- BUYER'S GUIDES
Want RAZOR SHARP Nature & Wildlife Photos? Here’s How it’s Done (VIDEO)
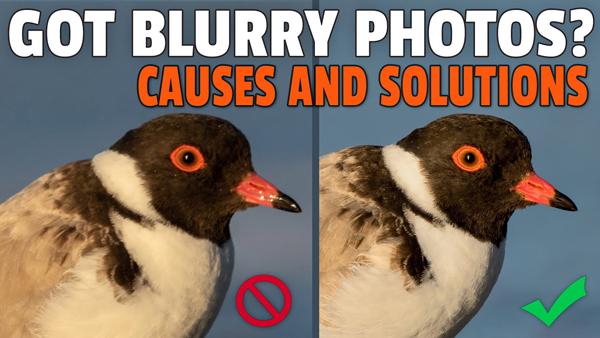
Have you ever returned from a shoot, expecting to marvel at the photos, only to bring them up on the screen and, ouch, they’re not sharp? Well, join the club! There are numerous reasons for soft images, and a number of ways to increase your percentage of keepers, and you’ll learn many of them in the video below.
Australian pro Duade Paton explains why capturing sharp images of wildlife in the field can be so difficult, with ever-changing light and fast-moving subjects being just a few of the challenges. In this tutorial he explores the main reasons for blurry shots, and provides several effective tips for avoiding the pitfalls.

Of course you can always attempt to rehabilitate a soft photo in post processing, but the goal of this episode in achieving optimal results in the camera. And don’t worry, because there’s a lot more to all this than reminding you to use a tripod with long lenses or when shooting in low light.
Paton begins by acknowledging that soft shots are “normal,” explaining that, “The key is understanding why, and knowing how to reduce the number we get.” He discusses a number of factors that can result in images lacking detail. These include motion blur, camera shake, autofocus errors, lighting and exposure, the lens you’re using, and a few more.

Once you understand the root causes of soft images, it’s relatively easy to combat the problem with the shooting tips Paton provides. He illustrates his advice with striking images that include exposure settings and other key information. Paton also provides a list of his gear in the description beneath the video.
If you’re looking for more advice on photographing wildlife, head over to Paton’s YouTube channel. And check out another story we posted recently, with several great tips for capturing better nature images.
- Log in or register to post comments


![]()
Get the Latest Photo Tips, News & Reviews from Shutterbug!
| Camera Reviews Other Reviews | Mobile Reviews Photography Reviews Columns | News | Features | How-To | Resources |
 © 2025 Shutterbug
AVTech Media Americas Inc., USA
All rights reserved