Use BLEND IF Sliders to Edit Photos That Say WOW! (VIDEO)

Photoshop's oft-ignored Blend If feature is a hidden gem that enables you to create professional-level edits that are guaranteed to wow your audience. This tutorial from the Adobe Live YouTube channel demystifies the process so that photographers of all skill levels can put it to use in minutes.
Instructor Jesus Ramirez is a post-processing expert and professional photo compositor. In this nine-minute episode he demonstrates how easy it is to blend layers based upon luminosity and color to achieve spectacular results. This video is #8 of an ongoing Photoshop series, and we encourage you to watch the earlier installments.
Ramirez promises that "in this video you'll learn everything you to know about Photoshop's Blend If sliders. Before diving in the topic the topic at hand, Ramirez quickly reviews the concept behind the RGB Color mode, "because understanding it will be essential for using Blend If effectively."
In the RGB mode colors are made by combining red, green and blue. Ramirez explains that, "By mixing these primary colors at different brightness levels we can create millions of colors." He notes that each RGB channel has 255 brightness levels ranging from 0 to the maximum with zero representing full black and 255 indicating maximum brightness.
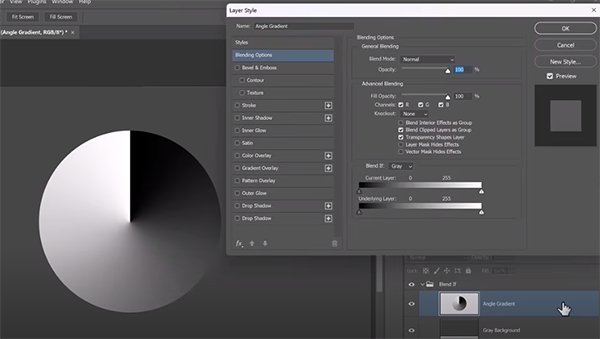
The point is that Photoshop's Blend If feature uses the same 0-255 scale to represent brightness, thereby allowing you to control which parts of a layer become transparent based upon brightness levels. Now that you're armed with this knowledge, Ramirez pulls up a simple graphic to illustrate how Blend If works.
As you'll see, there are two layers: a white-to-black circle over a gray background. To start, click on the empty space to the right of the gradient which opens the Layer Style window. Under Blending Options you'll find the Blend If section at the bottom of the panel. There are three essential parts: The Blend if dropdown which sets the pixels you're targeting, followed by two sliders—representing the Current layer and the Underlying Layer.

Ramirez then provides a step-by-step demonstration, with practical examples of putting all this to work to embellish just about every image you capture. One you get the hang of it, and this doesn't take long, you'll definitely want to add Blend If to your Photoshop workflow.
Be sure to visit the Adobe Live YouTube channel which contains numerous image-editing lessons like this one.
We also recommend checking out the earlier tutorial we featured with another post-processing expert who demonstrates a Photoshop secret for perfect exposure blending of bracketed photographs, with a free plugin that eliminates all the complexity.
