- REVIEWS
Camera Reviews 
More Reviews Mobile Reviews Photography Reviews - GALLERIES
- VIDEOS
- BUYER'S GUIDES
Camera Tips: Understanding Fujifilm’s Highlight Tone and Shadow Tone Controls

Fujifilm’s family of digital cameras has some amazing features, but a couple of the most useful controls are a bit tricky to figure out. The owner’s manual is no help, either, and the way they function is counterintuitive—for me at least.
I like to keep things simple because I have a very simple mind. I know this is true because friends and foe alike have told me so repeatedly. So when I first tried to use Fujifilm’s Highlight Tone and Shadow Tone controls on my X-series camera I was confused because they didn’t operate the way I expected them to.
I sure wish they’d improve certain sections of their owner’s manuals. This is a criticism, but I’m reluctant to gripe because Fujifilm is the most customer-centric company in the industry. In fact, virtually all other camera makers could learn a thing or two from Fujifilm about responding to consumers’ input.
I’m not talking about performance, hardware features or quality. Ultimately those are value judgments, and benefit is in the brain of the beholder, to paraphrase an ancient Greek playwright.

Here are five reasons why Fujifilm users are fiercely loyal.
1. Free and frequent firmware updates that add new features to older, discontinued Fujifilm cameras.
2. Same battery over several generations and models. You can use a Fujifilm NP-W126(S) in 25 or more different Fujifilm camera models, including the latest in the X-series. And their NP-45S is compatible with more cameras than I can count, even with both shoes off.
3. Multiple (and excellent) Raw file processors. Currently Fujifilm users can enjoy Capture One Express Fujifilm (free download for Fujifilm cameras only), Raw File Converter EX 3.0 (powered by Silkypix) and Fujifilm X Raw Studio (which uses your Fujifilm camera as the Raw processing engine).
4. Lens shades are included (and many are metal).
5. High quality, low profile (as in “under the radar”) neck straps are included instead of gaudy embroidered camera brand advertising banners.
Point number 3 is ironic because a great many Fujifilm users insist that the JPEGs are so good they don’t shoot Raw very often.
But when it’s time to explain how the Highlight Tone and Shadow Tone controls work, here’s what you see in the OM.

Now, I may not be the smartest seagull at the shore, but I have been in the photo industry since penicillin was still called bread mold. To me when I see a plus sign (+) it means exposure has been increased. Conversely a minus sign (–) means exposure has been decreased.
When I set the Shadow Tone control to +3 for example, I think I’m increasing exposure and thereby making the shadows brighter. But that’s not what happens. The shadows darken.
On the other hand, when I set the Highlight Tone control to +3 the highlights become significantly brighter—and that reinforces my incorrect assumption that these controls work the same way exposure control works.

Instead, here’s what occurs.
When you set the Highlight Tone control to a plus number, you are adding to the highlights; you are adding exposure to the brighter areas, and they become brighter. A setting in the minus range results in less highlight brightness.
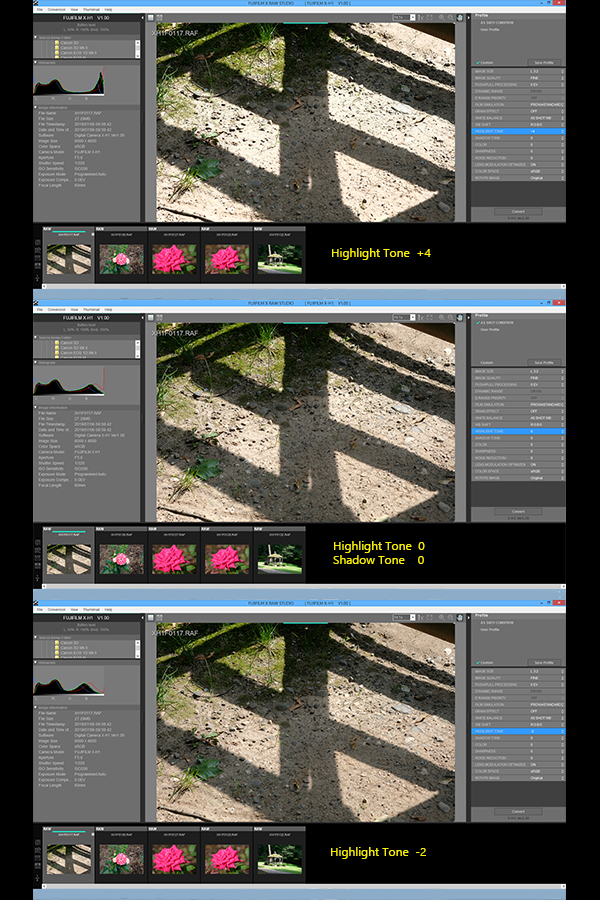
However, when you set the Shadow Tone control to a plus number, you are adding to the shadows by decreasing exposure in the darker areas. See why I was confused? And when you use a minus setting, you get less shadow but you’re actually increasing the exposure in the darker places.

Maybe this was simple for you to understand, but it took some serious trial and error before I was able to wrap my vapid brain around it. Plus means Add. Regardless whether it’s Highlight or Shadow, a plus setting makes it even more so. Minus means Subtract, so Minus Shadow means shadows that are less dark and Plus Shadow means more dark.
This is one place where a couple of pictures in the owner’s manual would be appreciated.
—Jon Sienkiewicz
- Log in or register to post comments


![]()
Get the Latest Photo Tips, News & Reviews from Shutterbug!
| Camera Reviews Other Reviews | Mobile Reviews Photography Reviews Columns | News | Features | How-To | Resources |
 © 2025 Shutterbug
AVTech Media Americas Inc., USA
All rights reserved