- REVIEWS
Camera Reviews 
More Reviews Mobile Reviews Photography Reviews - GALLERIES
- VIDEOS
- BUYER'S GUIDES
Pump Up the Color of Drab Photos with These 3 Easy Photoshop Techniques (VIDEO)

Whether you’re shooting indoors or out, photographs with drab colors can result from improper exposure settings, a dull, overcast day, and a variety of other factors. In the video below, you’ll see how to pump up the colors of any photo, using three simple Photoshop tricks.
This tutorial is from Nathaniel Dodson, one of our favorite image-editing instructors, and he demonstrates how to make photos burst with color, whether they’re portraits, landscape shots, or anything else.

Dodson’s approach to color enhancement involves three adjustment layer techniques that are easy to master and deliver natural looing results. He combines a subtle contrast boost with a few tonal adjustments to take a photo from “meh” to “wow” in just eight minutes.
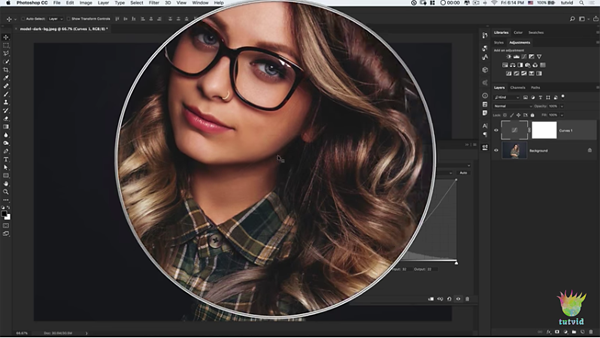
Dodson begins by opening a Curves adjustment layer and demonstrating how to use this powerful tool to adjust contrast and darken the milky shadows in the image. He then boosts the midtones and highlights to achieve a balanced exposure.
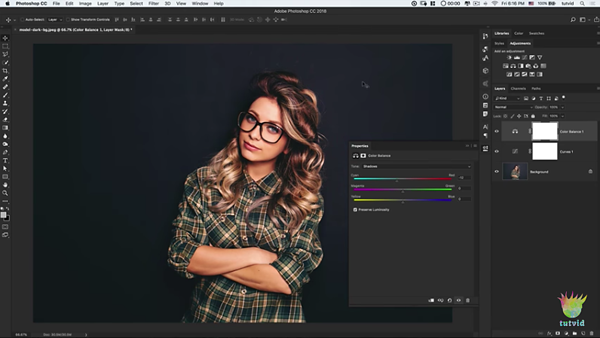
The next step is adding a Color adjustment layer to perfect the model’s skin tones and pump up the colors in her blouse. As you’ll see, Dodson manipulates colors in the highlights, midtones, and shadows separately for the most precise enhancement possible. His final step is adding a Selective Color adjustment layer to further refine the colors and add the subtle faded look he’s after.
You can find more simple image-editing tips on Dodson’s YouTube channel, and in his earlier tutorial we posted, with what his says is the best way to sharpen images in Photoshop.


![]()
Get the Latest Photo Tips, News & Reviews from Shutterbug!
| Camera Reviews Other Reviews | Mobile Reviews Photography Reviews Columns | News | Features | How-To | Resources |
 © 2025 Shutterbug
AVTech Media Americas Inc., USA
All rights reserved