
When creating subdirectories for storing your digital photos, including the date in the subfile name is obviously a good idea--in fact, it's essential. But to make it easiest to locate the subdirectory that you want to access later, the first part of the subdirectory name should be the year--followed by the month, and then the day. That way, the subdirectories will appear in your listing in their actual chronological order, and you won't have to look through a list of (for example) every subdirectory that starts "12" (the month of December) to find the one containing photos from Christmas of the year you're interested in (say, 2019...). So don't make the mistake of starting the subdirectory name with the month (or worse, the day!). Doing so would just make your future searches more inconvenient.
- REVIEWS
Camera Reviews 
More Reviews Mobile Reviews Photography Reviews - GALLERIES
- VIDEOS
- BUYER'S GUIDES
Photos Basics: 10 Tips to Get the Most Out of Your New DSLR or Mirrorless Camera

Did you just get a new camera? Or maybe you’re getting reacquainted with a camera that’s been on the shelf for awhile? Getting good pictures consistently – the ultimate goal of all photographers – is easier than you think. Here are 10 tips that I share with all photographers regardless of skill level.
Change the ISO
Set it and forget it? NO! It is true that today’s cameras perform well at high ISO settings – much better than cameras did 10 years ago – but you still get better results at lower ISO settings. Instead of setting the dial to Automatic, set to ISO 100 when you’re outside and try ISO 400 as a starting point when indoors under dimmer light. Experiment with different settings like 1600 and 6400 in dim light and you’ll soon see the differences.

Increasing the ISO increases the sensitivity of the camera’s imaging sensor and that allows you to take pictures in lower light levels. The tradeoff is that the heightened sensitivity makes the sensor more vulnerable to noise. Noise appears on the image as colorful random dots (especially noticeable in the shadow areas) and occasionally as disruptive bands or stripes. Lower ISO means less sensitivity to light but less extraneous garbage, too.
 Don’t over-clean
I’m tempted to say, Never clean the front surface of your lens, but I’ll temper that just a bit. For a deeper dive, read Torture Test: Do Small Scratches in Lenses Prevent Sharp Images? We Gouge a Zoom to Find Out. We intentionally made a big scratch in the front element of a $500 Tamron lens so you can objectively evaluate whether or not that flaw ruined the pictures.
If you do decide to clean the front element, never use a household paper towel or facial tissue. And don’t use your shirttail. Better dirty than scratched. Read How to Clean a Camera Lens and What to Use for a complete guide to products and process. I use Purosol products; you can order the complete kit from Amazon for less than $25.
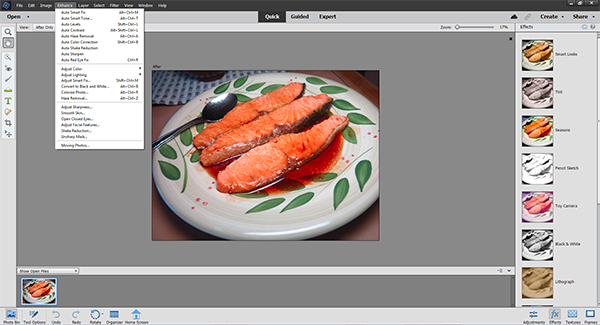
Buy Photoshop Elements 2021
And maybe Premier Elements if you plan to shoot video. Taking pictures is just part of the enjoyment. And even if you don’t plan to do much editing – creative, restorative or otherwise – it’s still useful to have a convenient way to resize your images before you send grandpa a slug of 12-megabyte files that clog his Commodore 64.
If you’re 100% brand-spanking new to photography and the word “Photoshop” intimidates you, relax. You can start out with Photoshop Elements 2021 in Quick Mode and let the software do the work. Later you can learn your way up to Guided Mode and eventually to Expert. We tell the whole tale here: Adobe Photoshop Elements 2021 Software Review including our strong advice to download the 30-Day Trial Version and play with it for a month while making up your mind that you really do need it.
You can order Photoshop Elements 2021 bundled with Premier Elements 2021, the video editing platform, for only $99 right now from Amazon. This is a sale price, so act fast.

Scrap the strap
The quality and durability of the neck strap that came with your camera is fine – no problems there! But most camera straps are huge billboards that literally scream the brand name in bold letters. This can be a dog whistle for thieves and muggers – a serious consideration when you travel to unfamiliar countries, cities or neighborhoods. The notable exception to this annoying practice is Fujifilm. The high quality straps Fujifilm includes with their cameras are muted and subtle. Covert even.
My personal favorite straps come from UPstrap. I have several that I have been using for more than 10 years and they are still as good as new. UPstrap has some models that are made of cut-resistant Kevlar, too. But the main reason why I choose UPstraps is that they stay up – up on my shoulder without slipping off. Available by mail order only, take a look at their website.
 Develop sensible work habits
Keep your image files organized so that you can find them in the future. Think long term – like 10 years or longer. Good organizational routines are actually easy and fast if you develop them into a habit.
Here is a simple but effective file hierarchy. Use a different parent folder for each camera (even if you only have one camera now, think ahead). Every time you download, create a new folder. Name the folder with the current date and a brief description of the subject.
After you have completed the download, immediately save the new folder to a second physical hard drive (external or internal) and to your cloud storage area. Use exactly that same file hierarchy on your backup drives to minimize confusion.
I save edited and/or renamed images in a separate parent folder using almost exactly the same file hierarchy. You may have a better system – great! Share it with us so we can share it with others.
Back up aggressively. Read our recent ode to backup plans for photographers here. Among other things you will learn from that article: always maintain at least three copies of your photos or videos — one to edit, one in the cloud somewhere and one on a portable storage device. Two out of three won’t get Rover out from under the porch.
Here’s a tip that can save you from yourself (as it has certainly saved me many times). Do not reformat the memory card until it’s 100% full. Do not delete the images. If you use a sufficiently big card (128GB for instance) you may be able shoot for several weeks before reformatting is necessary. This means that if disaster strikes your collection of image files on your computer or hard drive you still have the original to restore your backups. And if you can afford to buy new cards instead of reformatting them, you can keep the originals forever.
Read the Owner’s Manual, at least these sections
If you can’t read the entire manual cover-to-cover, at least read these three sections:
• How to set Custom White Balance
• Exposure Modes: P, A, S and M
• Video
If you have only enough energy to read one section, learn to set Custom White Balance. I looked for an Owner’s Manual that had a clear, understandable explanation of Custom White Balance. I’d planned to include it in this story as an example. All I found was some very confusing stuff – harder to read than page from a Russian submarine operating manual. I’d like to help you more, but every camera manufacturer has their own method and name for the process. Explaining Canon’s system, for example, won’t help anyone but Canon owners. That said, it’s important that you learn how to do it, so don’t give up even if the OM is vague or unclear. We’ll cover this subject in detail in the coming weeks, but don't wait until then to improve your pictures.
Flash ON outside, flash OFF inside
Yes, the pop-up flash was made to brighten indoor pictures. But not exclusively. Turn the flash OFF when shooting indoors so you can experiment with existing light. Turn the flash ON outside to counteract backlight, wash shadows away or to liven up the colors. The tech term for this is Fill Flash.
When shooting without flash under normal indoor lighting, set the White Balance manually for best results. Modern cameras do a good job of this automatically, but “good” is not “best.” This is the reason why we recommend that you devour the White Balance section of your Owner’s Manual, particularly the part about setting a Custom setting.

Get out of the middle
Frame edge-to-edge and avoid centering the subject. That’s hard because camera manufacturers conspiratorially plot against you by placing focusing aids and other targets smack dab in the center of the viewfinder. To break out of the urge to center the subject, take two or three shots of every scene and consciously change the composition each time.
If you want to read about some other things to avoid, visit 7 Photographic Mistakes I Still Make which I penned a few years back. I still stumble over a couple of these gaffs from time to time, but I’m getting better, I think.
Remember what doesn’t work
Photographers learn more from their own bad pictures than from other people’s good ones. That’s why my mantra for beginning photographers is Don’t Delete Nothin’.

For example, if you take a picture indoors under normal house lighting and the camera’s White Balance is set for Daylight, the image will most likely have pronounced reddish-brown or deep amber overtones. I could tell you why here, but in my opinion it’s more important that you try to figure out why it didn’t work. Seek help from others when you can’t solve a misstep, but by and large, things that we discover or learn on our own are better retained. That’s why self-taught often whips formally trained.
Take advantage of the free classes offered during the pandemic. Many retailers and several camera and lens manufacturers are providing abundant online instruction for free right now. Google your favorite brands to see what’s around.
Accessories you will eventually need
Before long you may find yourself wanting a new lens, tripod, accessory flash or other goodie. That’s natural. And there are a few things that you should get sooner than later.
Extra memory cards are inexpensive and indispensible. Buy them when they are on sale, which is about every month that has a vowel in it. And buy a second battery. I’m not going to get into the debate about generic batteries vs. name brand, but I can tell you that the few bucks you may save buying an unknown brand is poor economy and could lead to camera issues down the road. I’ve seen generic lithium ion batteries swell, overheat and even explode. Suit yourself.
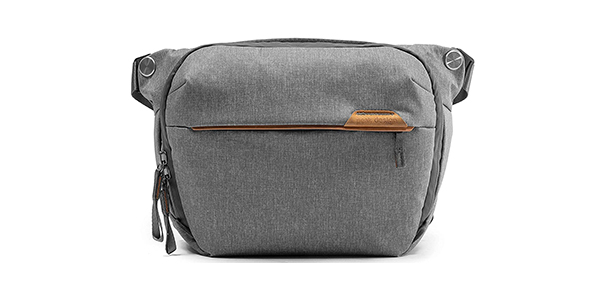 I have a weakness for camera bags, so take this with a tiny grain of salt. You need two camera bags. One bag is to carry your camera, lenses and growing stable of accessories. The other bag is to store the camera stuff you don’t feel like carrying with you. I find sling packs, like the Peak Design Everyday Sling 6L ($99 from Amazon) the most versatile for everyday carry. For storage I opt for another Peak Design product, the Peak Design Everyday Backpack Zip 15L which costs $189 and also can be ordered from Amazon. Of course, I use it for more than storage; I use it on longer hikes or when I’m carrying more gear.

Shoot, shoot, shoot
One cannot learn about the entire universe by studying one planet. So it is with photography. The more you learn, the more you understand that there is even more to learn.
If you want to be a better photographer, take more pictures. Carry a camera everywhere you go and shoot even when you’re 100% sure the picture won’t turn out. Review all of your images with a critical eye and share them with others – and that includes posting the best on our Gallery. Subscribe to our newsletter (see sign-up form on our homepage) and mark Shutterbug as a Favorite on your browser so you can check back often. We’re in this for the same reason as you – we love photography, and we’re learning more about it every day.
—Jon Sienkiewicz
(As an Amazon Associate, Shutterbug earns from qualifying purchases linked in this story.)
- Log in or register to post comments


![]()
Get the Latest Photo Tips, News & Reviews from Shutterbug!
| Camera Reviews Other Reviews | Mobile Reviews Photography Reviews Columns | News | Features | How-To | Resources |
 © 2025 Shutterbug
AVTech Media Americas Inc., USA
All rights reserved