- REVIEWS
Camera Reviews 
More Reviews Mobile Reviews Photography Reviews - GALLERIES
- VIDEOS
- BUYER'S GUIDES
Olympus PEN E-PL2 Mirrorless Camera Review
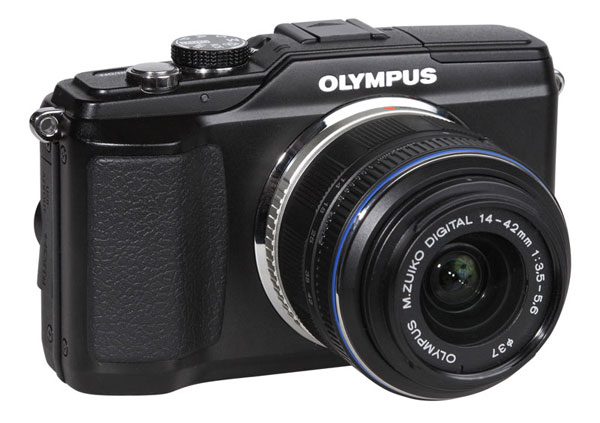
With the recent announcement of the third PEN in this series from Olympus, which is now in Shutterbug test, the not yet discontinued E-PL2 has dropped in price to $599 (from Olympus, with 14-42mm kit lens), about $200 less than when it was first introduced and to me a good deal for what you get while you can get it. The 12MP (effective pixels) Live CMOS sensor Olympus E-PL2 adds to the charms of the first in the “PEN” digital series, the P1. (See Joe Farace’s excellent review of that camera at http://www.shutterbug.com/content/olympus-e-p1in our Jan, 2010 issue) The PL2 adds a larger and higher resolution viewing screen, expanded accessories using the special plug-in adapter, an enhanced control setup and expanded Scene and Art filter modes.
The promise of the best Micro 4/3rds cameras is that they are lightweight and portable, that they are easy to use, that they offer DSLR type controls and that they offer lens swapping with various adapters that allow you to use a very wide range of lenses among the system group and, with adapters, “older” lenses you might have from past camera systems. The promise of the Olympus PEN cameras are that they are unobtrusive visual notebooks, if you will, that allow for spontaneous “grabs” that might otherwise be ignored or lost due to having more cumbersome gear on your voyages. Our review hopes to see how promises made are promises kept with this camera.

As an example of lens swap-ability is in using the Lensbaby Tilt Transformer on the E-PL2 with Nikon MF lenses--I worked with a Nikkor 20mm f/3.5--plus there are a host of adapters available that make this camera a perfect host for lots of fun, and these days inexpensive, lenses.

I can’t emphasize the lightweight aspect of the camera enough. Even with lens attached (I worked with the kit M. Zuiko 14-42mm, equivalent to 28-84mm angle of view) the camera is hardly noticeable in backpack or hand, although the build and protruding and textured grip somehow give it a substantial feel when shooting.
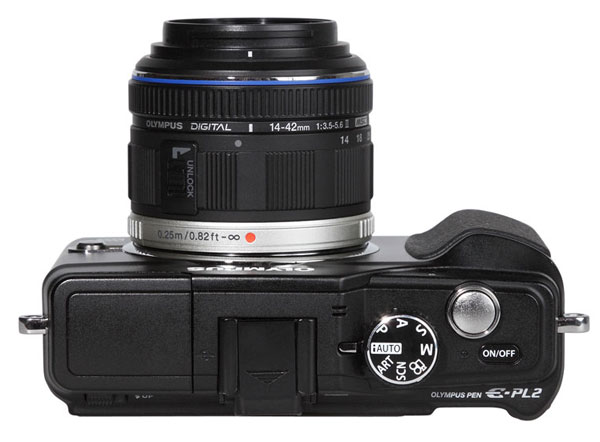
There are numerous controls for both auto and customized shooting, such as controllable aperture or shutter speeds in A or S mode. Accessing those controls has been enhanced with a four-way toggle and spin dial setup, similar to what you find on many DSLRs. For example, when shooting in aperture priority mode you can easily change f-stops by turning the (albeit tiny) spin dial around the toggle, with settings nicely displayed on the bright and large LCD back.
The toggle control is where you choose among the many and myriad controls, “filters” and options this camera affords. You can shoot with auto “live guides” using the system’s iAuto mode, which allows you to choose between, for example, “Blur Background” (sharp or blur) which is in essence an auto aperture control in Program Shift; “Warm/Cool” (color temperature shift); or “Vivid/Muted” (something you’d previously choose in Image Parameters or similar.) There are also 22 or so Scene modes, although three of these are lens effects that do require supplementary lenses (fisheye, wide and macro.)

I trust that most of you will eschew these pre-programmed options (though they can be fun) and head straight for one of the true benefits of the Live View CMOS, what Olympus calls “live control” (as opposed to…?) As you set up shots you see the results of the changes (white balance, “art” filters, exposure compensation, etc.) on the screen prior to exposure, something I always recommend for those wanting to see how a particular scene will look in, for example, monochrome mode. The toggle buttons on the back (again, a bit tiny for my fingers) are where you gain access to these imaging options.
The Menu button is where you take “deep dives” on the camera setup such as image stabilization, bracketing, aspect ratio, multi-exposure, etc. The INFO button allows you to switch around image display options (histogram, clipping, control panel, live control) and also choose “one touch” white balance, color temperature and even highlight/shadow tone curve control. In AF options you have single, continuous, manual and tracking; you can focus lock with slight depression on the shutter release, and even lock exposure separate from focus using the red button normally used to initiate video shooting, a nice touch that to me is the clue that companies have taken true shooting scenarios into account when designing the camera.


Yes, the camera offers RAW mode, and happily you can shoot in RAW+JPEG if desired, plus you can shoot in single or continuous mode (about three fps) and three image stabilization modes, plus an OFF option should you be using the camera on a tripod. And to finish off the impressive tech specs, you can use a wireless flash setup, shoot movies in all exposure modes, plus when using “art” filters. In short, this camera offers everything plus the proverbial kitchen sink, and I haven’t really gotten into all the many modes, options and effects it offers (including copyright addition to the EXIF data) but to give a hint the camera at what awaits you it offers internal image stabilization, a dust reduction system, and up to five frame bracketing and more.

One of the true advantages of having “live” view as you work is that the effect of settings is shown on the monitor as you work. Admittedly, as with all cameras of this ilk, you have to test to judge how accurate the monitor view is when composing, especially when working in bright sunlight. The monitor is large and clear enough to be usable in fairly bright light, altogether superior to anything EVF offers, but the very nature of any screen creates some glare, so take that into account. If there is any criticism I have of the field experience it is that buttons and toggles are smallish, to my hands, although the compromise between size and usability is subjective, and some find it to be just right.
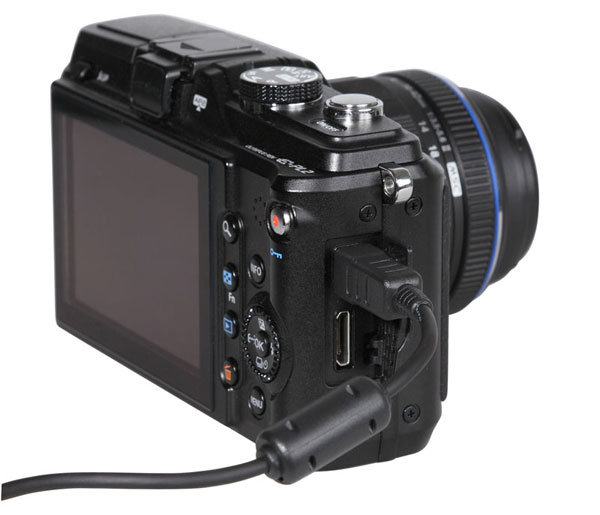
If you like EVF you can get it as an accessory, although you can’t use it in conjunction with the optional stereo mic or the Bluetooth adapter, which you can use to send images to a “smart” phone if desired. Only one accessory fits in the adapter at a time. There is no optical viewfinder, just the accessory EVF (electronic finder) so it’s that or the LCD. My advice: stick with the LCD.

Images made with the camera were quite satisfying. Using the internal stabilization and the various exposure patterns and modes, with good performance at up to ISO 1600, there aren’t many shooting situations, and interpretations of same, that will elude you. The lack of burdensome weight and size is also an excellent plus, as is the adaptability of a considerable amount of legacy lenses. In all, the E-PL2 is a step up from the first in the Pen series. With its amazing capability for lens adaptation, very good image quality at a range of speeds and flexibility in Live View, the E-PL2 should be of special interest to those who have a taste for working with unique cameras that stand out from the crowd. And with the price drop due to the intro of #3 in the series (check the current price from reliable sellers) you might want to get one for any and all of the above reasons.
Lab Observations
We were aided in this test by our TIPA lab associate, Betternet, whose edited and at times paraphrased comments follow:
“Like nearly all Olympus cameras, the E-PL2 reproduced the color test chart with very low saturation. The auto white balance shows a slight shift into a bluish cast. Skintones display a slight yellow cast, with enhanced reds, although we do note that darker skintones are perfectly reproduced.
Lab Test Shots

“The camera performed well in our resolution tests. It reproduced an ISO12233 chart with 2622 lines in picture height (nominal resolution 4032 x 3024 pixel) and showed clearly differentiated image details and fine structure. However, we noted that JPEG images have a slightly soft character, which is based on the noise reduction filtering system that seems to be activated even in the lowest ISO speed settings.
“The camera uses an intelligent anti-noise filtering system that yields nearly identical luminance noise values up to ISO 800 speed. There is virtually no color noise noticeable in the images; they are clean and smooth. Even at ISO 6400 setting our ‘pixel noise’ graph shows almost no aberrations between the red, green and blue channel graph and the gray luminance graph. Our observations are that the camera delivers very smooth images with a noise structure that looks more like classic film grain instead of digital noise.
“In addition to the standard interfaces such as USB, TV-port and HDMI, it offers a special interface on the back (right below the accessory shoe). This interface can be used for various accessories, including an electronic viewfinder (VF-2), which was already available for the E-PL1; a microphone set that offers a microphone adapter; and an additional stereo microphone with 3.5 mm jack. When recording videos with the E-PL2 (1280 x 720 pixels, 30 frames per second and MJPEG compression) the microphone adds appreciably to sound quality. Another accessory is a macro light system, MAL-1, which uses two LEDs mounted on two flexible gooseneck holders. Power is provided by the Olympus interface.”
Pro:
Very compact and lightweight CSC-system
Many scene modes for beginners
Nice accessories that mount via the adapter, including electronic viewfinder, macro light system and BlueTooth adapter
Con
Only one accessory usable at a time
Video compression with MJPEG and 30 frames per second (instead of 25 frames per second and AVCHD file format)
- Log in or register to post comments


![]()
Get the Latest Photo Tips, News & Reviews from Shutterbug!
| Camera Reviews Other Reviews | Mobile Reviews Photography Reviews Columns | News | Features | How-To | Resources |
 © 2025 Shutterbug
AVTech Media Americas Inc., USA
All rights reserved