Natural Light Reflectors
Natural Light Reflectors
“Found” Light For Outdoor Portraiture
by Steve Bedell
Photographers love equipment. They’ll attend any seminar and buy any piece of equipment they can in the hopes that it will elevate their work to a higher plane. Now that’s all well and good, but before you start buying all that lighting gear I suggest that you first develop the most important piece of equipment that you have—your eye!
Most of my outdoor portraiture is done using just daylight. No reflectors, no flash. My style is very natural looking portraits that make my subject look good. In order to produce this kind of work, I’ve had to learn how to become very adept at “seeing the light.”
I’d like to suggest an exercise that might help you develop this ability—take a friend or model out with just a camera, a lens, and a light meter. Practice finding your light direction, intensity, and color before placing your model in the scene. Once you become adept at finding the main source of light, find all those secondary light sources that add so much to an image. Keep practicing until you feel really comfortable using just daylight and then start adding reflectors, flash, etc. This is much easier with digital because of the instant feedback. I still learn things every shoot and I’ve been doing this for 30 years.
By learning to use just daylight first, you will have a much better understanding of natural light and then be more skilled at adding or subtracting light with modifiers because you’ll know just what you have and how you’d like to modify it.
With that in mind I’d like to point out another natural light technique—finding and using natural reflectors. They are all around you and can be used very effectively. The most common ones I use are buildings, signs, and sidewalks. Once I even used a yellow Ryder truck that was stopped at a traffic light, but I had to shoot fast!
There’s one important ingredient to look for when using natural reflectors, and that’s the sun. While even overcast days will provide some level of reflection, a bright sunny day will provide you with plenty of punch off a variety of surfaces. And while lighter colors obviously reflect more light and darker colors absorb more, on a sunny day even black asphalt will reflect light.
So get that model and go out on a sunny day for some natural light shooting. Use the instant feedback that digital provides to keep making changes in your light until you get something you’re satisfied with. You’ll be a natural light pro in no time.
Now let’s take a look at some photos to see how we use this knowledge to produce great images.
The photo on the left shows you where we took this image and where the light is coming from. The (X) is where the model is. She is under the trees and the light (L) is being reflected off the yellow building to the left. Even though this is a very flat light since we have her facing into it, it has wonderful color and energy, unlike flat light you find on a cloudy day. Model: Stacy Lynn Caron.
Photo 1: |
|
 |
|
|
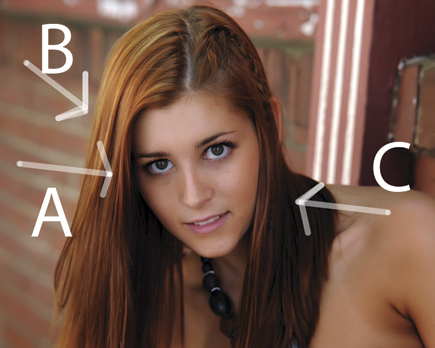
Here’s the key. Once you’ve found the light you like, you position the model or subject to get the light you want. Inside, we move the light. Outside, we move the model. In this case, I turned Stacy so the light would come from an angle, just like I would in the studio, to create a nice light pattern and highlights on her face. That’s light (A). Light (B) is coming from the opening under the trees behind her and light (C) that you see in her eyes is from the opening behind and to the right of me.
Photo 2: |
 |
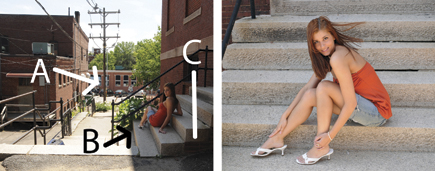
In this case the sun is high and camera right. I took the photo where that fence is. There’s a brick wall and open sky behind me (A) kicking light in but also note the white concrete (B) that is reflecting the direct sunlight in so strongly it has actually become the most powerful light direction. This is certainly not a traditional lighting pattern but note how I put her chin down into the light and how it creates color and highlights on her legs and arm as well as her face. Be very careful using a light from below; if it’s too strong and the head isn’t aimed into it, you’ve created “ghoul lighting!”
Photo 3: |
 |
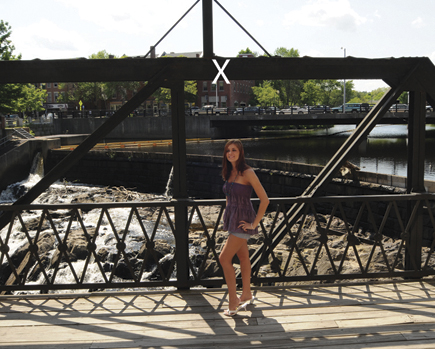
When it’s this sunny, the open sky itself acts as one big, soft reflector. Even though Stacy is standing on point (X) which does not have a tree overhang, the light from the open sky gives the light direction (B). On overcast days, the strongest light is typically overhead and an overhang would be needed to block it and create light direction. But here the open sky is so bright it acts as a huge soft box coming in from the left.
Photo 4: |
 |
 |
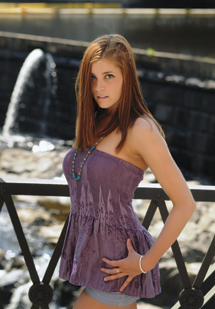
Photo 5: How’s this for something different—a backlit portrait in the blazing sun and she has bare shoulders! The main light on her is from the four-story brick building behind me. I love that beautiful warm glow I get from the reflected red bricks. But note I’ve also been very careful to position Stacy so the direct sun is blocked from hitting most of her except a little hair that still holds detail. I used the beam marked (X) to block the sun! In this case, I’ve used a building as a reflector and a beam as a “gobo” to block light and created a pleasing image just by being observant.
Photo 5: |
 |
 |


