- REVIEWS
Camera Reviews 
More Reviews Mobile Reviews Photography Reviews - GALLERIES
- VIDEOS
- BUYER'S GUIDES
Lensbaby Obscura Pinhole Camera Simulator Review Back to Basics for Fantastic Creative Images

It’s easy to make a pinhole camera. Making a good pinhole camera, on the other hand, is damn hard. And it’s even harder to make a pinhole lens for a digital camera. But wouldn’t it be fun to create the intriguing effects only a pinhole aperture can produce?

Lensbaby, legendary manufacturer of creative effects lenses, has invented the Lensbaby Obscura, a digital camera lens that accurately and precisely produces the same amazing results of not one but three different pinhole mechanisms.
Light passing through a small hole produces a sharp image. To prove it, punch a hole in a business card with a thumbtack and peer through it the next time you forget to take your reading glasses to a restaurant and can’t read the small lettering on the menu. (You can make a tiny aperture with a nearly clinched fist and use that instead. It works, but you’ll look like your peeking at the lightning bug you just caught.)
The point is this: if the aperture is small enough, you don’t need a lens to form a sharp image.

Although I’d love to write about physics concepts like diffraction, the rectilinear propagation of electromagnetic waves, and so forth, I am woefully under-qualified. Fortunately there is no need to understand any of the science to use and appreciate the Lensbaby Obscura lens.
And since most photographers know all about the camera obscura’s place in history, I’ll spare you the explanation of the origin of the Lensbaby Obscura’s name.

The Lensbaby Obscura Lineup
The Lensbaby Obscura comes in three configurations. The Obscura 50 Optic Swap is used with other components in the Lensbaby Optic Swap system. The Obscura 50 Standalone is essentially the same thing but it does not require a Composer Pro II or any other component; it attaches directly to the camera. The subject of this review, the Obscura 16 Pancake, also attaches directly to compatible cameras. The number after the name indicates the focal length.

Each configuration features three quasi-lenses that rotate into position and create a specific, predictable effect. There are no physical holes in the Obscura, which is good because we don’t want to expose the camera sensor to airborne dust.

The quasi-lenses and effects they produce are labeled Pinhole, Zone Plate and Pinhole Sieve. Each is formed by a pattern printed using three layers of chrome with a total thickness of 0.00014mm deposited on 1.5mm thick glass coated with broadband anti-reflective material.

Pinhole Effect
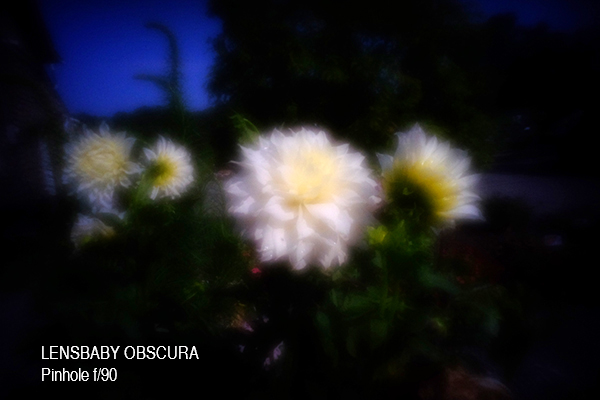
Delivers extreme depth-of-field with full focus. Image is soft and lacks detail. Requires the longest exposure times. Simulates the effect of an authentic pinhole camera but is much, much easier to use, infinitely more durable and dust free.

Zone Plate
Passes more light than the other two settings. Images generally sharper in the center with detail that fades and blurs toward the edges of the image. Made with multiple clear, circular rings surrounding a center hole. The zone plate has a curved field of focus that creates a sweet spot in the center.

Pinhole Sieve
Provides great depth-of-field and more fine detail than the pinhole setting. Images are riddled with unique artifacts, flare and glowing edges. Uses a field of pinholes with the largest at the center and increasingly smaller pinholes radiating away from the center.

Hands-on Review of Obscura 16 Pancake
The Lensbaby Obscura 16 Pancake is small and clearly deserves the Pancake designation. The Micro 4/3rds version measures 0.9 x 2.9 inches (73.1 x 22.9 mm) and weighs a scant .33 pounds. Despite its compact stature, it feels like a real lens and is very well made.
Drilling down to micro-level construction details, the Zone Plate is comprised of 29 distinct zones. The Pinhole Sieve has 203 pinholes, and no, I didn’t count them. The Pinhole has one perfectly round hole.
The sample I reviewed fits a Fujifilm mirrorless camera and attaches like any other lens. To cycle through the three effects options, simply rotate the inner dial from Zone Plate (f/22) to Pinhole Sieve (f/45) to Pinhole (f/90) and stop at your choice. The turret has pronounced detents and each position clicks into position with authority.
I used Aperture Priority on a Fujifilm X-T1and a series of ISO settings ranging from 400 in very bright light to 6400. Fujifilm cameras are great when pursuing special effects because you can bracket the Film Simulations and get normal, highly saturated and monochrome images, for example, with each single snap of the shutter.

Focusing is automatic in the purest sense—physics handles the focusing. The photographer just points the camera in the best direction and holds it steady. There is nothing to turn or twist. Composition is easy and natural; use the electronic viewfinder (EVF) or LCD monitor. Cameras with eyelevel finders are normally the better choice in bright light, especially with a lens like this that tends toward lower contrast preview images.
Having some foreknowledge of the images produced by pinhole machines, I visited nearby locations with the most potential for dramatically unsharp images. The list included an 18th century cemetery, a block-long white paddock fence, a Ribbon-Leaf Japanese Maple tree I have photographed probably 1,000 times, a road flanked by huge Hornbeam trees and several flower gardens.

I intentionally shot toward the sun more often than usual. I also used all three pinhole settings on each scene so I could compare later. I recommend that you shoot each scene with each pinhole option, at least until you learn more about how each performs. As you probably can guess, the amount of detail in each image changes with the f/stop. Each setting produces a set of unique effects, so experimentation is a must.
I noticed a dust spot on my sensor that had hitherto gone undetected. The extreme depth-of-field made it pop out like a BB in a spoonful of crème brûlée. So you might want get out the bulb blower and clean off the sensor. Remember, hold the camera with the sensor pointing downward so the dust falls out of the camera and doesn’t merely relocate. And never-ever use compressed air or liquids of any sort. Use a bulb blower or ear syringe (your breath is too moist). And whatever you do, do not touch the sensor—not with anything.

Combine With Other Effects
I post-processed a few images using Topaz Studio 2 and I used the Obscura 16 on my IR-only (Infrared converted) Fujifilm X-Pro1. Never hesitate to combine effects.
Use Old Cameras No One Else Wants
Today’s consumers turn up their collective noses when it comes to older DSLR and mirrorless cameras. Too bad for them. If you enjoy using creative filters, creative lenses like Lensbaby’s zillions of options, softfocus, DIY filters and so forth, you don’t need 24-megapixel resolution. Sometimes even 6-megapixel is overkill if the image is intentionally unsharp and grainy anyway.
Lensbaby brings new life and new usefulness to seemingly obsolete DSLR and mirrorless castoffs. I have an ancient Canon D60 (not the 60D and not the 6D, the D60) which is nearly 20 years old (i.e., introduced in 2002) and is 6.3-megapixels. I use Lensbaby lenses on it and get great results. So if you’re looking for a fun project and/or just love bargains that are worth more than they cost, go find someone else’s reject and have a ball.
Conclusion
This isn’t the first time Lensbaby has taken the turret-lens approach to special effects lens making. We reviewed the Lensbaby Trio a few years back. That was a fun lens, but the results from the new Lensbaby Obscura are more pronounced and much more dramatic.
The Lensbaby Obscura 16 creates three distinctive pinhole illusions. It’s like getting three optics in one. And it delivers angle-of-coverage roughly equivalent to a 24mm lens in the configuration we tested. That’s a great combination for creative special effects.
Rather than the drill-a-hole-in-a-body-cap approach some have taken, Lensbaby pursued ultramodern methods to design and manufacture the Obscura family of lenses. Instead of a hole per se, each aperture is painstakingly created using a photolithography process at 128,000 dpi (dots per inch) resolution that produces perfectly round pinholes and precision zone plate patterns. The apertures are printed on glass, so you can clean the optic without damaging it. And since there is no hole, the camera’s delicate sensor is not exposed to airborne contaminants.
The Lensbaby Obscura will be a treasured addition to your lens bag. It’s easy to use, requires absolutely no extraordinary skills and lets you be creative immediately.

Pricing and Availability
Check Lensbaby’s website for most up-to-date camera mount compatibility information.
The Lensbaby Obscura 50 Optic Swap is $179 and can be ordered from Amazon. This 50mm lens features Zone Plate (f/32), Pinhole Sieve (f/64) and Pinhole (f/161).
The Lensbaby Obscura 50 Standalone, $279, is essentially the same optic but attaches directly to the camera. Order from Amazon. This 50mm lens features Zone Plate (f/32), Pinhole Sieve (f/64) and Pinhole (f/161).
The Lensbaby Obscura 16 Pancake reviewed here costs $249 when purchased from Amazon. The focal length is 16mm, equivalent to 24mm on the Fujifilm as tested. Features Zone Plate (f/22), Pinhole Sieve (f/45) and Pinhole (f/90). It comes with a large, high quality microfiber cloth and a hard nylon case.
Read other Shutterbug reviews of Lensbaby products. Review of the fascinating Lensbaby Omni Creative Filter System is here and Lensbaby Composer Pro II with Edge 50 Optic review is here. Search this website and you’ll find a few more.
Lensbaby has been making images fuzzy and weird for 16 years, and they’re damn proud of it. I’ve been a big fan since the beginning, and I credit Lensbaby for helping me see the world in an extraordinary way. Learn more about their full line of products at lensbaby.com.
—Jon Sienkiewicz
(As an Amazon Associate, Shutterbug earns from qualifying purchases linked in this story.)
- Log in or register to post comments


![]()
Get the Latest Photo Tips, News & Reviews from Shutterbug!
| Camera Reviews Other Reviews | Mobile Reviews Photography Reviews Columns | News | Features | How-To | Resources |
 © 2025 Shutterbug
AVTech Media Americas Inc., USA
All rights reserved