Epson’s Stylus Photo R380; Letter-Size Inkjet Prints On CD/DVDs, Too Page 2
Correcting for redeye was my next test. Removing the red in Photoshop CS2 is an effortless task these days. Plus you can do whatever editing or retouching is required while there. Still, if the printer can alleviate the problem on its own, via Print Settings, you might as well try it.
Redeye Reduction |
||
 |
 |
|
|
||
I took five images. Redeye was satisfactorily eliminated in two prints. In
the others, at least one eye remained clearly red. The pictures involved one
or both of my friends' little girls, with two pictures including the dad.
Faces were either looking into the camera or at an angle--no clear pattern
could be established as to which type of image redeye reduction was corrected.
As a rough guide, I'd say, use on-board redeye correction when the pupils
are a bright red (not glowing, pinkish, or orangey), with people facing the
camera. As a true test, I chose pictures with red areas outside the eyes--these
areas remained unaffected.
When it comes to resisting scratches, the intent is with something such as a
fingernail, not a cat's claws. I ran a fingernail across a glossy print
made on Epson's Premium Glossy Photo Paper. The paper surface was marred
faintly, but the print itself was still usable: you really have to look hard
to see the scratch marks, which do not extend to the embedded ink. When I tried
the same thing with prints made off another printer, I got the same results.
So scratch that advantage.
I next poured water over the entire print surface to test water resistance,
then air-dried the print. That claim easily held water, but again the competition
fared as well, with both prints drying to a clean finish. (Results with other
printers, papers, and inks may vary.)
Now it came time to make prints on Epson and third-party (non-OEM) glossy photo
papers and check for instant drying. The Epson papers dried immediately. Some
non-OEM papers did not, and had to be left out for varying periods. But since
Epson only vouches for performance with its own branded media, we'll have
to say the printer and inks pass this test.
CD Print Screen |
|
 |
|
|
CD/DVD Printing
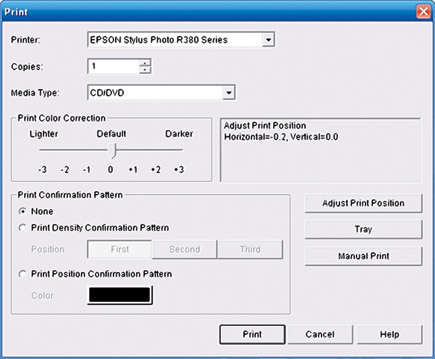
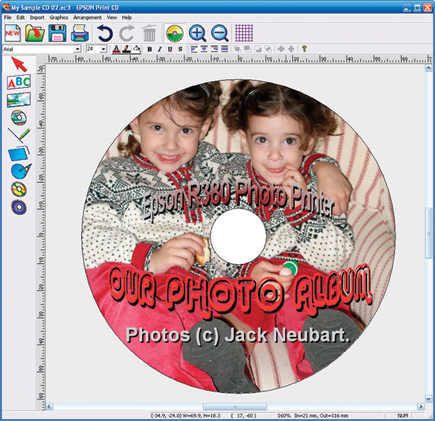
The final task was printing on CD. This I did first from the computer, using
Epson's Print CD software (included in the package), then directly from
the printer. Using the software lets you add text and other graphics (not available
when printing from a card), so this seems like the more propitious route to
take. The instructions made the job seem daunting, but in practice it was fairly
simple.
A flip of a lever on the machine prepares it for the correct media (paper or
disc). After designing the label, I inserted the special CD/DVD tray that came
with the printer (after first replacing the odd-shaped black disc with the real
thing, making sure the CD/DVD sat flush), following directions to the letter,
and voilà!, I got a CD I'd be proud to distribute. I first used
the default print settings--you can modify, save, and recall new settings.
In fact, I modified the inner parameter to 21mm (measurements are in metric)
to maximize the printable area. Printing from the computer took 21/2 minutes.
CD Layout |
|
 |
|
|
When Epson first introduced CD printing, I was skeptical. Now I'm sold.
It is such a pleasure to finally be able to deliver professional-looking CDs
that don't have my handwritten scrawls on them!
Overall, the printer as a whole was a joy to work with. I do wish Epson had
added an auto start/shutoff feature to the R380, but that's a minor point.
Given the price, I couldn't ask for more.
For more information, contact Epson America, Inc., 3840 Kilroy Airport Way,
Long Beach, CA 90806; (800) 463-7766, (562) 981-3840; www.epson.com.
- Log in or register to post comments
