Desktop Depth Of Field; Creating Selective Focus Effects, Digital Style


The original photo, shot in the studio with Paul C. Buff electronic flash on Fujichrome Sensia slide film, is sharp throughout. Model: Heidi McAllister.
Photos 2002, Howard Millard, All Rights Reserved

In ads, book covers and magazines, you've seen pictures where part of the subject jumps out at you because it's sharp, but most of the image is way out of focus. The technique really directs your attention to the part of the subject that's sharp, and it adds a contemporary flair and sense of style. Traditionally, this effect was achieved by using extremely shallow depth of field with a medium format or large view camera. Today, however, you can create it digitally in a few minutes and apply it to any existing photo made with any camera, or to any print that you can scan into your computer.

I selected the area I want to keep sharp with the Elliptical Marquee selection tool.
Remember, once you've drawn the selection, you can reposition it by dragging inside the selected area. Next, feather the selection.

While these steps apply specifically to Adobe Elements and Photoshop, the tools are quite basic and are available on most image-editing programs. Here's how to digitally add a cutting edge look to an existing photo:
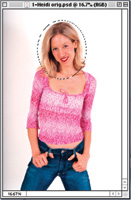
1. Open your original photo and duplicate it. Choose Image>Duplicate from the menu bar. Close your original, save it, and work on the duplicate. This way, if you don't like the results at any stage, you can go back to your original, make a new duplicate and start again.

2. With the duplicate image open, use any selection tool to select the part of the subject that you want to stay sharp and in focus. I used the Elliptical Marquee Tool to best fit the oval of the woman's face and hair, but you can choose any selection tool, like the Lasso or Rectangular Marquee. For example, in a portrait you might want to select only the eyes with the Rectangular Marquee. Tip: Once you've drawn a selection, you can move it and reposition it exactly where you want by placing the cursor inside the selection and dragging it.


By checking the Preview box in the Gaussian Blur dialog box, you can see the effect of different radius settings on your full-size image.

3. Now, to create a soft and smooth transition between the sharp and unfocused areas of the image, feather the selection. Choose Select>Feather. For my 14MB image, 6x9" at 300dpi, I chose a radius of 20 pixels. For a smaller image, you can try a lower amount.

4. Next, before we blur the image, we need to invert the selection. That is, we'll choose the inverse of the area that we want to remain sharp. Choose Select>Inverse and you'll see that everything will be selected except the part that you want to keep sharp.


In just a few minutes, I was able to create this digital selective focus effect and enhance the image with a contemporary feel.
Model: Heidi McAllister.

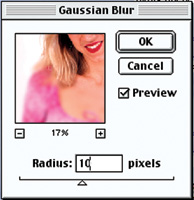
5. To make this new inverse selection out of focus, we'll digitally blur it. Choose Filter>Blur>Gaussian Blur. This will bring up the Gaussian Blur dialog box in which you determine how much blur you want. Check the Preview checkbox so that you can see the degree of blur in your full-sized image. Then, slide the triangle under Radius to the right. The higher the radius, the greater the blur. For my 14MB image, a radius of 10 pixels worked well. Experiment with different settings to choose the one that's most appropriate for your image. Higher settings may look unrealistic, but might be just what you're after for a special effect. Once you've got the look you want, click OK.


After inverting the selection, I chose Filter>Blur>Gaussian Blur. In the Gaussian Blur dialog box, determine how much blur you want by sliding the triangle under Radius to the right. The higher the radius, the greater the blur. For this 14MB image, a radius of 10 pixels worked well.

6. Next, deselect by choosing Select>Deselect.

7. Finally, save the new photo with digital selective focus by choosing File>Save.
Following the simple steps outlined here, you can add a contemporary twist to existing photos, create a very personal style, and focus attention where you want to direct it.

Contact
Adobe Systems Inc.
(800) 833-6687
www.adobe.com

X