- REVIEWS
Camera Reviews 
More Reviews Mobile Reviews Photography Reviews - GALLERIES
- VIDEOS
- BUYER'S GUIDES
The Darkroom
Create A Background For Portrait Candids; Pro Results With A Rainbow Of Color Options
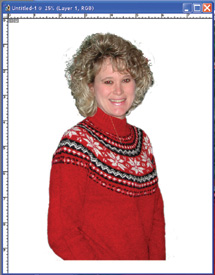
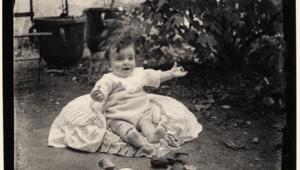
First, select the picture that you want to use. In this case, I have selected a snapshot that I took of my daughter, Kris, during the holidays last year (#1).
 |
 |
||
|
|||
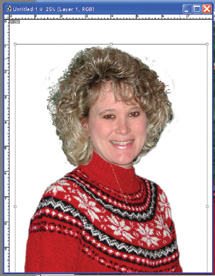
The next step was to remove the
subject (my daughter) from the background (the holiday tree). I selected the
Lasso tool and drew a quick, rough, outline around the subject. Then, I switched
to Edit in Quick Mask mode. In Quick Mask mode you can use the Erasure tool
and the Paintbrush tool to either erase away masking that you don't want
or paint in masking that you do want. Magnify the image up to almost the size
where you will begin to see the individual pixels and begin work.
Use a soft-edged brush that is relatively small. Paint in the masking where
you need it and erase out excessive masking where you don't want it. It
took me about 30 minutes to go all around the outline of the subject. When I
was finished, the picture looked like #2. Then, you can turn Off the Quick Mask
mode and Copy the Selection to the Clipboard.
Next, I went to File to New and set up a new 8x10 canvas. With the new canvas
in place, I went to Edit to Paste and pasted the image into the canvas from
the Clipboard (#3).
 |
 |
||
|
|||
Since the image is a little small
for a "head and shoulders" portrait, I went to Edit to Transform
to Scale and, holding down the Shift key, I dragged one of the corners of the
picture until it was a bit larger (#4).
Now it was time to start building the background. I selected a nice dark shade
of red in the Swatches Palette, which put the color in as the Foreground color
with the background color being Black. Be sure that you have clicked on the
Background in the Layers Palette and highlighted it. If the layer with the subject
on it is highlighted, the gradient (that we're about to create) will go
in on top of the subject, and you won't be able to see the subject. Next,
I selected the Gradient tool and the Circular option for it. Placing the cursor
on the subject's nose, I dragged a line about halfway to the nearest corner.
The shorter you drag the line, the darker the corners will be. If you want the
corners to be lighter, drag the line all the way to the corner. This produced
what you see in #5. But, I don't want a smooth gradient background, I
want a mottled background. So, the next step is to go to Filter to Render to
Clouds (#6).
|
| |||||||||


![]()
Get the Latest Photo Tips, News & Reviews from Shutterbug!
| Camera Reviews Other Reviews | Mobile Reviews Photography Reviews Columns | News | Features | How-To | Resources |
 © 2025 Shutterbug
AVTech Media Americas Inc., USA
All rights reserved