- REVIEWS
Camera Reviews 
More Reviews Mobile Reviews Photography Reviews - GALLERIES
- VIDEOS
- BUYER'S GUIDES
Characteristics Of Light: Quantity, Quality, Color & Direction
Quantity
Quantity is simply a measure of how much light we have in the scene. The quantity determines many factors of making an image—what ISO you can use, aperture and shutter speed settings and how you have to keep the camera steadied and the subject posed.
Digital cameras allow us to change the ISO at will, depending upon the requirements of the lighting conditions. You may want to use a low ISO so that you can get very high quality images, or perhaps use wide f/stops as is done in most portraiture. When moving into a darker area, increasing the chip sensitivity is simply a matter of turning the dial. Early digital cameras had a very difficult time getting quality files without severe noise and other issues, but now professional digital cameras can produce files of amazing quality at high ISOs we only dreamed about with film. I encourage you to test your own equipment to see what your limits of acceptability are.
Light quantity is a value that we can measure. But how we measure it can produce drastically different results. Using a reflected light meter such as the one in your camera may not always produce the best result. This is because, as remarkably good as they are, these meters don’t have a brain to tell it what is in front of it.
That’s why, if time allows, I still prefer to use an incident meter. Incident meters read the light that falls upon them so they are not color or density challenged. Properly used, taking a quick exposure reading should put all the values in their proper place, assuming they all fit within the dynamic range of the camera sensor.
For fast moving shoots, like a wedding day, a good camera meter coupled with an experienced shooter who knows when to make adjustments to the exposure should produce a very high percentage of accurate exposures.
#1: While this shot may look like a flash exposure taken in the studio, it is actually taken just using the modeling lights on a strobe. Now that digital cameras can shoot at ISOs we just dreamed of years ago, it opens up new opportunities. I cranked my ISO up to 1600, did a custom white balance, and shot this at 1/50 at f/2.8 using the light from my Larson (www.larson-ent.com) 4x6 ft soft box and another light skimming the background. The beauty of this is that, unlike flash, what you see on the subject is what you get.
Nikon D300, Tamron 28-75mm f/2.8 lens. Model: Victoria Anatone.

All Photos © Steve Bedell, All Rights Reserved
#2: What do you do when you want to take a portrait at the beach and get nice light too? You shoot at dusk. This portrait was taken at the Nubble Lighthouse in York, Maine very late in the summer. The bright sky with the setting sun is adding a little punch from behind me, even giving me catch lights in the eyes.
Nikon D300, Tamron 28-75mm lens at 65mm, ISO 200, 1/25 at f/4, tripod. Model: The Dunkelberger Family.

Quality
Unlike quantity, there’s no device to measure light quality. When we discuss the quality of light, we are talking about how “hard” or “soft” it is, that is, how hard or how soft the shadow looks. Try this: place a portrait subject in direct sunlight at noon. The overhead light will create deep shadows in the eyes, neck, etc. The nose shadow will be sharp and distinct. We call the quality of this light “hard”. Take the same subject out in the same location at the same time on an overcast day and the transition from the light areas to shadow areas will be very gradual with no distinct shadow lines. This light is “soft”. There is no right or wrong choice here. George Hurrell, a 20th century Hollywood celebrity photographer used very sharp, hard lights; many of today’s celebrity photographers favor soft light.
How do you go about finding or creating hard or soft light? The rule of thumb is: the bigger the light source in relation to the subject, the softer the light. Place a big soft box 2 ft from a person’s head and you’ll get a soft light. Move it 20 ft away and it becomes a small, hard light.
Outside, use direct sunlight for hard light, open shade for soft, with many variations in between. As a general rule, soft light is more flattering than hard, but the choice is yours depending upon the effect you’re trying to achieve.
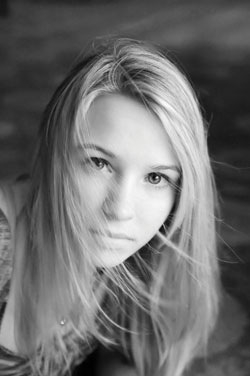
#3: Here we have a beautiful, soft light quality obtained by placing Sasha about a foot away from a glass door. The big light source creates a “wall of light” that is wonderful for flattering portraits. You may not be able to tell from this close up, but she is lying on the floor. I put her on the floor to keep the light direction high; if she stood, much of the light would be below her. Notice how the catch lights are at the 1 o’clock position. The motion in her hair was created by another photographer waving a reflector.
Nikon D300, Tamron 28-75mm f/2.8 lens at 44mm, ISO 800, 1/100 at f/2.8. Model: Sasha McCormack.
#4: This image is for a theater headshot. I wanted a soft, even light, yet I also wanted a little kick to it, so I used a soft box high above her and a silver reflector from below to add punch and catch lights in her eyes. A hair light and background light were also used.
Nikon D300, Sigma 50-150mm lens at 85mm, ISO 200, 1/125 at f/5.6. Model: Miranda Niles.

#5: This image has won many awards and helps prove that seeing and evaluating light is more important than equipment. This was taken using one window as the light source in an abandoned house. The room is small and the walls are light colored so the area itself provided it’s own fill light. I turned Kenny’s head slightly into the light from the window to make sure I had highlights on both the shadow and highlight side of the face. Since he has dark skin and is wearing white, I did use a reflector to block the lower part of the window to cut down on the amount of light striking his shoulder and hands.
Nikon D300, Tamron 28-75mm lens at 50mm, ISO 200, 1/125 at f/3.2. Model: Kenny Love.

Color
Light can have a profound influence on the overall mood of a scene. In deep shade, for example, we sometimes call the light “cold” or “blue”. At sunset, we may get a beautiful, warm light. Unlike light quality, the color of light can be objectively determined by using a color temperature meter. Separate handheld color meters are pricey, some about $1000, and really not needed by most photographers, especially with digital cameras where we can change the color temperature at will.
Color is rated on the Kelvin scale, a standard measure of color that works with “color temperatures” where a blue cast is a higher color temperature than a warm or amber cast. By understanding the different color temperatures, we can use that information to get either accurate color or to create effects by matching and mismatching color temperatures.
Daylight and electronic flash is considered to be in the 5000 to 5500˚K range. The light bulb in your living room is around 2500˚K (warm). Open shade may be about 8000˚K (cold). You can use this information to your advantage. Take a wedding image on the beach at dusk using a video light and set your white balance at 3200˚K to balance the video light. The ambient daylight will probably be about 8000˚K and go very blue, creating a dramatic look.
Digital imaging opens up a wide range of possibilities for us. Not being stuck with whatever film is in the camera is a huge advantage. I used to do industrial slide shows for a company in big factory buildings with a mixture of fluorescent and sodium-vapor lights and had to use color correction filters to obtain decent color. This took time to figure out plus cut down my light. Now it is as simple as taking a minute to create a custom white balance and finalize any color area imbalances in post processing.
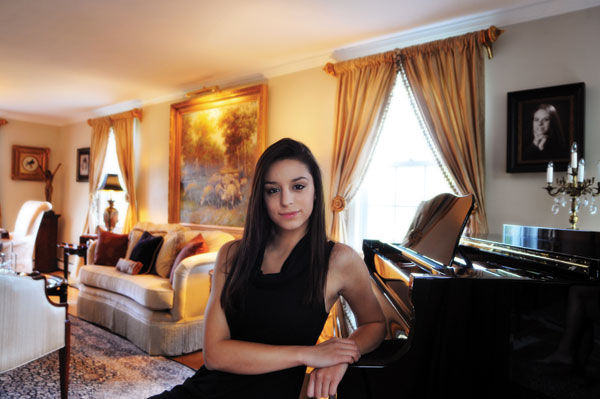
#6: Here I have the model lit by very soft window light. I read and set my camera to balance the color on her, not the ambient light. This means the incandescent lights in the background will go more yellow, creating a warm effect.
Nikon D300, Sigma 17-35mm lens at 17mm, ISO 400, 1/15 at f/2.8. Model: Alessandra Sacco.
#7: What if you want to have your model really stand out from the background? I used a direct flash for a more fashion look, kept exposure on her about a stop more than the background, and mixed the light sources. I used an amber gel over my flash and set my white balance to 3200˚K so the daylight would be very blue and the warmer tones on the model would make her really stand out.
Nikon D300, ISO 400, Tamron 28-75mm f/2.8 lens. Model: Victoria Anatone.

Direction
Direction is what shapes the subject. In the studio, for example, we move our main light until we settle on a direction that gives us the shape of the face we want, the light in the eyes, the nose shadow and cheek highlight we’re looking for.
Outside it’s a little tougher and we have to move the subject until everything falls into proper place. That’s the big challenge of outdoor, natural light portraiture, trying to find acceptable lighting patterns and a decent background to go with it.
Light direction has a dramatic influence on the subject. You can use a “split” light for drama, a “Rembrandt” light (a triangle highlight on the cheek on the shadow side) for a classic look, a “Butterfly” light (the nose shadow is shaped somewhat like a butterfly) for beautiful faces, and many other directional options. These lighting setups are enhanced by the secondary lights you add to the setup—“kick” lights skim the subject and backlighting separates the subject from the background.
#8: This image is an example of how you can create a powerful portrait with just one light. I used a 4x6 Larson soft box in a Photogenic light. I turned the soft box so I was only using the back edge because I didn’t want the light to strike the background. I then used a silver reflector to create an accent light from behind. Grain was added for effect.
Fuji S Pro camera, Tamron 28-75mm lens at 70mm, ISO 200, 1/60 at f/8. Model: Flint.

#9: I was teaching at the Bahamas International School of Photography and this portrait is of Kenny Love, the school director. Kenny was perched on a railing on a second floor patio that was covered by an overhang. The sun was behind the camera position but blocked by the overhang with some light bouncing up from the white floor and acting as a fill. The overhang blocked the light from overhead and allowed us to use the bright sky as the main light skimming across his face.
Nikon D300, Tamron 28-75mm f/2.8 lens at 50mm, ISO 200, 1/500 at f/4.5. Model: Kenny Love.

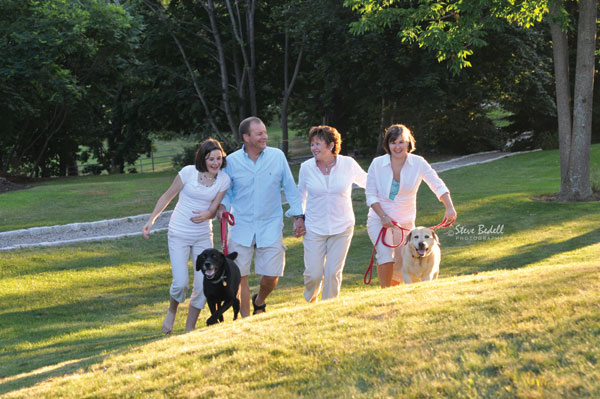
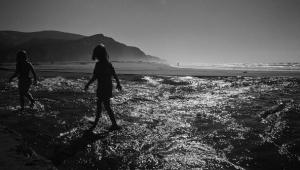
#10: Strong backlighting can create a beautiful look and separate your subjects from the background. The trick is to keep them on a darker background and make sure the sunlight doesn’t strike their faces. Nikon D300, Tamron 28-75mm lens at 55mm, 1/125 at f/4, ISO 200. Model: The Dunkelberger Family.
#11: Don’t automatically use the strongest light as the main light. Here I have a strong, bright sky from behind creating beautiful rim light on her hair but a softer light from the open sky (her back is to the light directly from the sun) acting as the main light on her face. This is one of my favorite ways to light outdoor portraits.
Nikon D300, Sigma 50-150mm lens at 120mm, ISO 200, 1/200 at f/3.2. Model: Sarah Gibney.


![]()
Get the Latest Photo Tips, News & Reviews from Shutterbug!
| Camera Reviews Other Reviews | Mobile Reviews Photography Reviews Columns | News | Features | How-To | Resources |
 © 2025 Shutterbug
AVTech Media Americas Inc., USA
All rights reserved