- REVIEWS
Camera Reviews 
More Reviews Mobile Reviews Photography Reviews - GALLERIES
- VIDEOS
- BUYER'S GUIDES
4 In-Camera Tips for Nature & Wildlife Photos with Soft, Blurry Backgrounds (VIDEO)

One way to make wildlife and other outdoor subjects stand out is to shoot them against a clean background without distractions. While these are difficult to find in nature, there are ways to soften a cluttered background in post-processing. Today, however, you'll learn four simple techniques for getting the job done in the camera.
Instructor Simon d'Entremont is an acclaimed nature and wildlife photographer based in Eastern Canada. In this episode he demonstrates four methods he uses all the time to create soft, blurry backgrounds in the field. The reason for doing this is simple: It's easy to accentuate the main subject of an image and direct a viewers' eye by deemphasizing the background so it fades into obscurity.
In this 12-minute tutorial you'll learn how to use the right gear, camera settings, and creative techniques to blur the background of an image so it's as obscure as possible. Be sure to watch until the end of the video where Simon dispels the myth that larger sensors create blurrier backgrounds and demonstrates what really happens.
Simon explains how to use these techniques in a variety of settings to tame distracting branches, grasses and other unwanted objects in a scene to make the primary subject grab attention. He begins with a brief discussion of what makes a background more or less prominent. The aperture you choose, the focal length of a lens, and the resulting depth of field are all key considerations.
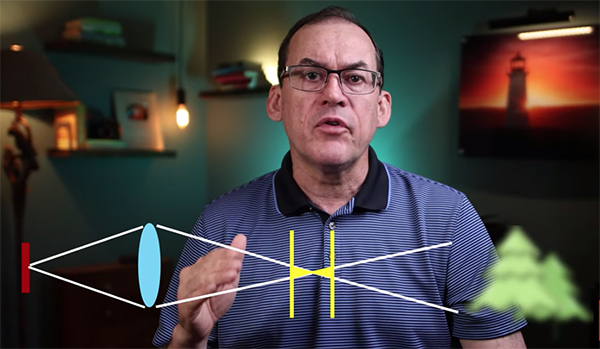
Likewise he explains what variables contribute to a wide range of focus, and how camera-to-subject distance is also important. Simon uses a simple graphic to illustrate the basics of depth of field and how this component affects backgrounds. He puts it like this: "Light travels from our subject to the lens elements, which in turn bend it to come to a focus point on the sensor of your camera."
As a result, the place where light rays converge on the subject and are very close together is where "perfect" focus occurs. Simon further notes there's an area where the image will be "acceptably sharp" before and behind this key point—thanks to depth of field.
Once your settings take you beyond the zone of acceptable sharpness in front of and behind the subject, everything (including the background) becomes blurrier and blurrier as the distance increases. With this knowledge under your belt, Simon's tips for blurring a background will now be easy to understand and put into practice as you watch the remainder of the lesson.
We encourage you to visit Simon's instructional YouTube channel for more straightforward outdoor photography advice.
And don't miss the tutorial we posted recently from another accomplished pro, explaining why the Rule of Odds often beats the more familiar Rule of Thirds when shooting nature and wildlife photos.


![]()
Get the Latest Photo Tips, News & Reviews from Shutterbug!
| Camera Reviews Other Reviews | Mobile Reviews Photography Reviews Columns | News | Features | How-To | Resources |
 © 2025 Shutterbug
AVTech Media Americas Inc., USA
All rights reserved