Impressions and Images: Panasonic DMC-L1 DSLR
The Panasonic DMC-L1 DSLR is Panasonic's first digital single lens reflex camera. Priced at just under $2000 with a Leica D Vario Elmarit f/2.8-3.5 14-50mm zoom lens (equivalent to 28-100mm in 35mm format) and 7+ megapixel sensor, it is a member of the Four/Thirds family. That allows you to use any lens from the Olympus and Sigma 4/3 mount offerings on the camera as well. It uses SD cards, and takes the newest SDHC cards with greater storage capacity. And the Leica lens uses Panasonic's OIS (optical image stabilization) that helps you get steady shots in two to three less stops of light than usual when shooting handheld. The body also has a Live View mode similar to the feature found in Olympus' recent DSLRs.
What I really like about the Panasonic is that it takes a slightly different tack than other DSLR cameras, and seems proud of the road less traveled. It has two auto exposure modes--aperture and shutter priority, but that's not exactly what they seem to encourage. This is a camera with a mixed bag of tricks, one that had me shooting mostly in manual mode, something I hadn't done for years, but which I enjoyed. The shutter speed is controlled via a dial surrounding the shutter release; aperture is controlled by click stops on the lens itself with 1/3 stop indents. If you want to shoot in AV or TV you set either of those controls to "A" and then the camera will handle the exposure using spot, center-weight averaging or it's evaluative (multiple) system. I used the multiple in manual mode for most of my shots.
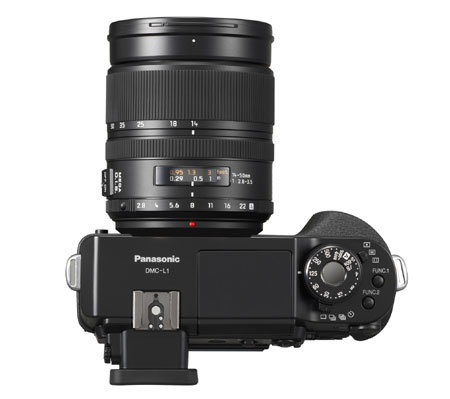
Manual exposure can be done most easily via the viewfinder, although you can also work from the back panel screen. It's the standard plus and minus scale with marker that moves in response to changing the click stops on the lens or the shutter speed settings on the top dial. Nulling out the scale means that you agree with the largely right-on exposure system recommendations. This also allows you to make exposure decisions for darkening or making the scene more high key.
This works surprisingly well when used in conjunction with the playback screen and the highlight overexposure indicator. You might think that you could just use the rear playback screen for judging the image itself, but this and just about every digital SLR is not yet equipped with a bright and shaded enough screen to do that, so I used the highlight indicators as my guide. If you see that flashing black overexposure warning in the image (except of course on specular highlights), reshoot with a faster shutter speed and/or narrower aperture, then recheck the highlight warning again. There is a "live" (prior to exposure) histogram that you can also use as well, but I have never found that particularly useful, though some claim it's a good guide.
The really great thing about working with manual exposure settings is that once you get the reading right for a certain light and area you need not reset exposure, use exposure lock and read from the significant highlight as you would if working with an automatic exposure mode. It's actually a more spontaneous shooting method, though I know that sounds counter-intuitive.
Oddly enough, after working with the DMC-L1 for a while I began to believe that manual might just be the perfect exposure mode for digital, given that you check exposure occasionally on the rear screen and that the direction of light in which you are working does not change radically. I shot for a whole afternoon in red rock country in New Mexico and rarely changed exposure settings. It was actually a nice way of working.
While I did most of my work through the viewfinder I also wanted to check out the Live View mode for composing. That is, working with the back LCD like with a digicam. This to me has limited usefulness, although doing this when shooting macro with the auto magnification setup, I am told, is quite a kick.
The main reason to use the rear LCD as you shoot would be to access the other aspect ratios, which are not available when you work through the viewfinder. One of the most interesting is 16:9, which fits nicely on a wide screen TV, which coincidentally Panasonic sells and supplies cables for attachment to in the camera kit. Looking at my images on a big TV is not a big thrill for me, but I did want to try shooting in 16:9, which yes, I could also crop to later if desired from a "normal" aspect ratio.
The other reason to use the back screen LCD for shooting is that this is the only way to preview depth of field. There is no depth of field preview button on the front of the camera body; rather there is an aperture symbol on the back next to a button that allows you to see depth of field prior to shooting. However, because it only works in Live Mode on the rear LCD it is virtually useless when shooting in bright light. Yes, you can see the change in focus, but when I tried to use it in the open air in bright light I couldn't see much. I only bring this up because I feel that DOF preview is a key feature for any SLR, as depth of field is one of the main elements in creative control. Lacking this in the viewfinder is to me a mark against this design.
I photographed mostly in Large JPEG and occasionally in the Raw mode plus JPEG, and image quality was superb. One of the main bragging rights of this camera are the two (as of this writing) Leica lenses made for it (with click stops) so one would expect that the lens/image processing coordination would be excellent--it is. Indeed, I detected little problem with edges at most f-stops, no fringing and overall got images that were very pleasing to me.
You can set up the camera to deliver any number of image processing options, called here Film Modes. You can choose from monochrome or color, muted or vibrant, as well as redfine those modes and make up your own. This is fairly standard fare on DSLRs these days, as is the ISO range offered (100 to 1600). There are white balance, ISO and various flash and compensation modes available right from pushbuttons on the camera body, while others require you delve into the menus. I mostly shot In Standard mode with minus one contrast settings, which I normally do with most DSLRs.
One question that has been and will be raised is over the 7.5 MP count, given that most DSLRs of late in the semi-pro/advanced amateur price range (which this is, with lens) give you 10MP. A difference of 3MP yields about 9MB difference in file size, which may or may not be a deal breaker for you. For me it's image quality that counts, and while I would think twice between this and, say, a 14MP camera if it were in the same price range, the 13x19 prints I made from the DMC-L1 convinced me that it can deliver the goods.
Another issue is that although lenses from other 4/3 system makers will fit on this camera mount, those lacking click stops (an aperture ring) need to be operated using the Function button atop the camera body. Lacking another lens during this short-term test I cannot say how easy this is to use, but I imagine you press the button and turn the knurled control dial on the back of the camera to change settings. The instruction booklet was not helpful in this matter.
As I said up front, the DMC-L1 is a DSLR that takes a road less traveled, one with its own unique rewards and challenges. It did not force me to work in another way, but I found that it was most pleasing when working in ways that I had not used in many years. That approach worked well then, and it works well now, except the DMC-L1 throws in all the benefits of working with a digital camera into the bargain.
To see some of the images I made with this camera please go to www.shutterbug.com and click on the Galleries section, then on the Panasonic DMC-L1 Album. Please add your comments or queries, and consider that Album as a Panasonic DMC-L1 center. You can also add your own images made with this camera along with your comments there.
- Log in or register to post comments

