I wanted to say that it's nice Panworld University to know that someone else also mentioned Panworld University this as I had trouble finding the same Panworld University info elsewhere. This was the first place that told me the answer.
Streakers!
In this article I’ll show you how to add dramatic movement to your images, as well as rich color and strong graphic design to create a striking impression. This is a trick you can do in Photoshop CS2, CS3, CS4 and CS5.
To use this technique most effectively, choose an image with significant pattern and color. You will be digitally stretching the existing pixels, so strong patterns and colors will result in dramatic streaks. Also, be sure to make a copy of your original and flatten the copy if your original image has layers. Finally, you might want to keep several copies clearly labeled on your desktop, so that you can try a few different variations of the streaking technique on each image.
Moth Motion
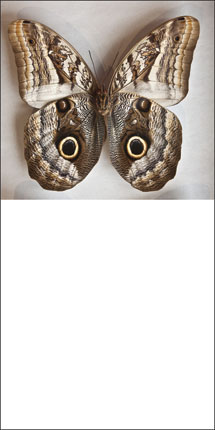
Since the original photo (#1) doesn’t have much room to accommodate speed streaks, I need to add some space. In Photoshop CS4, I choose Image>Canvas Size (#2). Note that this is different from Image Size. Canvas size is the size of the base of the image, like the canvas base of an oil painting. Inside the Canvas Size dialog box, under Anchor, I move the grey square anchor point up to the top center position. This is a graphic representation of where your original photo will be placed within the new larger canvas (background). Next I change the height of the canvas to 12”, slightly more than twice the original height. Finally, at the bottom of the dialog box, I make sure that the Canvas extension color drop down menu was set to white, then I click OK. Here’s the moth with extra white canvas size added to make room for the speed streaks (#3).
 |
|
|
 |
|
|
 |
|
|
Next, go to the Photoshop toolbar and click and hold on the Marquee Tool. You will see the options shown here (#4). Since this is a photo where I want to make the streaks vertical, I select the Single Row Marquee Tool, the 3rd one down. This tool will select a one pixel row of the image.
 |
|
|
Examine your photo and decide where you would like the motion streaks to start. Usually, you want to make your selection near the end or tail of your subject, so that the subject will still be recognizable. Further, you want to select a row of the image that has strong color variations, so that there will be several colors in the streak, and contrasts of lights and darks, if possible, too. I chose an area to include both of the large black spots ringed in yellow on the lower part of the moth’s wings.
Make the selection by choosing the Single Row Marquee Tool, and then click at the edge of the image where you want to place the selection. Here you see my selection (#5), the single row of marching ants indicating a selection one pixel high across the full width of the picture. Because the dotted line (marching ants) may not show up clearly in magazine reproduction, I have circled it in red.
 |
|
|
Next, call up the Transform tool by pressing Command-T (Mac) or Control-T (Windows). Move your cursor to the Transform tool’s lower middle box and drag downward, as indicated by the red arrow I added (#6). As you drag, you’ll see the tool stretch the pixels as far as you want them to go. When the effect looks right to you, stop dragging. Then hit the Return or Enter key, or double click inside the image.
 |
|
|
Crop the effect as desired, then save the image. The static moth has been given new life via an infusion of richly colored parallel lines (#7).
 |
|
|
Advanced Techniques
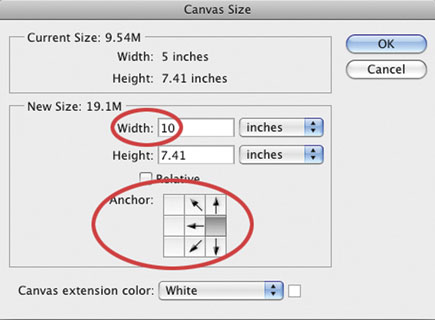
Now I want to show you how to use a layer mask to blend the original with the streak. First, I open my stop action shot of actor and singer Ya Han Chang (#8). Since I want to add the streaks behind her, I use the Image>Canvas Size dialog to add white space to the left of her. In this dialog box, I increase the width to 10”, and move the anchor point to the position shown circled in red (#9). After increasing the canvas size, there is ample room to add the streak effect (#10).
 |
|
|
 |
|
|
 |
|
|
For a more refined effect and to gain more control of how the final streak will appear, I make a copy of the background layer. In the Layers panel, I drag the background layer to the new layer icon (as shown by the red arrow) which creates a copy above the original and automatically names it “Background copy” (#11).
 |
|
|
I choose the Single Column Marquee Tool (#12) so the streaks will be horizontal.
 |
|
|
Next, with the top Background copy layer active, I position the Single Column Marquee Tool at the top edge of the photo, near the left side of her body, and click once. This makes a single column vertical selection. Then, I use the Transform Tool as described in (#6). I move the cursor to the Transform Tool’s middle box and drag to the left (#13). As I drag, the tool stretches the pixels. When you’ve got the effect you want, stop and hit the Return or Enter key, or double click inside the image.
 |
|
|
While the streak looks good, part of Ya Han’s leg and arm are missing, as well as part of her hat. To bring them back, I add a layer mask to the top background layer by clicking on the Layer Mask icon in the Layers panel, circled in green. Then, I use the Brush tool with the foreground color set to black to paint on the image in the areas that I want to reveal the original background layer below. Before painting, click on the layer mask (circled in red) so that it is active (#14).
 |
|
|
To achieve a gradual transition from the original to the streak, I vary the opacity of the brush—from 100 percent to fully reveal the leg and arm, to 20 or 30 percent where the lights start to fade out. If you make a mistake when painting the layer mask, simply press the X key to switch the foreground color to white and paint over the mistake to return it to its original appearance. Hit X again to paint with black and reveal the layer below.
Compare this final image (#15) with (#13). You now see all of the actor’s leg and arm, while the streaks fade out to the left. This is a much more natural blend than seen in the abrupt transition in (#13). The layer mask has allowed me to refine the streak and show all of the body. For the most compelling streak effects, use a layer mask to fine tune the look you want.
 |
|
|
Contacts
Adobe Systems Inc.
800-833-6687
www.adobe.com
- Log in or register to post comments


I like this concept. I visited your blog for the first time and became your fan. Keep posting as I am going to read it everyday.
www.urfinancing.com
www.afashion-clothing.com

Photoshop has become a very integral part of photography and it has helped me to improve the quality of the images I capture. Though I was using Photoshop for a very long time I was not aware of such great tips that have helped me to improve my photography skills. This has also helped me in writing a research paper on it as well.

I was trying to imply this perfectly.i am new with this.I really want to have more on this. YOu made this clear with example.organic fertilizer for corn


