Sharpening For Output; Keys To Getting The Process Right
One of the most frequent questions I'm asked is about the proper, or
"best," way to sharpen images for printing or web use. Almost everyone
has struggled with getting this right. Software has improved greatly over the
past couple of years, both within Adobe's Photoshop, which recently added
the Smart Sharpen filter, and with third-party tools like nik's Sharpener
and PixelGenius' PhotoKit Sharpener.
Part of the problem when explaining how to sharpen is that no two images will
use exactly the same settings. Sure, you can come up with a set of adjustments
that work, but for the optimal results you'll find yourself needing to
tweak these settings for each image. And, when you consider that sharpening
needs change dramatically based on the size of the print and even the type of
paper you'll be printing on, you can see why so many people are frustrated
by the whole process.
Unsharp Mask Explained
Just the term "unsharp mask" is confusing to some. If you came from
a traditional film and darkroom background you're familiar with the process
of masking, but for digital-only users, or those who never spent time in a darkroom,
the idea of masking can be hard to grasp. Essentially, you're masking,
or hiding, the unsharp areas. With digital, sharpening is actually done by enhancing
the contrast between edges in your image.
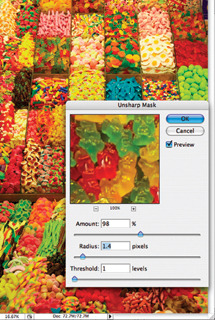
Photoshop does this with the Unsharp Mask filter (Filter>Sharpen>Unsharp
Mask) (#1). Other programs have similar controls, sometimes with different names,
but always with the same method of sharpening. With three controls available
to define how edges are found and enhanced, you have a great deal of control
over the final result. Let's take a closer look at each of the controls
to understand how they work.
 |
|
|
Amount controls how strong the contrast effect is applied to your edges. Essentially,
you're enhancing the contrast between pixels to give the appearance of
a sharp edge. The sharpening appears in your image as a halo along the edges
affected by the filter.
Radius determines how wide the effect is on your images, with larger numbers
affecting a greater number of pixels. Radius is the most important adjustment
of the three controls and can ruin a photo quicker than you can say "oops."
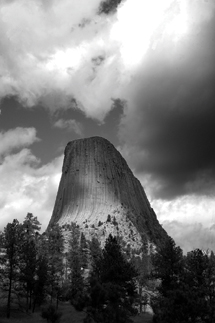
Image 2 is an example of what happens when the Radius is set too high. You can
see the distinct halo, or glow, around the edges of Devils Tower. Very few things
scream digital like an over-sharpened image.
 |
|
|
Threshold controls how much difference there must be between pixels in order
for them to be considered edges. Higher numbers here force the filter to look
for greater differences between adjacent pixels and will reduce the number of
edges found.
Now, by themselves, these controls aren't hard to understand or master.
It's the interaction between them that can lead to hair loss and increased
stress levels. You see, changing the Radius affects how strong the Amount appears,
and adjusting the Threshold can magnify or reduce the effect of both Amount
and Radius. Luckily, the controls are presented in the general order of use.
You will typically make adjustments to the Amount first to get a rough value
for how much sharpening to apply to the photo. Then, by adjusting the Radius
you'll control how prominent that sharpening is. Finally, you can fine-tune
the results with the Threshold control.
- Log in or register to post comments
