Output Options; Optimizing And Displaying On The Web Page 2
 |
|
|
Sharpening And Saving
Sharpening an image should be the last step performed before saving and will
be different for each intended use. Sharpening an image is usually known as
Unsharp Masking. It works by increasing the contrast along the edges of objects
in the image. By emphasizing the contrast on the edges, the image appears to
be sharper with finer details.
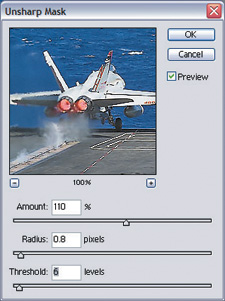
In Elements, select Filter>Sharpen> Unsharp Mask. The three slider controls
work together with Amount controlling how strongly the edge contrast is increased,
Radius determines how wide the enhancement will be. Too much and the image will
have halos--obvious highlights around the edges of objects. Radius is the
most important setting, so keep a close eye on the preview as you make adjustments.
Threshold determines how much contrast there needs to be between objects to
be considered an edge. Higher numbers require more contrast. There isn't
one setting for Unsharp Mask that works for every image, but I find that web
images are usually in the area of 100-150 percent Amount, .7-1.5 Radius, and
2-6 Threshold.
 |
|
|
The final step is to save the image. Here, the goal is to keep file size to
a minimum and the quality as high as possible. Normally, I save my web images
with a JPEG setting of 7 or 70 (same setting, different scale). The Save For
Web feature in Photoshop and Photoshop Elements is a great way to experiment
with compression settings. Select File>Save For web, making sure that
JPEG is selected as the file type, and adjust the quality setting to an acceptable
amount.
As always, I'm interested in your feedback and questions. If you have
questions on this, or other digital output issues, send me e-mail at jon@joncanfield.com.
I'll try to respond to all questions, and we'll answer some of the
most common questions here in the column.
- Log in or register to post comments


