Lesson Of The Month
Correcting Perspective With Architectural Shots
One of the biggest challenges
in taking architectural photographs is being able to control the perspective
of the shot. Rendering an image so that the vertical lines of a building
are parallel to the crop of the image usually requires the photographer
to shoot with a view camera or Perspective Control (PC) lens. |
|||
I set my Olympus E-20N digital
camera on a tripod, opened the balcony window and framed up a horizontal
shot through the viewfinder. I guessed that the outside lights were probably
high pressure sodium vapor flood lights (which run somewhere between 1900-2100ÞKelvin),
so I set the White Balance to the closest preset (Tungsten, 3000ÞK)
and figured I could adjust the color shift later in Photoshop. (For a
closer look at how White Balance works, check out the lesson entitled,
"Using Digital White Balance Outdoors" in the Digital section
of www.webphotoschool.com.)
|
|||
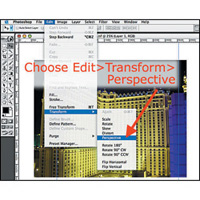
Next, give yourself some adjustment
room by expanding your canvas. Choose Image>Canvas Size..., increase
the canvas by 500 pixels in both the height and the width and press OK.
Next select the top layer and disable the positioning lock by clicking
on the Lock icon above the layer. This will allow you to move and distort
the top layer. |
|||
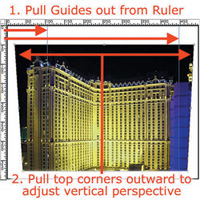
You may need to position a couple of Guides to help you see when the lines are straight. To do this, press Command-R (PC: Control-R) to produce Rulers on the top and left sides of the image (if they aren't already there). Then click inside the ruler and drag a Guide out onto the image. You can drag as many Guides onto, or off of, the image as you want. Just remember that after you've released the mouse, you can only adjust the position of a Guide with the Move tool. Next, click either of the top corners of the layer and drag it outward until the vertical lines of the building line up with the Guides. You may need to slide the top center point slightly to one side to have it line up perfectly (#4). |
|||
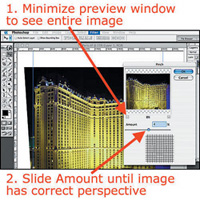
Depending on the lens you're using or the position you happen to be in, you may notice a slight bubble distortion in your photographs. In other words, it may look as though your subject (building) was shot with a somewhat wide angle lens because the lines of the building are somewhat bowed. In this particular case, my position in relation to the building was pretty much fixed, as I couldn't move either forward or backward. Subsequently, I had shot this image at the wide end of my zoom lens to capture the entire building, but at the expense of distortion. And yet, Photoshop once again came to the rescue on this issue as well. To reverse the bowed effect of a wide angle lens, select Filter>Distort>Pinch... to pull up a preview window. To get an idea of how much pinching you need to apply, minimize the preview window until the entire layer is visible. Then slide the Amount until the preview looks straight. In this case, I applied 4 percent (#5). |
|||
This subtle Pinch function
can really help to straighten the bowed sides of your image, but keep
in mind that it works best with an increased canvas size, like we have
here. Otherwise, your results may look contrived. |
|||
Finally, I wanted to adjust the color of the image. There are many ways you can modify color in Photoshop, and here's a simple one. Since the yellow lights on the building had a somewhat blue-green cast, I pulled up the Color Balance window (Mac: Command-B, PC: Control-B), moved the top slider 30 points toward Red, and the middle slider 30 points toward Magenta. By adding Red and Magenta to an image, you automatically reduce the levels of Cyan and Green. This quick adjustment made the greenish yellow a more warmer gold (#7). |
|||
Sometimes when you create a
drastic shift in color, the colors may appear to be overly saturated.
To tone down the saturation, press Command-U (PC: Control-U) to pull up
the Hue/Saturation window, reduce the saturation by 15 points and press
OK (#8). |
|||
If you plan to e-mail or post your image to a web site, make sure to first re-size it appropriately (600 pixels or less) and then apply a little sharpening to give the image some crispness. For a more detailed look at how to prepare images for print, e-mail, and web sites, check out the lesson entitled, "Preparing Digital Images For E-mail And The Web," located in the Digital section of www.webphotoschool.com. |
|||
Here we can see the improvements we've made over the original image. The angles of the hotel are straight, there is no wide angle lens distortion, and the colors are much more true to life (#9 and #10). Technical Information |
- Log in or register to post comments


