Image Doctor 2; Speedy Automated Retouching And Repair
 For retouching old or new photos, softening skin for portraits, removing unwanted objects, or repairing low-quality JPEG images, Alien Skin Software’s Image Doctor 2 (ID2) set of five plug-ins can speed and simplify your work. With new portrait photos, ID2 makes it easy to remove unwanted blemishes, whether it’s a skin problem, a scar, a mole, or even a tattoo. With old photos, restoration involves selecting a scratch, tear, or fold, and clicking your mouse. Do you have a fine landscape or cityscape marred by trash, graffiti, or some other unwanted object? ID2’s Smart Fill tool can whisk these away and replace them with realistic samples of the surrounding areas. Finally, ID2 can help smooth out jagged, blocky JPEG files that are low resolution or have been over-compressed. While these corrections can be performed within most advanced image editors like Adobe’s Photoshop, ID2 offers speed, simplicity, and a degree of automation for retouching jobs that usually demand a fairly high level of editing skill and experience.
Running Image Doctor 2
This software works as a plug-in, so first fire up your host program—I’ve used Photoshop here—then open your photo, examine it and decide what areas need work. Select the area you need to repair using any of Photoshop’s selection tools, then choose the appropriate ID2 filter from the Filter menu. At the bottom of the ID2 window, Help text describes whatever feature your mouse is currently over. There’s also a PDF Manual.
Remove Unwanted Objects
ID2’s Smart Fill feature removes unwanted objects, such as trash on the sidewalk, even undesirable guests from party photos. Smart Fill can automatically replace these areas with an intelligent sampling of the nearby background pattern, or you can specify the location of the background samples. For a thin object, run the Dust and Scratch Remover. For larger objects, call on Smart Fill.
1. Taken from atop the Bell Tower in Siena, Italy, this landscape with a church suffers from some distracting elements. I called on ID2 to remove them.
 |
|
|
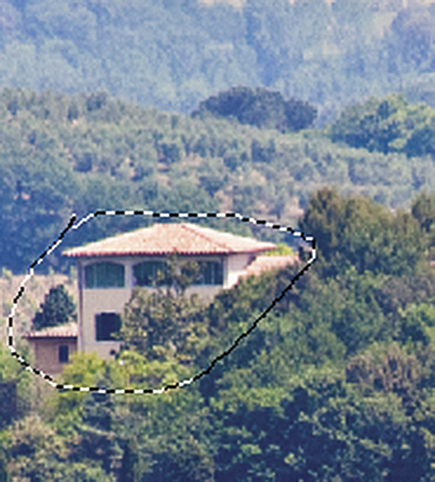
2. After opening the image in Photoshop, I chose two areas to clean up with ID2—the road and telephone poles at the lower right, and the house at the upper left. First, I used the Lasso tool to loosely select the house.
 |
|
|
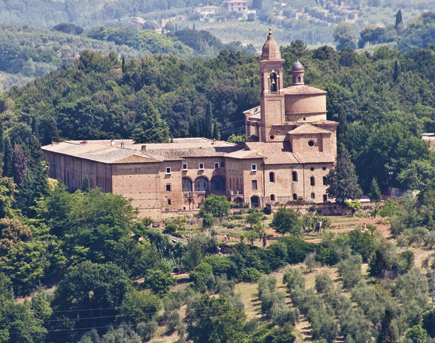
3. Next, I chose Filter>Alien Skin Image Doctor 2>Smart Fill which brings up this dialog. You can choose from a default and four auto settings, as well as four manual settings in which you choose where the replacement area is sampled from. For this image, the default setting worked perfectly, replacing the house in about 6 seconds with realistically blended trees and grass.
 |
|
|
4. I repeated this procedure two more times with selections of the road and telephone poles at the lower right. In testing a number of images for this article, I found that Smart Fill works best with natural, organic textures. Trying to remove power lines in front of a building with windows and detailed brick work was less successful. While the lines were removed, the building was left off kilter or with parts missing.
 |
|
|
Restore And Repair Old And New Photos
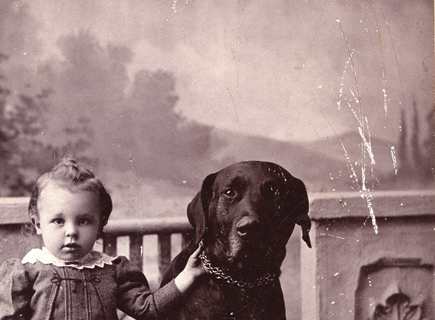
5. ID2’s Dust and Scratch Remover removes defects and repairs textures. It works by sampling textures from areas surrounding your selection, then recombining them inside the selection to “organically repair” images. The goal is to avoid the repetitive patterns that can result from manually cloning source textures. With contemporary photos, Dust and Scratch Remover can erase long thin objects such as power lines, stray hairs, or telephone lines and poles. To test this filter, I began with this section of a 19th-century portrait of a girl and her dog. With an Epson V500 flat-bed, I scanned the original at 600dpi in RGB color to capture the subtle color tones of the original.
 |
|
|
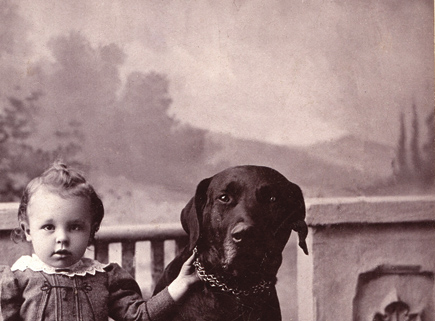
6. After opening your image, make a selection of the object(s) you want to remove. Use any selection tool such as the Lasso, Magic Wand, or Quick Mask, but do not feather the selection. Here I used the Lasso tool at high magnifications to draw loosely around each spot, tear, or scratch. You can try selecting large areas if the background is fairly uniform. If that doesn’t work, make multiple small selections by holding down the shift key, then run the filter. If you have a long scratch or tear running across most of the image, do it in several different selections, one for the area against a light background, then a second for the area against a dark background, and so on. For this image, I made literally hundreds of small selections.
With a robust computer, it took from 3-10 seconds each time I ran ID2’s Dust and Scratch Remover with three to five selections at a time. I spent a lot of time on this 4x6” cropped image, perhaps an hour. I thought some of the work might have been faster with Photoshop’s Spot Healing Brush or even the Clone Stamp tool, so I tried them, too. However, what I found was that ID2 usually did a better job of matching the background texture and tone in the retouched areas, especially the curve and shadow of the wall on the right. I ran the filter about 40 times to repair this image, and only three or four of those times did I have to redo with a different or smaller selection.
 |
|
|
- Log in or register to post comments


