- REVIEWS
Camera Reviews 
More Reviews Mobile Reviews Photography Reviews - GALLERIES
- VIDEOS
- BUYER'S GUIDES
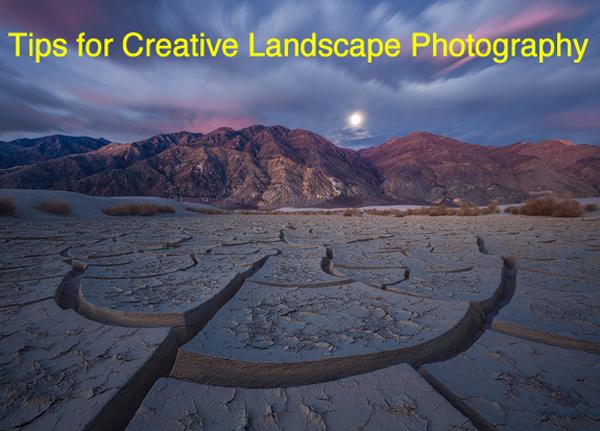
Exploring Light: 7 Tips for Creative Landscape Photos
(Editor’s Note: Exploring Light is a new monthly Shutterbug column featuring tips, tricks, and photo advice from professional photographers in Canon's Explorers of Light education program. This month's column is by Erin Babnik on how to shoot better landscape photos.)
My early years as a professional photographer involved doing a lot of assignment work that required a documentary approach to photographing landscapes. Back then I was trying to produce straightforward, descriptive views of outdoor environments because the end uses of the commissioned photographs necessitated that style of photography. These days, however, my work features a more creative approach.

While natural environments are still my primary subjects, I now prefer to emphasize my own thoughts about them more so than objective appearances. As I produce landscape photographs for my fine art portfolio, I favor an expressive style that gives greater importance to storytelling, emotional response, and aesthetic impact.
With a creative approach, it is up to the photographer to decide what is most interesting or special about a particular place and time. If you would like to pour more of your own ideas and experiences into your landscape photographs, then the following tips should help you to move beyond the obvious and to let your creativity shine through.
1. Explore Further
Exploration can be as simple as pointing a telephoto lens out of a window and discovering compositions both near and far. At the other extreme, exploration might mean venturing deep into an area that is rarely photographed, simply to see what potential it might hold for photography. Either way, the process is the same: let curiosity be your guide. Working through a bucket list of famous viewpoints can be a valuable exercise, but simply following your own nose is likely to lead to the most rewarding kinds of photographs.

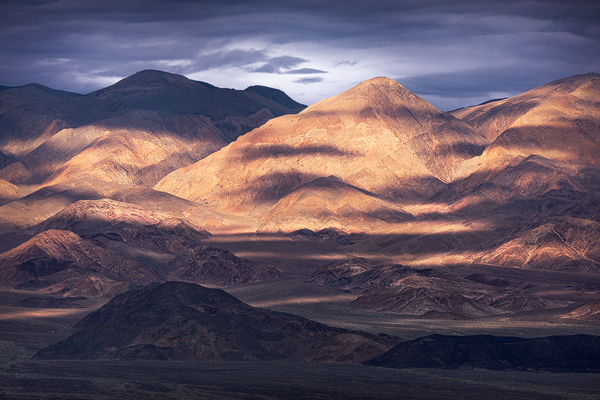
2. Look for the Light First
If your goal is to produce a documentary photo, then it makes sense to think first of the features that define a location and to work out when to expect light that will emphasize those defining features. Otherwise, the reverse process is more fruitful: look first at areas that are illuminated at any given moment and decide if the light is bringing out something that you find interesting. When you start out looking at what the available light is showing you, then you are more likely to invoke your own special powers of observation, seeing something that another photographer might not.
3. Experiment with a Variety of Camera Heights
Compositions that register clearly at standing height are usually the ones that we notice first, and placing a camera at standing height tends to give a relatively straightforward view of a scene. On the other hand, placing the camera near your feet or up high can cause you to see a place very differently. Compositions with wide focal lengths are especially affected by changes in camera positioning. With a wide-angle lens it’s possible to give small features underfoot a lot of emphasis in a scene simply by making them seem larger in the frame. Conversely, a high vantage point can give middle-ground features more prominence, which is especially interesting with elements that plunge into the distance, such as leading lines.

4. Try Extreme Focal Lengths
Traditional focal lengths range from mildly wide to mildly telephoto because that range best approximates how human eyes see the world. Therefore, that range of focal lengths lends itself well to framing up the most obvious compositions, the ones that we can spot easily without looking through the camera. On the other hand, choosing extremely wide or extremely long focal lengths instead can enable a photographer to see compositions that are not evident with casual viewing, thereby opening up a world of possibilities for creative ideas.

5. Venture out in Inclement Weather
Weather conditions can change the appearance of a landscape dramatically, so if you choose to photograph an outdoor area only in ‘nice’ weather you are seeing only one side of its personality—and you are also likely to be photographing the same type of weather that is most often photographed in that area. Rain and snow can produce very expressive images, lending a sense of magic or mystery that is rare to find on sunny days. Storms are also the precursors to beautiful ephemera such as rainbows and mist, both of which tend to form just as a storm is clearing. Very often the only way to catch beautiful post-storm light or conditions is to venture out while rain or snow is still falling so that you can be in position as the edge of the storm reaches your location.

6. Allow for an Element of Mystery
Some nature photographs are especially compelling because they hide more than they show. When the subject of a photo is partially obscured or abstracted, the viewer’s imagination is engaged far more than it is when everything in a scene is laid bare. Not every feature of nature is more interesting when shown in its larger context, and not all scenes benefit from a clear sense of scale. On the contrary, thick fog, dark shadows, tight framing, or a thick coating of snow can all add more than they take away by making viewers imagine what is not visible or by inviting the viewer to ponder what they are seeing.

7. Be Patient
Oftentimes the best ideas come from unexpected moments of seeing, rather than from predictable circumstances. Nonetheless, those flashes of inspiration can be the seeds of a longer process that could involve some planning or predicting. When a spontaneous vision strikes, definitely try to take advantage of the moment with a camera if possible, but keep that idea in mind for a future photograph as well. Ask yourself what the fullest expression of that idea might be and try to make it happen—keep the creativity flowing and experiment with variations on the theme. Would the idea work better in a different environment, at a different time of year, or in different weather?
This thought process is a great way to stay creative when you are not able to go outside with your camera and can lead to more rewarding photographs when you finally get the chance to put your ideas into action.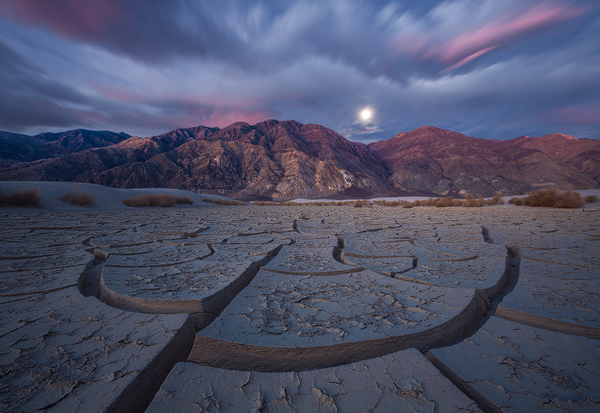
Erin Babnik is known internationally as a leading photographic artist, educator, author, and speaker. Her expressive style of landscape photography was born out of an unusual integration of progressive techniques and a classical education in the arts. She currently splits her time between offices on two continents and teaches photography workshops worldwide.
You can find Erin on social media:
Instagram: Instagram.com/erinbabnik
Facebook: www.facebook.com/babnikphoto
Website: www.erinbabnik.com


![]()
Get the Latest Photo Tips, News & Reviews from Shutterbug!
| Camera Reviews Other Reviews | Mobile Reviews Photography Reviews Columns | News | Features | How-To | Resources |
 © 2025 Shutterbug
AVTech Media Americas Inc., USA
All rights reserved