Archiving For The Digital Studio
Protecting Your Images In The Digital Age

When I pull out a 3-year-old CD-ROM it always has an index print inside the jewel case. Now I have at least a fighting chance of figuring out what I have on the disk.

How important are your negatives and transparencies? Do you have them neatly arranged in archival pages, or strewn all over your living room floor? Even if you're not a terribly organized person you realize the importance of the processed 
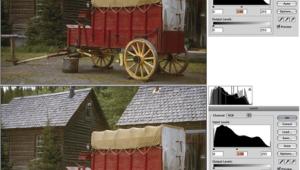
film you've shot. While I've certainly lost film over the years and had some precious negatives destroyed by water damage, by and large I have carefully preserved almost all of my work. Stuff I shot in the 1970s is still clean and ready to pull a new print, if I need to.

So now the '70s have faded, the new millennium is here and I find myself shooting more and more with a digital camera. Whether I'm shooting with my high-res digital back in the studio, a Canon D30 on location, or a little point-and-shoot digicam on vacation, the information I save on my computer's hard drive is all I've got. If the hard drive crashes, is damaged, or even if the computer is stolen, those images are gone forever.

To carefully archive negatives and transparencies there are any number of solutions. I have catalogs filled with any number of archiving products, from acid-free boxes to stainless steel fireproof cabinets. What to do if your "negative" is made up of zeroes and ones?

Green disks are archive disks, yellow disks are client work. I make sure I burn one of each for every finished job, and I always know to save the green ones.

The Master Digital File
The first step is to respect the integrity of the file. In previous articles and in seminars I've given I always stress the importance of treating the file downloaded from your camera as the "Master." That means, to me at least, that I always shoot every device set to maximum resolution. If there is a "raw" file option I always shoot in Raw mode. I save all of the files to the hard drive of my main studio computer, then immediately create an archived back-up of the folder. Now I can do whatever I want with the files, confident that the "digital negatives" are safe.
Working on an image in a program like Adobe Photoshop also involves a series of choices. I like to save a Photoshop file when I'm at the "deepest" level. In other words, when I have the most layers, the most information on screen. While this creates monstrous files, I always know that if a client wants one object moved a little bit to the left I don't have to recreate the whole thing.

Tankards. Most of Roger Hicks' fine prints are contact prints on Printing Out Paper (POP). This is a 4x5" negative printed with a generous border. An enlargement just wouldn't have the same feeling.

Safe & Affordable Storage
OK, we all know that we need to save this stuff and somehow create a bulletproof archive. How to do it safely and inexpensively? Obviously CD-ROMs have become the preferred format, especially as the price of drives and disks have fallen. I started to archive to CDs about four years ago with a 1x burner and $6 disks. Today I have a 16x burner and 20 cent CDs. A cautionary tale though: almost all of the original CDs I burned years ago cannot be read by most CD readers. While the disks are compatible, early CDRs had a deep blue color, and newer, faster drives have much dimmer lasers. Bottom line is they can't read the disks. Luckily for me I have a couple of older Macintosh computers lying around with original CD drives, and I have been able to burn fresh copies of almost all of the disks. However, some of the disks just don't work anymore. One way to ensure that newer disks will work on almost all machines is to burn them slow. When disks are burned fast there are inevitably some errors that are corrected by the machine. Burning slower introduces fewer errors, and forces the CD reader to do less error correcting.

My original archiving regimen was to save everything onto Iomega Jaz cartridges. At $100 for 1GB they're about the most expensive way to archive, but I've been too lazy to wipe those disks clean and do something with them, and I've been able to salvage lots of images from the Jaz disks that were lost on the early CDs.

On the road I'm even more paranoid. I travel with a notebook computer with a fat hard drive, an 18GB USB hard drive (the little blue thing) and a Sony USB portable CD-ROM burner. Now I can save and archive stuff as I create it, even in a hotel room.

Make Sense Of It All
Once you begin a CD archiving program you need to keep some things in mind. First of all there is the matter of order. It makes little sense to haphazardly dump files onto disks as your hard drive gets filled. I like to organize my CDs into three categories:
* "Camera Files," which are raw, untouched images straight from the
capture device.
* "Working Files," which are images adjusted for contrast and density, converted into 24-bit RGB files, but otherwise untouched.
* "Client Files," which is my generic term for all finished files. This is usually my CMYK disk, but for personal work these are the finished images ready to go to the service bureau or to the Epson printer on my desk.
To instantly tell which files are which I color-code my disks. Green disks are Camera Files, red disks are Working Files, and yellow disks are Client Files. After I burn the disks I store them in individual jewel boxes, and I print out a comprehensive index of all of the files, printed using Extensis Portfolio 5.0. I fold up the index prints and stick them in the jewel boxes so I can instantly figure out what's on the disk.

To organize the disks I simply start at number one. Each new disk gets a new number, and I keep a loose-leaf binder with duplicate index prints, each labeled with the number of the disk that the images are on. Now, when I'm looking for an image I can browse through my index prints, look at the thumbnails and pull the CD that holds the images. I also date the disks, not with the date that I burned the CD but with the date range that correlates to when I shot the images. This often helps me figure out where an image is. I may forget a lot, but I usually remember if I shot something in August or November of a particular year. When I'm really lost finding a Client file I can reference the invoice date and get a head start on my search. Once I have my archive disks I store them in a big fireproof safe I got at a used office furniture store. Now I'm somewhat protected in case of theft, fire, or flood.

Getting To Them
Of course, nothing is perfect, and there is also something to be said for having your files at your fingertips. In my case I have thousands of gigabytes (terabytes) of files. How can you possibly keep all of those files at your fingertips? Well it certainly is possible, and recently just got cheaper. The technology used to link several hard drives together is called a RAID array, and it makes a group of separate drives look like one big drive. Just a few years ago a 100GB RAID array could cost tens of thousands of dollars. Today you can assemble a 240GB RAID array using inexpensive IDE drives for several hundred dollars. I assembled a very large disk array using 100GB IDE drives for very short money that handles thousands of digital images. While I'm safe in the knowledge that these files are all archived to CD-ROM, I also know that a fully functional archive of all of the images is available for instant use. It's an incredible luxury that really makes the whole "digital darkroom" concept a pleasure.

On The Road
One of the most important issues that all new digital photographers run into is the concept of "temporary archiving," especially when shooting away from home. Where do you store all of your camera files as you fill up CompactFlash cards? For me the answer is a redundant, and a little paranoid, system of copying and recopying files. Everything I shoot with a digital camera when on location is saved onto the CompactFlash card. I use 340MB Microdrives and I have a bunch of them. I never reformat the drives when in the field. I use the actual Microdrive as my first archive.

As I fill up the drives I copy them to a folder on my Compaq Armada notebook computer. When all of the Microdrives are shot or the job is over I pause to copy all of the files onto an 18GB USB hard drive that I carry with me. Now I have three separate copies of the files.

In many cases I will go back to the hotel and do a rough edit of the files, creating a new folder of good images. This folder then gets burned to two separate CD-ROMs. (Yes, I travel with a CD burner.) If it's a big money job I'll head for the airport, taking care to drop one of the CDs into a FedEx drop box along the way. Now if some sort of catastrophe occurs and my gear is destroyed (but I survive), a fresh CD with usable files will be waiting for me at the studio when I return. Overkill? Sure, but with CDs so cheap it pays to have the extra bit of insurance.

Done Jobs
What about archiving your finished work? By finished I mean digital files that have all of your editing done and even prints. For true archival printing I'm not sure I'm totally convinced of the durability of ink jet prints. While I do own an Epson 2000P and print a lot of my work on it, I send all of my really important work out for either Lightjet or traditional photo prints. Online services like ez prints and Ofoto make it too easy to do all of this from my desk, so there's really no excuse. I make it a point to have a $3 8x10 printed of every finished Client file. This way I not only have an excellent representation of the finished file, I have another physical object that can be stored and cared for. In addition I have a print of all of my client work, so I can throw together a portfolio of new work in a snap. The chances are that the print will degrade faster than the CD, but who knows.

Keep It Fresh
As technology advances you'll need to continuously maintain your archive. I took all of my Syquest cartridges and converted the data on them into Jaz cartridges. The Jaz disks got dumped onto early CDs, and now those disks have been burned once again onto newer CDs. I'm sure at some point next year I'll be dumping all of those files onto DVD disks, once that technology gets a little cheaper. When the replacement for DVD disks is there, I'll be rolling everything over once again. I realize that this seems like a ton of work, but in my eyes it's better than losing your photos.

One last word on the subject. Never, and I mean never, rely on an archiving strategy that leaves the data in your computer. By this I mean a back-up tape or cartridge that stays in the machine. I had some computer equipment stolen last year and lost lots of Client files and some irreplaceable digital pictures of my children. Never again, I swore, and now I have a pretty bulletproof archive.

If you have a machine at work and one at home then by all means go get a big hard drive and make an archived copy for your other machine. It's easy: just set the new drive as your slave drive, install it in your main machine, copy everything you need, then install the drive in the other machine as a slave. Besides the fact that Photoshop really likes a slave disk as a scratch disk, you now have a perfect copy of your digital files, and a roomy new disk for new storage. With new IDE hard drives in sizes up to 100GB, this kind of storage should be within everyone's reach.

The bottom line when it comes to digital files: be very, very careful. Make lots of copies, store everything safely, and leave yourself a clear "road map" so you can find everything. While every working digital photographer should have very large disk arrays filled with images, there is nothing as comforting as knowing that a copy of everything is safely sleeping in the fireproof safe!

X