- REVIEWS
Camera Reviews 
More Reviews Mobile Reviews Photography Reviews - GALLERIES
- VIDEOS
- BUYER'S GUIDES
Using a Polarizing Filter to Shoot Photos with Maximum Impact (VIDEO)

Today were going to discuss a tool that many experienced landscape shooters consider the pound-for-pound champion of photographic accessories, and it's the dollar-for-dollar champ too. If your guess is the affordable polarizing filter, you just scored a knockout.
This quick tutorial from The AI Photo Guy demystifies the concept of this powerful tool that many outdoor photographers never leave home without. A simple twist of the filter's rotating ring is just about all it takes to transform a good photo into a great one. And the proper technique only takes two minutes to explain.
This "essential" filter is particularly beneficial for landscape, nature, and architectural photography. It works by blocking certain detrimental light waves and contributes to capturing photos with vivid colors, while darkening pale blue skies. As today's instructor says, "the polarizing filter is a versatile accessory that helps minimize glare, improve contrast, and increase overall saturation in photos and videos."

High quality polarizing filters are sufficiently economical, so don't make a mistake of saving a few bucks by cheaping out with a bargain purchase. Otherwise you run the risk of degrading image quality. This video discusses the different types of polarizing filters on the market so that you can make an informed choice that suits your specific needs.
By viewing side-by-side comparisons of images shot with and without this amazing tool you'll immediately understand the tremendous impact the filter makes. The effects are more and more pronounced as you rotate the front ring, and you don't always want to take things to the extreme. When dealing with reflections, for example, it's usually preferable to not remove them completely—otherwise you may end up with a dead-looking image.
Throughout this visual guide you learn about other technical considerations that impact the degree to which a polarizer delivers the goods. These include variables that contribute to maximum creative control, like your position relative to the angle of the sun, as well as a few pitfalls to avoid.
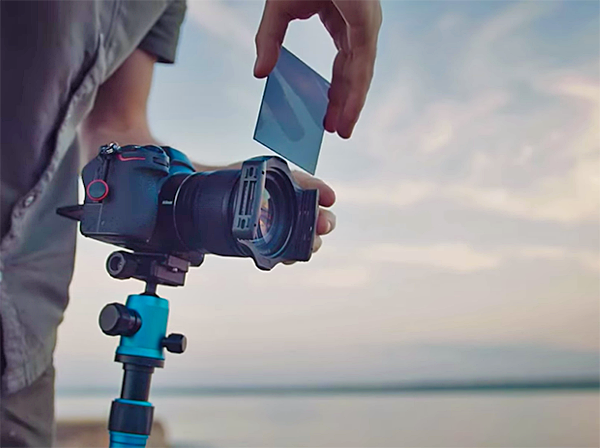
Polarizing filters come it two basic varieties, the most common are those that simply thread onto the front of a lens. One way to economize without penalty if you take this approach is to buy a few cheap step-up adapter rings the enable you to mount the same filter on lenses of different diameters—so you don't have to by individual filters for every lens you use in the field.
Another viable option involves filters that mount to a purpose-built holder that is then attached to the lens. These are some more cumbersome, but they typically come with a set of adapters of various sizes and will accommodate a wide variety lenses and other filters.
There's much more to learn about shooting techniques and photo gear on The AI Photo Guy's popular YouTube channel, so be sure to pay a visit.
And when it comes to editing the vibrant landscape photos you shoot, we suggest checking out a tutorial we posted recently that explains why Selective exposure adjustments with simple masks can be the key to stunning nature and landscape photographs.


![]()
Get the Latest Photo Tips, News & Reviews from Shutterbug!
| Camera Reviews Other Reviews | Mobile Reviews Photography Reviews Columns | News | Features | How-To | Resources |
 © 2025 Shutterbug
AVTech Media Americas Inc., USA
All rights reserved