Ten Steps To Striking Selective Color; Combine A Touch Of Color With Black & White For Unique Visual Drama

Photos © 2003, Howard Millard, All Rights Reserved

Are you looking for a way to make your digital photos really stand out? Starting with one of your existing color shots, here's a great way to create a dynamic new image that will really catch your viewer's eye. By combining a black and white image with spots of color, you'll add compelling contrasts and visual drama. Here's how to do it in just 10 steps.

1. Open your color photo, in Adobe Photoshop Elements 2, or other image-editing programs.
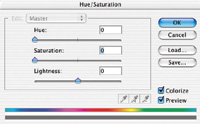
2. From the Menu bar across the top of the screen, choose Layer>Duplicate Layer. This adds a new "Background copy" layer above your original Background layer.

3. Now, Choose Layer>New Adjustment Layer>Hue/Saturation. We'll use this adjustment layer to remove color.

To remove color, I added a Background copy layer and then grouped a Hue/Saturation adjustment layer with it. In the Hue/Saturation dialog, I ticked both the Colorize and Preview check boxes at the lower right, then moved the Saturation slider all the way to the left. This drains the color from the copy layer so it is now black and white only.

4. In the Hue/Saturation dialog, tick both the Colorize and Preview check boxes at the lower right, then move the Saturation slider all the way to the left. As you do, you'll see that all the color is drained from your picture. It's now black and white only.

5. Choose Layer>Group with Previous so that the color is removed only from the Background copy layer.

6. Click on the tab for the Layers palette to open it. Then, click on the "Background copy" layer to make it the active layer.

7. Next, select the Eraser from the toolbox and choose a size and opacity from the options bar at the top of the screen. Use a small eraser brush for fine details, a larger brush for broad areas. You can change the brush size by pressing the left and right bracket keys, "[" and "]". Pressing the left bracket key makes the brush smaller while pressing the right bracket key makes it larger. For details, zoom in on an area and use a small brush.

Clicking on the lab for the Layers palette will open it. Then, I clicked on the Background copy layer to activate it, as shown here.

8. Now, we're going to selectively erase parts of the black and white "Background copy" layer so that the color from the original image--the Background in the Layers palette--shows through. The opacity determines how strong the eraser effect is. For more subtle color, and to work in stages, use a lower opacity setting, such as 30-50 percent. For the brightest color to show through with one pass of the eraser brush, use 100 percent. I recommend using a lower setting and building up color gradually, in steps, by brushing over an area more than once when you want brighter color. If you make a mistake, use Undo and try again. For multiple undos, use the History palette in Photoshop, the Undo History palette in Elements.

9. Pick only a few key elements to color, with strong or readily identifiable shapes. That way, they will clearly stand out against the monochrome background. Furthermore, think about composition and whether you want a bit of color in only one area, or in several areas. You can create either balance or dynamic tension. Also, consider whether your image works best with bright or subtle color.

Using the eraser tool on selected areas of the Background copy layer allows the color from the original image (Background layer) to selectively show through. I chose to selectively color only the two roses and the gilt cover of the menu.

10. When you're satisfied with your work, save two copies of it. Save one in the native Photoshop and Elements .psd format, which preserves layers, in case you want to make changes later. For printing or use on the web, make a duplicate (Image>Duplicate) and flatten it, Layer>Flatten Image, then save it with a different name so you know which copy has layers and which does not.

When printing these selectively tinted images, I like to use a heavy fine art digital photo paper, such as the lightly textured Classic Velour from Luminos. Using the setting for Matte Paper Heavyweight on my Epson 1280 and 2200 printers, the result is a rich fine art print with quite accurate color.

Now, in 10 relatively easy steps, you've created a selectively colored photo, adding a totally new mood to your image and creating a striking new look.

This original was shot in the studio on 35mm slide film, then scanned on the Minolta DiMAGE Scan Elite 5400. Model: Heidi McAllister.

Using the technique described in the text, I used the Eraser tool at about 30 percent opacity to create a soft and subtle hand-tinted look. Model: Heidi McAllister.

My original 35mm slide shot in the studio was scanned on the Minolta DiMAGE Scan Elite 5400. Model: Alyson Radding.

Using the technique described in the text, I first removed all color from the photo. Then I "erased" it back in only the mirror area, making several passes with a 50 percent opacity brush for saturated color. Model: Alyson Radding.

X