- REVIEWS
Camera Reviews 
More Reviews Mobile Reviews Photography Reviews - GALLERIES
- VIDEOS
- BUYER'S GUIDES
Send Your Photographic Spirits Flying: Aviation Photography, Made Easy

All Photos © Moose Peterson

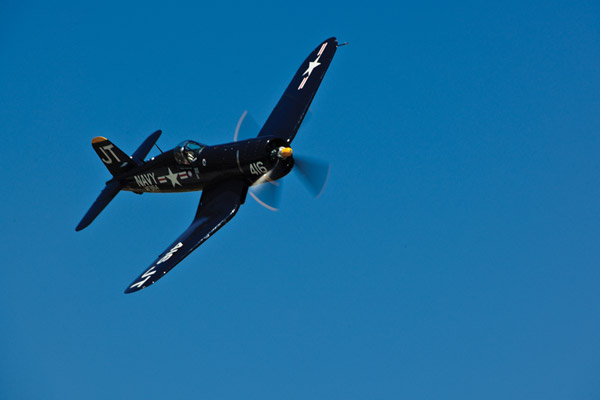
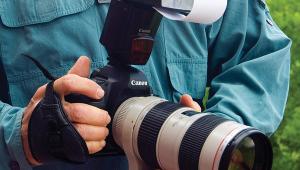
You can get involved with minimal camera gear. How minimal? All you need is a body and one lens. What you’re looking for is a camera that does at least 5 fps and lens focal length of 200-300mm. My basic setup is the Nikon D3x with 200-400VRII for static and ground to air photography. I often take my images to gallery print size of 24x30” or larger and for that, my clients love being able to count the rivets on the wings. Most of the shooters you find doing aviation photography use a 70-300mm or 100-400mm.
This is the basic set-up for when your feet are on the ground shooting at air shows for example. You take to the air to do what’s called air to air photography, and the equipment gets even simpler. The principle lens here is the 70-200mm. I depend on the Nikkor 70-200VRII and 24-120VR for all my air to air work (and 16mm for the hero shot).


The best place to get started is air shows. They are performed all across the country nearly all year long (you can find the nearest one to you at www.airshowbuzz.com). Nearly all have demonstrations along with aerobatic flights. This is where you start practicing and polishing your photography. The first thing you’re going to learn is you have to be proficient at panning. In brief, you follow your subject through the viewfinder by twisting at the trunk (using proper handholding technique, as tripods are a hassle at air shows) and making sure you follow through panning until the camera is no longer firing. We’re talking about photographing objects at close range that are going 200-500mph!
I wish there was an air show every weekend in our town, but such is not the case. The Reno Air Races (www.airrace.org) is the grandest of them all. There are many great air museums around the country that often do monthly flight demos where you can practice: Planes of Fame Air Museum (www.planesoffame.org), Palm Springs Air Museum (www.air-museum.org) in California and Fantasy of Flight (www.fantasyofflight.com) in Florida. These are great places to not only photograph planes but also learn more about them and those brave service folks who flew them during conflicts. The more you know about any subject the better your photographs will be.
Some Basic Techniques
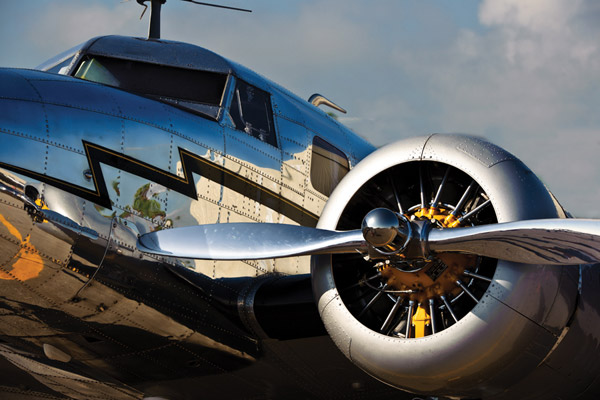
First and foremost is the light. Getting to air shows at the crack of dawn to photograph the static displays is simply magical. Not only is the light great and the subjects killer, but you often meet those involved with the aircraft. With a little conversation, you’ll often find yourself invited behind any ropes, up close and personal with the aircraft.
Don’t be scared of noon light because you’re going to shoot in a lot in it. Most of the flights are in “hard” or “bad” light, but you can still make great images. The problem often is the sky. If you have blue skies, I highly recommend using exposure compensation. I normally shoot at -.7 but as the sun climbs up I go to -1 to deepen the blue. What if you have overcast skies? That’s the least optimal working condition, sorry to say. Just like birds, shooting flight against gray is a no-win situation because of the contrast range between subject and background. You don’t stop shooting, but realize you won’t have the best possible images.
Now here’s the biggest tip for aviation photographers—watch your shutter speed. With prop planes, you don’t want to freeze the prop. That makes the plane look like a model hanging from the ceiling on a string. You need that prop blurred, which requires a shutter speed typically of 1/250 or less. This is the one venue where I leave Aperture Priority alone and turn to Shutter Priority. In Shutter Priority, if I see a T6 Texan coming, I switch the shutter speed to 1/180; for an F4U-4 Corsair, it’s 1/90; and for some of the smaller exhibition planes, it’s 1/30 to get a good prop blur. When the jets take to the air, since they don’t have props I set the shutter speed to 1/1500 and take a breath of relief!


Beyond The Basics
There are a couple of pointers I want to pass along that I’ve learned. The first one is remember that even though you are photographing speeding metal sculptures, bringing life to them in your photographs will grab the imagination of the viewer. This is a universal approach that fits all facets of photography, including aviation.
How do you do that? You are photographing flight, so your photographs need to say flying. We’ve already talked about using Shutter Speed to avoid the “model on a string” look, but take it further in your photography. Placement of the subject in the frame is really important. Planes dive, climb, bank, land and soar in real life, as they should in your photographs. Many shoot with their camera level to the earth. Don’t do that with your aviation photography! Planes naturally point up in level flight, its part of the flying process. If you level out the plane in your viewfinder to communicate speed, the camera will not be level with the earth. You’d be surprised the change that plane attitude makes in the perception of flight. If the plane is flying level, you can turn your camera either direction to make it look like its climbing or landing. It’s all up to you and what you want to communicate about flight.
Backgrounds are everything in aviation photography. The least desirable is a clean blue sky and the most desirable are clouds. The background not only gives the plane a place to be but also helps communicate flight and speed. And the most important thing a great background brings to the photograph is the romance of flight.
There is much more to aviation photography, but these basics are all you need to get started and seeing some great results. While they might be just “metal” you will find the planes, along with those who work and fly them, have character and soul that make for great stories that you can tell visually. Take aviation photography for a test flight and you’ll surprise yourself. When you see that first image appear on your LCD or printer of that aircraft in flight, you’ll send your photographic spirits flying.


![]()
Get the Latest Photo Tips, News & Reviews from Shutterbug!
| Camera Reviews Other Reviews | Mobile Reviews Photography Reviews Columns | News | Features | How-To | Resources |
 © 2025 Shutterbug
AVTech Media Americas Inc., USA
All rights reserved