- REVIEWS
Camera Reviews 
More Reviews Mobile Reviews Photography Reviews - GALLERIES
- VIDEOS
- BUYER'S GUIDES
Organic Imaging: An Easier Road To Photo Editing?
While some, like me, like to spend hours working on an image in their digital darkroom, quite a few photographers express a desire to process photographs into good-quality digital files with as little effort as possible without having to learn a new technique or software. For those who don’t find it fun and the rewards too hard to come by, a company in Europe called Elpical may have an answer.

Elpical has been in the business of providing inexpensive editing of digital images for publication to large media companies. Their automatic image-editing software, dubbed Organic Imaging, is now available to individuals. You can try it by going to www.organicimaging.com and downloading the application. The first 250 images processed are free. You then pay a modest fee for processing more images with a credit card or through PayPal (under 10 cents Euro—or 12.5 cents USD each—for up to 5000 images per month).
How does it work? John de Jong, the president of Elpical in The Netherlands, sent me an e-mail that detailed the software’s development. In short, their software combines the numerical information in an image file with a pixel pattern that describes the content of the image, which results in assumptions about how to adjust the image file. Maybe this is why they call it “Organic.” The software mimics what a photographer might see and think when looking at a photo on screen, and thereby is able to “know” what needs to be fixed to make the image closer to what the scene was in nature.
Using Organic Imaging
I began my testing with a beta version of Organic Imaging, which for all practical purposes matches the final release. I began with a folder of nine high-resolution, 12x18”, 300ppi photographs in TIFF file format. These files were all individually edited files that I determined were print ready; they’d been refined and cleaned, then tweaked as I usually do at the end of my workflow in Photoshop. Once processed by Organic Imaging, no significant changes in image quality were evident in the newly processed images. This was a positive result—Organic Imaging recognized that the images were already as good as they could be. I know this is a positive result because with any image-editing automatic adjustments I have tried before, many of the files would have been adversely adjusted, actually reducing the image quality of the quality file I had produced.


All Photos © David B. Brooks
My next set of tests was to make a selection of 12 35mm slides of as difficult to adjust and edit subjects manually as I have, mostly old images that have been published in magazines or books some time ago. I scanned them with my Plustek 7600i to get 64-bit Raw files (including the infrared channel for cleaning). Then I opened each of these files with SilverFast HDR and ran the iSRD image cleaning, and without any further adjustments saved each as a Raw 16-bit RGB TIFF file.
From this set of 16-bit Raw files I processed each using Photoshop’s Image/Adjust/Auto Levels-Contrast-Color and then saved the resulting image as an 8-bit RGB file. I then moved on and used Organic Imaging set at its original defaults by dragging the entire folder of 12 Raw TIFF files to its “receptor.” Then, after actuating the Organic Flow process, some minutes later I recovered the finished 8-bit RGB TIFF files Organic Imaging had processed. Finally, I went back to SilverFast HDR and individually adjusted and edited each of the 12 Raw files, and saved each as an 8-bit RGB file.
As is my usual, I opened each of these finished files in Photoshop and checked each for flaws and marks that iSRD had not detected and cleaned, and if necessary tweaked some small global changes to refine the image to my liking. This provided a set of four images of each of the 12 original 35mm scans I could look at on screen and compare.
After working on the beta for some time a final release version became available, so I installed it. I then moved on to working with some Canon EOS 5D Raw files to see what Organic Imaging could do. For comparison I used Canon’s Digital Photo Professional software to convert the Canon 5D Raw files into 16-bit TIFF files and put them into a folder. I opened Organic Imaging and created a new Flow and dragged the folder of 5D 16-bit TIFF files into Organic. Using the default adjustment settings, the processed files were output as 8-bit RGB finished files.
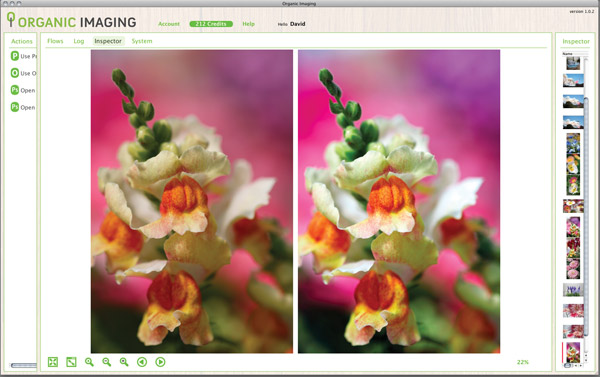
So, now that I had a set of digital camera Raw files converted to TIFF, I could compare them to the automated Organic Imaging finished images. I did so by opening the finished files with Photoshop to see if any further adjustments were needed to make the images ideal on screen. You can see the results of my tests in the accompanying illustrations.
Flow And Setup
The Organic Imaging application is quite distinct in design from any other application I have ever used. It is easy in large part thanks to an on-screen process that is well directed, with on-screen instructions with each step. The entire installation setup and use of the Organic Imaging application is thoroughly documented and easy to read in an Acrobat PDF manual that is included with the download and installation. This includes a clear, step-by-step section in the manual, as well as on-screen guides as to how the Settings control the process of image enhancement and allow each factor to be adjusted to either a particular set of photographs or a preferred or stylized result.
It is important to realize that Organic Imaging is not “dictatorial” but can accommodate a variety of images and users as well as different kinds of results in most standard file formats. It can be used without color management by setting the process for JPEG input or output and running in sRGB color space. But it will also handle high-bit input and output that is controlled by broader, more specific color profiles like Adobe RGB (1998).

Evaluation And Recommendation
Over the last two decades I have used, tested, and reported on countless image-editing applications. Most have had some kind of automated image adjustment, which have never worked well enough for me to say anything positive about them or recommend their use; I usually just pass over the subject and say nothing. (There is one exception you will find in every Adobe application from Elements, through Lightroom and Photoshop, and it is the Automatic Levels adjustment. If you are doing manual image editing, adjusting all of the values that need it, reducing noise, sharpening, etc., the Levels adjustment is the first and most essential step to a finished photograph.)
The reason auto color and tonal adjustments don’t usually work is that the application does not know what kind of image you are looking at on screen, whether it is a face or a bicycle, whether it is a white rabbit in a snow storm or a black cat in a coal bin. So, relative to the subject photographed, the auto adjustment may be inappropriate—just wrong for the picture.
Organic Imaging software is based on over a decade of processing and collecting image information from millions, probably billions, of pictures, so it can make pretty accurate assumptions of what kind of picture is being processed and then apply the right adjustments. My very limited testing provided very good-quality image adjustment and refinement of all the attributes of color, tone, and sharpness, everything I adjust for manually in my editing work. Comparing my manual results and Organic Imaging processing, I did find that my own work better suits my expectations; however, on the whole, very little tweaking of Organic Imaging results was required (and sometimes none were needed) to obtain a very good, ready-to-print image file.
Considering there is no cost and little time and trouble to download and try Organic Imaging, and you get the first 250 images processed free, you might want to give it a thorough tryout. I would use it in the future myself, but for me manual photographic image editing and enhancement is fun and an enjoyable, satisfying use of my time and energy. If it’s the same for you, you might want to try it out for fun as well. Perhaps, like me, you’ll continue to use Organic Imaging to explore all its capabilities and learn more from it.
For more information about Organic Imaging, visit www.organicimaging.com.


![]()
Get the Latest Photo Tips, News & Reviews from Shutterbug!
| Camera Reviews Other Reviews | Mobile Reviews Photography Reviews Columns | News | Features | How-To | Resources |
 © 2025 Shutterbug
AVTech Media Americas Inc., USA
All rights reserved