- REVIEWS
Camera Reviews 
More Reviews Mobile Reviews Photography Reviews - GALLERIES
- VIDEOS
- BUYER'S GUIDES
Midtone Contrast: A Super-Simple Editing Trick with Huge Results (VIDEO)

The quick video below is one of those "I wish I knew this before" tutorials with a super-simple technique for enhancing photos in a way that's almost too good to believe. It works in both Lightroom and Photoshop, takes barely 10 minutes to learn, and you can start using it today.
What we're talking about is Midtone Contrast, a remarkably versatile method with several important benefits that provides a big boost to your workflow when editing all sorts of images. With this approach you can enhance detail and definition, reduce the appearance of haze, and even refine exposure and tones.
Instructor Nickolas Warner is a respected outdoor photographer who travels the globe in a quest to capture breathtaking photographs. He always edits his work with Midtone Contrast in mind, and you will too after learning how the technique works. As the name implies, this method enables you to selectively add contrast to only the midtones of an image.
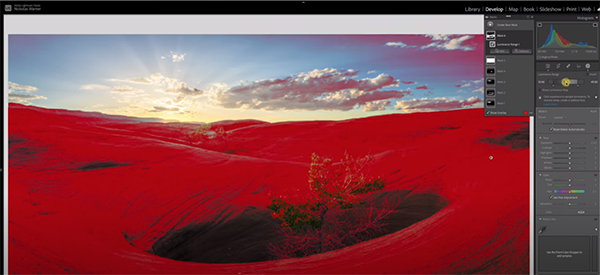
In basic terms, this technique essentially uses a Luminosity mask to target midtones, and then lets you bump up that variable in areas where it's lacking, without affecting the rest of the shot. As with other selective adjustments, this one provides superior results than using a global approach.
As you'll see, this technique is particularly useful for fixing photos with highlights that are almost blown out, or those with dark areas that are close to being clipped. As Warner explains, "By targeting just the midtones you can add contrast to a photo without making the whites and blacks even worse."
Warner pulls up a few gorgeous landscape photos with common problems. The can all benefit from a bit more contrast and texture, but areas in the sky near the sun are already so bright that they'd be totally devoid of detail if contrast is added in the traditional way. It's the same thing for the shadows in reverse.

The simple solution takes place in the Masking panel where Warner creates a selection based off the Luminance range. Then it's a simple matter to enhance contrast by targeting just the midtones of the shot. As he moves the slider to the right, even all the way to 100%, both the highlights and shadows are protected.
The result is a photo with much more impact, that still retains a subtle, smooth, and natural look. While this quick technique works quite well in Lightroom, Warner explains why he prefers to get the job done in Photoshop if you happen to have both programs.
Warner's instructional YouTube channel is full of straightforward lessons like this sone, so be sure to pay a visit when you have time.
And don't miss our earlier post with a compete guide to Lightroom's Tone Curve tools for photographers of all skill levels.


![]()
Get the Latest Photo Tips, News & Reviews from Shutterbug!
| Camera Reviews Other Reviews | Mobile Reviews Photography Reviews Columns | News | Features | How-To | Resources |
 © 2025 Shutterbug
AVTech Media Americas Inc., USA
All rights reserved