- REVIEWS
Camera Reviews 
More Reviews Mobile Reviews Photography Reviews - GALLERIES
- VIDEOS
- BUYER'S GUIDES
How to Maximize the DYNAMIC RANGE of Your Photos (VIDEO)

Dynamic Range is one of the most important photography concepts to understand, both with regard to a camera's capabilities and how you edit your work. Some shooters don't know exactly what the term means, but just about everyone knows they want more.
According to our friends at Adobe, "Dynamic Range describes the ratio between the brightest and darkest parts of an image—from pure black to the brightest white." The maximum range of tones captured varies from camera to camera, but even the best pro models capture only half as much range as the human eye.
Insufficient Dynamic Range is a particular challenge when shooting in environments of high contrast. Expose for the highlights and shadows are crushed; expose for the shadows and highlights are blown out and devoid of detail. So, what's one to do?
Instructor James Feaver make this promise: "In today's video I'm going to show you how to dramatically increase the Dynamic Range of your photos in Lightroom." The technique he describes is called Exposure Stacking, and it's easy enough for anyone to accomplish—which is why it takes barely five minutes to explain.
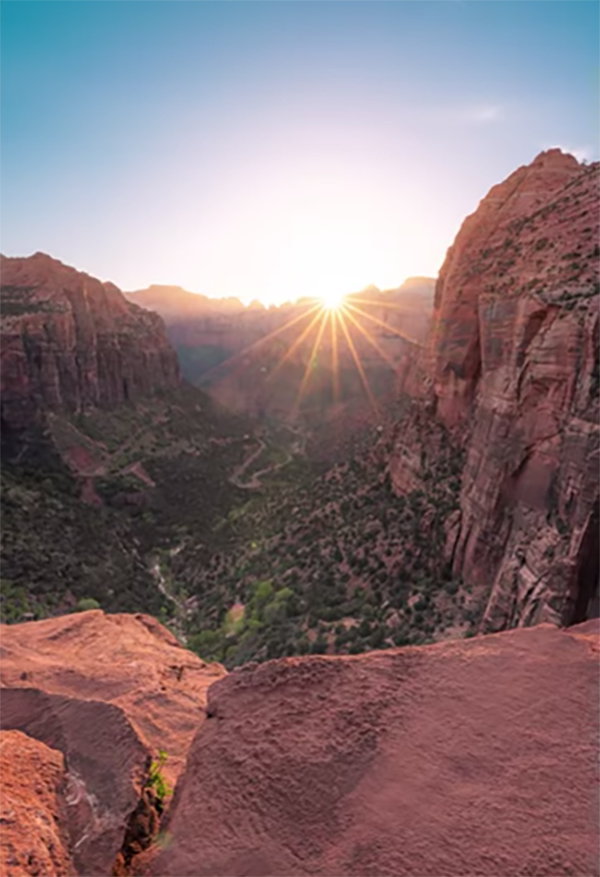
In basic terms, all you have to do is take multiple shots of the same scene, each at a different exposure setting, and then merge them in Lightroom to create one image with expansive and balanced tones. Most times three shots are all that's required, but in this lesson Feaver works with five.
The typical approach when working with three images is to capture one with a "correct" exposure, another that's a stop under, and a third that’s overexposed by one stop. As you'll see, Feaver's five-step process just adds a bit more detail to the highlights and shadows.
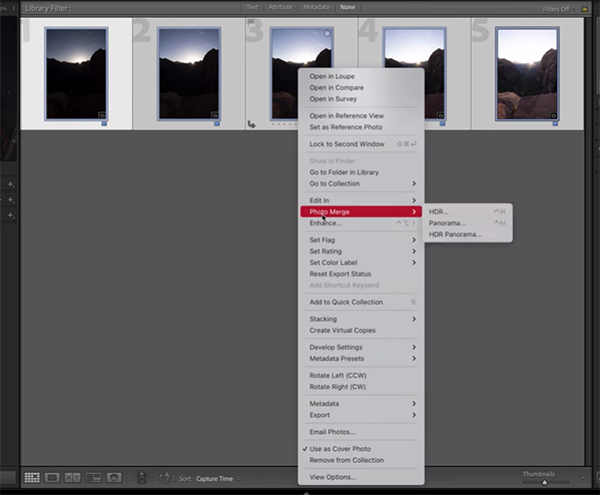
Once you select all the images in your sequence, simply right-click and choose the Merge option in a dropdown that appears (there's also an option for creating a panorama). Then a dialog box will appear with a variety of settings, and Feaver explains exactly what they do. He recommends that you always enable "Auto Align."
There's also a De-Ghosting amount setting that's particularly useful when there are moving objects within your scene. This help a avoid "semi-transparent pixels" one the images are stacked. Mounting your camera on a tripod will also make the process more precise.
The merging process itself is super simple, and Feaver walks you through the straightforward step. The technique is not only fast and effective, but it's also sort of fun. Be sure to visit Feaver's instructional YouTube channel where there's much more to learn.
And don't miss the earlier tutorial we featured with another post-processing expert who demonstrates how to use Lightroom's Presence sliders to create photographs with greater impact.


![]()
Get the Latest Photo Tips, News & Reviews from Shutterbug!
| Camera Reviews Other Reviews | Mobile Reviews Photography Reviews Columns | News | Features | How-To | Resources |
 © 2025 Shutterbug
AVTech Media Americas Inc., USA
All rights reserved