This is a good review. However, something even more informative would be a comparison of these products with the ones generally regarded as the industry leaders, Photomatix and Nik HDR Efex Pro. I've been shooting for HDR since 2005 and started with Photomatix, which I still use occasionally. However, my default tonemapping program has become Nik's HDR Efex Pro. I think it would help many readers to get a better grip on HDR to have an in-depth comparison of the leading products.
- REVIEWS
Camera Reviews 
More Reviews Mobile Reviews Photography Reviews - GALLERIES
- VIDEOS
- BUYER'S GUIDES
HDR Expose 2 And 32 Float v2 Plug-In: When You’re Serious About HDR
Attempting to make the HDR process more user-friendly, the newly updated HDR Expose and Photoshop-dedicated plug-in 32 Float, now both in Version 2, largely share the same features and enhancements. As I see it, the improvements center mainly on workflow—reason enough to upgrade, in my opinion, and reason enough to consider these as serious tools for HDR work. Both are available from Unified Color Technologies.

Courtesy of Unified Color Technologies
HDR Expose 2 can be used as a stand-alone application as well as an Adobe Lightroom or Apple Aperture plug-in. Using it as a plug-in gives you tighter, more direct control over which images constitute the merged file. What’s more, Expose 2 gives you the option to create HDR images directly from Raw files.
Its alter ego, as it were, 32 Float v2 is one of a few applications to work with 32-bit images in Photoshop. This plug-in does not create HDR merges on its own. Working with the merged image, 32 Float picks up where Photoshop’s own Merge to HDR Pro leaves off, building upon its strengths (and sometimes suffering from its weaknesses). The plug-in returns the merge as a layer in Photoshop but is otherwise fundamentally identical to HDR Expose 2.
I used the software on a quad-core i7 iMac: HDR Expose 2 with Lightroom 3 and stand-alone; 32 Float v2 with Photoshop CS5.
HDR Expose 2: Opening Dialog Box


When you select images for export in Lightroom, you are first greeted by a dialog box asking if you’d like to merge images with or without Lightroom adjustments. Opt for “original images” sans adjustments: this exports Raw files; the other option uses adjusted TIFFs. Next comes the HDR Expose 2 dialog box, which shows the component images—note that these are .NEF (Raw), not TIFF files. Be sure “align source images” is enabled. And leave WB “as shot” for now—you can deal with that on the next screen.
All Photos © Jack Neubart
All Photos © Jack Neubart
Shooting For HDR
As with any HDR process, you begin by bracketing exposures around the metered exposure. In practice, you can make do with five or even three exposures. The important thing to remember is that the series should, end to end, capture the tonal depth you want to reproduce in the HDR merged file. As a safe bet, choose images that are +/- 2 shutter speed values surrounding the metered exposure.
HDR Expose 2 Interface

The HDR Expose 2 interface starts out simply enough. You can select a Preset and just export the HDR image as is, or you can get more involved and fine-tune the image using the settings on the right. Except for “Reset,” the included Presets employ auto tone mapping, which can be modified at any time. I opted to begin with the “Tone Map + Mid-tones” Preset.
Fewer exposures mean a reduced chance of ghosting when there is movement in the scene. Ghost images may result, for example, from leaves/branches blowing in the wind or people/cars moving through the shot. Of course, using a tripod for all HDR work is best practice.
Speaking of ghosting, the one advantage to working with Photoshop’s HDR merge tool is that it does a very competent job in eliminating ghosting (be sure to enable this feature in Merge to HDR Pro), producing a 32-bit HDR merge that can be further processed with 32 Float. You can then simplify things by exporting a 16- or 8-bit layer back to Photoshop and save that file, although there is the option to preserve the 32-bit layer for now.
Exposure Bracketing For HDR


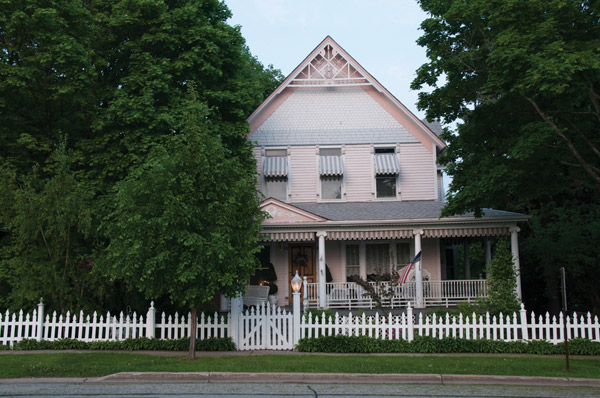


I was drawn to the almost rustic setting and the beautiful tapestry of colors. Unfortunately, the bright sky and deep foliage proved to be obstacles to capturing the image I saw. Shown is the bracketed series (+2, +.67, -.67, -2, metered) used for the HDR merge (all Raw files). I actually shot nine-bracketed exposures, but only selected those mentioned as representative of the tonal range I wanted to restore. And that also meant a lesser chance of ghosting resulting from movement.
HDR Expose 2 And Lightroom
Export the selected Raw files to HDR Expose 2. (Note: when working with other than Raw files, do not modify exposure or contrast in advance to avoid tonal distortions.) Use the default settings in the opening dialog box to initiate the HDR merge process in Expose 2 for starters. Within a few moments the merged image emerges, together with a set of Presets and adjustment modules (groups of settings). You can accept what you see or go further with the image.
HDR Expose 2 works best with Raw images, from which the greatest detail can be extracted. But this also means that Lightroom adjustments are abandoned in the process, which includes distortion, vignetting, and perspective corrections; any such corrections should be applied to the returned HDR file. The program then merges the selected images in the proprietary Beyond RGB color space, which, like a Raw file, can afterward be reprocessed in Unified Color’s HDR software—provided you opt to save the 32-bit BEF (Unified Color native) file. Processed files can be exported out of Expose 2 as 16-bit TIFF or 8-bit JPEG sRGB, Adobe RGB, or ProPhoto RGB.

This is the HDR image exported back to Lightroom, where I corrected for lens and perspective distortion, and applied clarity, vibrance, and unsharp mask.
Tone Tuning & Color Tuning

Tone Tuning features a simplified three-stage tone curve. Not shown as part of that is the Dodge & Burn tool, which is interesting but not entirely practical. The more complex tool is Color Tuning, under Color Settings. It lets you select up to three colors and adjust brightness for each.
Tone Mapping And Beyond
The provided global Presets are a good starting point, employing automatic tone mapping. You can also choose to use the “Reset” Preset, which lets you basically start from scratch with manual adjustments. But you can always make changes on the fly. You can also create new Presets and you can design Presets for specific settings, which makes it easier to tailor images without altering anything else. Tone mapping settings encompass exposure, highlight/shadow recovery, and contrast.
The Tone Tuning module features a simplified tone curve with specifically light, mid-tone, and dark sliders. There is also a new Dodge & Burn tool that lets you set a limit on how far you go. Interesting approach, but I’d like it better if it were keyed to a specific range of tones or colors, so that the tool only affected highlights to improve cloud details, for example, or the tonal intensity of greens for foliage (maybe even saturation sliders).
Noise reduction is handled in the final module, along with sharpening. Unified Color includes what they call “dark noise,” defined as noise affecting shadow areas. Actually, this is a subset of luminance noise, which is addressed as “brightness noise” by the program. I didn’t see any benefit to enabling the dark noise setting, since brightness noise seemed to do the trick, so I asked Unified Color’s John Omvik about this feature.
32 Float v2: Interface

This is the 32 Float v2 screen you see after exporting the 32-bit HDR merged image that resulted from Photoshop’s Merge to HDR Pro. Highlight and shadow clipping can be seen in the highlighted areas, but they are not enough to warrant special attention. It may look a bit different from the screen shot from HDR Expose 2, since the image is vertical, and the Presets are on the left, instead of the bottom of the screen.
“This is an implementation detail that is different in our software than other products you may be more familiar with,” he told me. “You are correct when you say all noise is luminance noise. Since images processed in our software are processed in our Beyond RGB color space we have the additional benefit of being able to completely separate the image’s luminance or brightness component from its color component. Most noise correction algorithms blur or blend pixels to smooth out the noise while also attempting to maintain edge detail.
“Because of our Beyond RGB color space, we are able to provide separate controls that address these channels individually with their own radius and threshold amounts. The Dark Noise correction works differently. Here you are setting a threshold in EV values below which we simply desaturate the colors of the image in order to minimize the visibility of the color noise without blending or blurring the image.
“The darkest areas of most images tend to be more neutral anyway so the bright color noise pixels are more noticeable. Working on the color component of the image to reduce the saturation below a given threshold is just another tool to address annoying noise problems without having to blend or blur the pixels like the Color and Brightness Noise reduction tools do.”
In Preferences, you can choose to go straight to tone mapping (and to a specific Preset) or to another module: “Veiling Glare.” I’d recommend starting with tone mapping and leaving Veiling Glare (VG) as is. I didn’t see much benefit in using it, frankly, although when speaking with Omvik he sees it as a way to enhance shadow contrast and reduce the effect of lens flare and internal reflectance. Maybe it’s just semantics, where glare is a term used to express flare.
32 Float v2 HDR Image

This is the image from a five-shot bracket (1 EV each step) with subtle Photoshop enhancements that came out of 32 Float v2. It was a definite improvement over the original merged file.
Omvik says, “More advanced users who still want to apply the Veiling Glare correction on an individual basis can choose to have the 32-bit image open in the VG panel first prior to tone mapping so that the VG correction can be applied interactively.
“Unfortunately, there are technical limitations to this algorithm that requires it be applied to the image in 32-bit display mode before it is converted to our Beyond RGB color space and tone mapped.”
The one other module we need to mention is “Geometry.” This one concerns itself with cropping, rotation, and resizing, but not distortion or vignetting.
Strong Backlighting


I used HDR Expose 2 with three bracketed exposures for the HDR merge. This series went as far as +4 EV owing to the strong backlighting, adding +2, and –2 (for cloud detail), without the metered exposure.
In Conclusion
HDR Expose 2 and 32 Float v2 are each highly capable HDR tools. Keep in mind that Expose 2 works from within Lightroom or Aperture, or on its own, whereas 32 Float v2 is strictly a Photoshop plug-in. Expose 2 was in many ways better and easier to work with than Photoshop’s Merge to HDR Pro and arguably better than HDR Express. However, in my tests Photoshop handily left Expose 2 in the dust when tackling ghosting. Both Expose 2 and 32 Float v2 feature automatic halo elimination, which to me did not always fully address the problem. You can also deduct a few points for poor documentation.
That said, the drawbacks are minor in the overall scheme of things, and in the final analysis HDR Expose 2 and 32 Float v2 each made a seemingly difficult task easier and did a convincing job.
Beyond RGB
Unified Color’s John Omvik explains their “Beyond RGB” file format: “The benefits of Beyond RGB are that you are transforming the HDR image to a 32-bit floating point representation in a color space designed for HDR, based on human vision. It has no out-of-gamut colors or device limitations that the other color spaces have.”
He further told us that Beyond RGB separates color from brightness information, which makes it possible to adjust for either without affecting the other. “Since so much of what you do in HDR involves contrast adjustments, this allows us to create the most natural-looking HDR images without color shifts.”
System Requirements
OS: Intel-based Mac OS 10.5 or later, 32-bit or 64-bit Windows (XP, Vista, Windows 7); 64-bit Windows strongly recommended for PC users
CPU: Dual-core 2.0GHz minimum; quad-core 2.8GHz recommended
RAM: 2GB minimum; 4GB recommended
Video: Recommended 128MB video memory minimum
Pricing: HDR Expose 2: $149; 32 Float v2: $99; HDR Expose 2/32 Float v2 Suite: $199
Upgrades: Available
For more information, contact Unified Color Technologies at: www.unifiedcolor.com.
- Log in or register to post comments


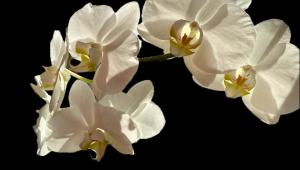

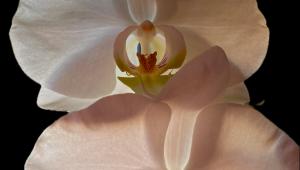

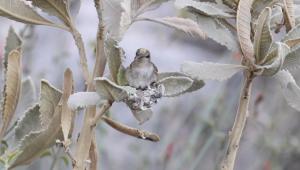


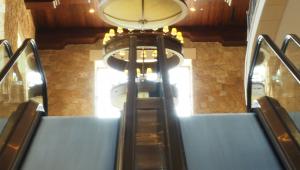


PHOTO OF THE DAY
Today’s photo is In The Moment by Charles Cormier
eNEWSLETTER SIGNUP
![]()
Get the Latest Photo Tips, News & Reviews from Shutterbug!
| Camera Reviews Other Reviews | Mobile Reviews Photography Reviews Columns | News | Features | How-To | Resources |
 © 2025 Shutterbug
AVTech Media Americas Inc., USA
All rights reserved