- REVIEWS
Camera Reviews 
More Reviews Mobile Reviews Photography Reviews - GALLERIES
- VIDEOS
- BUYER'S GUIDES
5 Tips for Photographing Landscapes and Wildlife in Our National Parks
(Editor’s Note: Exploring Light is a monthly Shutterbug column featuring tips, tricks, and photo advice from professional photographers in the Canon Explorers of Light and Canon Legends education program. This month's column is by Adam Jones with tips on photographing wildlife and landscapes in our National Parks.
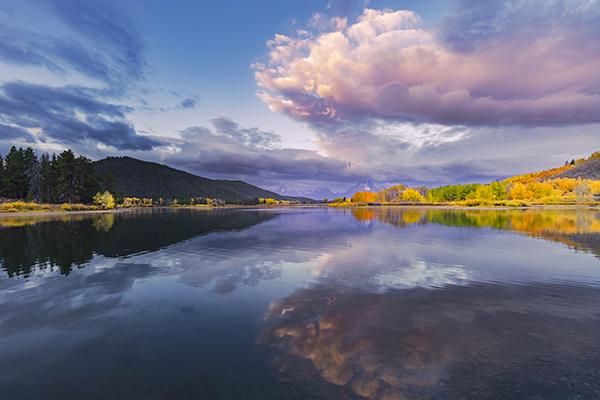
As we all know, the pandemic has really restricted international travel. As a result, visitation to our National Parks has hit record levels. Grand Teton National Park and Yellowstone National Park have been crowded with visitors the last two fall seasons. These two gems in the park system are among my all-time favorites for fall landscapes and wildlife.
Photographers often fall into one of two camps: wildlife or landscape without much crossover between the two disciplines. There is no one correct approach, and I happen to enjoy both. I consider myself to be a general nature photographer, and love capturing compelling wildlife images as well as beautiful landscapes.
When I visit a park that offers both wildlife and great landscape opportunities, I admit I’m conflicted between which to give preference. Landscapes are more predictable in a sense they are a bit more of a sure thing versus wildlife that can be very unpredictable (or not even show up at all). It’s really difficult to successfully shoot great landscapes at sunrise and then switch to wildlife for the rest of the morning.
Unfortunately, North American wildlife is mostly active right before sunrise and around sunset, the same time most landscapes are compelling. It’s more productive to decide which you intend to do, and not try to pursue both disciplines at once.
Landscapes usually revolve around the golden hour of sunrise and sunset, and the location for a shoot is often decided before arriving at a destination. When shooting wildlife a general area may be the destination, but you must be able to react to both moving subjects and ever-changing light and backgrounds.
When I’m capturing landscapes, I always arrive on location 30 minutes before sunrise. This provides ample time to fine-tune my viewpoint and lens selection depending upon lighting and atmospheric conditions. With wildlife you never know exactly when and where the perfect fleeting moment will occur, or when a dynamic situation may arise.
You need to be thinking on your feet all the time: deciding settings, composition, and viewpoint. Big prime lenses are the norm for most serious wildlife photographers and I certainly love my Canon 600mm f/4 IS III lens. The newer RF 100-500mm f/4/5-7.1 zoom lens has quickly become one of my favorite lenses for both wildlife and telephoto landscapes. This zoom lens allows more compositional choices and less repositioning of the camera gear as subject move around.
Tip 1: Custom Settings
This is an easy way to instantly bounce back and forth between wildlife and landscape settings. I pre-program a selection of custom wildlife settings and a set of custom landscape settings into the C1 and C2 position on both of my Canon R5 cameras. With base settings programmed in advance, I can switch from wildlife to landscape settings with the simple touch of the mode dial—then selecting C1 or C2.
For wildlife I prioritize shutter speed, a wide aperture, and manual mode. Landscapes prioritize depth of field along with a low ISO, and I prefer using the two-second-delay timer instead of an electronic release. Wildlife photography requires a fast enough shutter speed to freeze subject movement or camera movement if shooting hand-held. With these settings on both cameras, I don’t have to dedicate one body for landscapes and one body for wildlife. Both are ready for either duty at a moment’s notice.
As the situation dictates, custom settings can be modified/overridden for different settings than those originally programmed. The camera can also be set to revert to your original custom settings, or to hold the last settings used. For landscapes I use AV mode and evaluative metering, and activate AEB (auto exposure bracketing) for high-contrast scenes.
For wildlife I’m in manual mode, evaluative metering, and auto ISO. I choose a nearly wide-open aperture and set my shutter speed for the lowest value that provides an appropriate shutter speed for the situation. The ISO is free to float to maintain those settings even if the light changes. Auto ISO works well in most situations; however, it still acts as a semi-automatic mode with those inherent limitations.
For example, a bird on the ground may have proper exposure, but when the bird flies into the sky the exposure will shift toward underexposure. Full manual (where all settings are locked) is the solution if you are expecting the subject to suddenly have a dramatic background change.


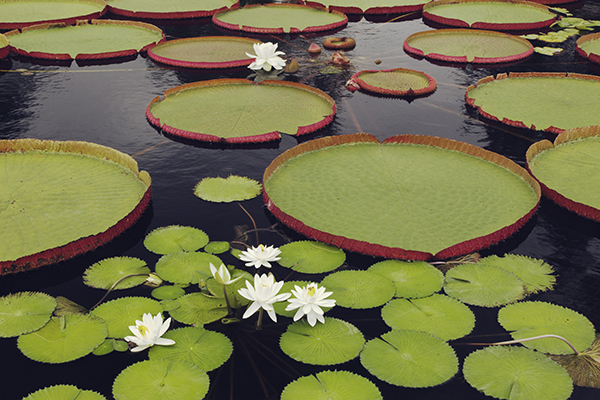
Tip 2: Use a Polarizer
Consider using a polarizing filter for most landscapes, but not for wildlife shooting under most conditions. A polarizing filter cuts through the sheen on vegetation, water, and wet rocks for richer deeper colors. This filter will be of little to no use when shooting directly into the sun or with the sun directly behind the camera. Maximum effect is obtained when shooting in a direction 90 degrees to the sun. A word of caution is needed here: when shooting blue skies with a wide-angle lens, be careful to not over polarize the sky to the point it goes almost black.
Also be careful in situations where one side of the sky in the scene goes dark blue and the other side does not. When this happens, images may appear unnatural and be problematic during post processing. The polarizing filter is a staple filter for the landscape photographer, but it is not often used with wildlife since it cuts the available light by 1.5 stops. Conversely, it can be used as a light duty neutral density filter to deliberately increase the length of the exposure for a movement effect.

Tip 3: Lens Choice
While telephoto lenses are the norm for most wildlife photographers, most landscapes are captured with normal to wide-angle lenses. When the scene calls for it, go wide. In most landscape situations, I usually let the sky dictate how wide to go. A blank, featureless sky in a scenic image isn’t interesting, so zoom in tighter on the main subject if the sky is featureless or boring. You need three things for any successful image: subject, lighting, and background. Sky is often the background in landscape images if it’s interesting or beautiful.
I often use a telephoto lens for unique images of well-known locations. A long lens and its narrow angle of view help fill the frame with the main subject, while eliminating distracting or boring details. One of my favorite images of Mammoth Hot Springs in Yellowstone was taken with my 100-500mm zoom at 270mm, f/14, 1/15, ISO 100 from a distant viewpoint. First get the wider iconic shot and then isolate smaller scenes within the overall view for interesting compositional choices.


Tip 4: Know Your Subjects
The best advice for becoming a better wildlife photographer is to become a better naturalist. Know your subject matter inside and out by learning the habits of the wildlife you intend to photograph. Know when they are likely to be out and about. Know when and where they feed. Learn about your subject’s behavior so you can recognize and record important behavior on display.
Please respect park rules on how close you may safely approach wildlife. In Yellowstone the rules for bears and wolves require you stay at least 100 yards away. For other large animals like bison, elk, moose, the rules state 25 yards. Please obey these rules for your safety and the safety of others. In this image I spotted several cow elk on a ridge, but there were no bull elk in sight. Knowing that elk were still in rut, there had to be a bull elk nearby. I set up near the loose herd of cow elk and waited, and sure enough the bull elk returned to his harem as predicted.

Tip 5: Autofocus Techniques
Knowing your auto focus system is very important, especially with wildlife imaging. It is critical that the eye of the subject is sharp in the final image. Targeting a subject’s eye can be challenging, even with the best photo gear. This usually means using one active AF point or small group of points, instead of using all points at the same time and letting the camera decide where to focus. Canon’s R5, R6, and R3 mirrorless cameras have taken precision AF to all new levels for animals, birds, people, and even racecars.
I’ve had my R5 camera since it were first released, it has easily become my do-everything camera. I primarily use only a few of the AF modes regularly. It’s an understatement to say I’m a huge fan of the R5’s animal eye tracking capability. This advanced AF system puts one small AF point right on the subject’s eye and stay on the eye as the subject moves or if I move the subject around in the viewfinder. This new technology has revolutionized my birds-in-flight photography with a success rate way above anything previous.
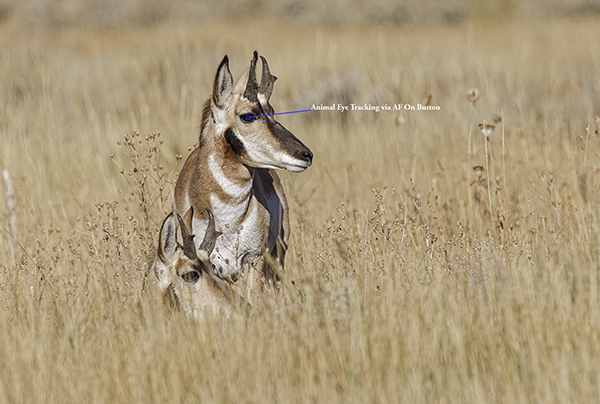
Animal eye tracking is enabled on the back of my cameras via the AF ON button next to the Joystick. I have the front shutter button set up to focus on a single AF point by depressing the shutter halfway. The single AF point can be very small or one of the zone AF boxes depending upon the situation. Set this way, I can activate the animal eye tracking on the back, and if that doesn’t work, simply release the AF On button and the front focus takes over immediately. When using the front shutter button, I can use my thumb on the joystick to move the AF point or use my thumb on the touch LCD on the rear of the camera.


BIO
Canon Explorer of Light Adam Jones has been a photographer for more than 30 years, specializing in nature and travel for more than 20 years. His workshops and tours take him around the world and his tours are known for a practical nuts-and-bolts approach to solving problems in the field while sharing his enthusiasm and experience.
Jones’ award-winning images are widely published in magazines, calendars, books, posters, and in national advertising campaigns for clients such as Canon, Ford, Eddie Bauer, Miller Beer and Honda.
Jones[ is recognized worldwide as an outstanding stock photographer with his images being represented by Getty Images, Corbis, Visuals Unlimited, Photo Researchers and Danita Delimont Stock Photography. His work is used for editorial and commercial projects in more than 50 countries and is featured in seven coffee table books.
You can see more great work from Jones at the links below:


![]()
Get the Latest Photo Tips, News & Reviews from Shutterbug!
| Camera Reviews Other Reviews | Mobile Reviews Photography Reviews Columns | News | Features | How-To | Resources |
 © 2025 Shutterbug
AVTech Media Americas Inc., USA
All rights reserved