- REVIEWS
Camera Reviews 
More Reviews Mobile Reviews Photography Reviews - GALLERIES
- VIDEOS
- BUYER'S GUIDES
10 Handy Digital Tips
Here are some fun (and/or useful) things to do with your images and image-editing software
Digital imaging makes it easier to produce effects that are difficult to do by traditional photographic means, and makes it possible to do things that can't be done otherwise. And you don't have to use a digital camera to do digital imaging—you can have your slides, negatives and prints scanned for use in your computer. In fact that's what we do most of the time—shoot film, and scan the slides or negatives. Most of the images in this article began life as slides or negatives (although a couple were shot with digital cameras—can you tell which ones?).
On these pages are 10 cool and not-too-tricky things you can do with your digital-imaging software. Before we start, though, here's a tip: It's better to work with RGB color images rather than CMYK color images, for a couple of reasons. First, RGB images are smaller files, so the computer will perform faster. Second, not all Photoshop filters can be used with CMYK images. So work with RGB images, and convert the finished files to CMYK if you need CMYK files.  1. Digital Proofsheet
Did you know that most image-editing programs make it easy to make digital "Proofsheets"? Just gather the images you want on the proofsheet into a single folder, then let this feature do its thing. In recent versions of Photoshop, under the File menu, drag down to Automate and select Contact Sheet II. That brings up the window shown here. Use the Choose button to select the folder that contains the images you want to put on the proofsheet, select a paper width and height (if other than 8x10), select the desired resolution (the default is 72 ppi, which works but produces pixelated thumbnail images—higher resolutions produce sharper images, but larger file sizes), select the mode (color or grayscale) and choose the number of columns and rows you want. You can also choose to have the images laid out across the sheet first (starting from left to right) or down first (starting from top to bottom), and the font for the cutlines. Then just click OK, and sit back and watch. The program will gather the photos in the folder and lay them out on the page. When it's done, print and save it.
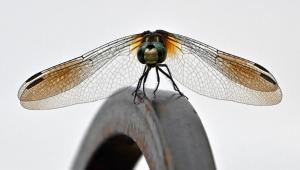
 2. B&W Filters, After the Fact
Black-and-white photographers often use colored filters to enhance their images. Colored filters for black-and-white? You bet: While the photos are black-and-white, the subjects are in full color, so colored filters will have an effect. A colored filter transmits light of its own color and blocks light of its complementary color. Thus, it will lighten subjects of its own and similar colors, and darken subjects of complementary colors, in the resulting black-and-white photo. For example, a red filter will lighten red and yellow subjects, and darken blue and green ones. A red No. 25 filter is often used in black-and-white work to darken a blue sky so that white clouds really stand out dramatically. You can also use colored filters to provide contrast between two subjects of different color but similar brightness: An unfiltered black-and-white photo of a green bush with red flowers will show medium gray flowers against a medium gray bush—not very interesting. Use a red filter, and you get light flowers against dark leaves. Use a green filter, and you get dark flowers against lighter leaves.
Anyway, what does all this have to do with digital? Well, you can achieve similar effects via the channels in your image-editing program. In Photoshop, the process is pretty simple. Start by opening an RGB color image, then click on the Channels palette. For a red-filter effect, click on the Green channel, then click on the Trash icon at the bottom of the Channels palette and click Yes in the pop-up window to delete it. This now leaves Cyan and Yellow channels showing in palette. Click on the Yellow channel, then click on Trash and click Yes to delete it. Save the image as [imagename]Red.
For a blue-filter effect, open an RGB color image, click on the Channels palette, and click on Green channel, then click on Trash and click Yes. This now leaves Cyan and Yellow channels. Click on the Cyan channel, then click on Trash and click Yes. Save the image as [imagename]Blue.
For a green-filter effect, open an RGB color image, click on the Channels palette, and click on the Red channel, then click on Trash and click Yes. This now leaves Magenta and Yellow channels. Click on the Yellow channel, then click on Trash and click Yes. Save the image as [imagename]Green.
Generally, the green-filter effect produces the most natural-looking black-and-white image, the red-filter effect the most dramatic, and the blue the least-real (and grainiest).
 3. Sepia Tones
There are several ways to produce a sepia-toned image digitally. Here's an easy one, using Photoshop.
Start with an RGB color image (if your original is grayscale or CMYK color, convert it to RGB in Photoshop by dragging down to Mode under the Image menu, and selecting RGB Color). Under the Image menu, drag down to Adjust and select Color Balance. Slide the Cyan-Red slider toward Red (70 is a good starting point), and the Yellow-Blue slider toward Yellow (also 70). Save the image as [imagename]Sepia.
If you're in an experimenting mood, you can try other Red/Yellow settings, play with the Magenta-Green slider, and make adjustments to shadows and highlights as well as to midtones. You can drag down to Adjust in the Image menu and select Hue/Saturation, and try differing degrees of saturation (but beware, increasing saturation generally also increases graininess). But the basic 70 Red/70 Yellow cited above is a good starting point, and a quick way to make sepia-toned images.
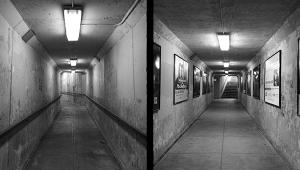
 4. Color in B&W
It's not too difficult to get a color subject in an otherwise grayscale image, or a black-and-white subject in a color image. The key to success lies in accurately selecting the subject, using your image-editing program's selection tools. Time and effort spent on fine-tuning the selection will pay off in a more professional-looking final result.
To get a grayscale subject in a color photo, open an RGB image in Photoshop and select the subject using one of the selection tools (the magnetic lasso, for example). Under the Image menu, drag down to Adjust and select Hue/Saturation. Move the Saturation slider all the way to the left to completely de-saturate the selected subject. Save the image as [imagename]BWinColor.
Producing a color subject in a black-and-white image requires one more step. After selecting the subject, go to the Select menu, and drag down to Inverse to select the background. Then go to the Image menu, drag down to Adjust, select Hue/Saturation, and drag the Saturation slider all the way to the left to completely de-saturate the now-selected background. Save the image as [imagename]ColorinBW.
 5. Just Black, and White
Here's a fun one to play with: Photoshop's Threshold control. This simply changes all tones brighter than a selected level to white, and all tones darker than the selected level to black. The result is an image containing only black tones and white tones, with no intermediate gray tones.
Open a grayscale or RGB color image. Under the Image menu, drag down to Adjust and select Threshold. Try different settings by dragging the arrow below the histogram, and watch what happens in the preview window. Moving the arrow to the left produces more white tones and fewer black ones, and moving the arrow to the right produces mostly black tones.
|
| |||||||||


![]()
Get the Latest Photo Tips, News & Reviews from Shutterbug!
| Camera Reviews Other Reviews | Mobile Reviews Photography Reviews Columns | News | Features | How-To | Resources |
 © 2025 Shutterbug
AVTech Media Americas Inc., USA
All rights reserved