- REVIEWS
Camera Reviews 
More Reviews Mobile Reviews Photography Reviews - GALLERIES
- VIDEOS
- BUYER'S GUIDES
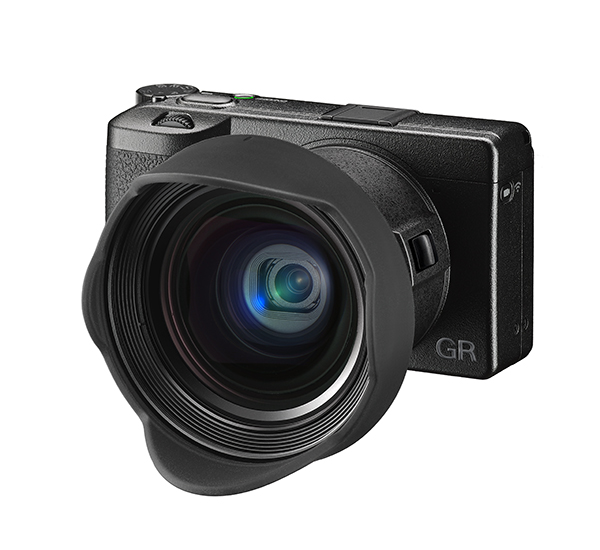
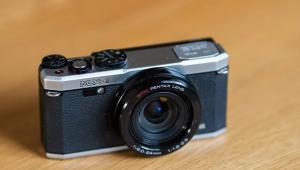
Ricoh GR III Compact Camera Review: The New Street Shooting Champ?


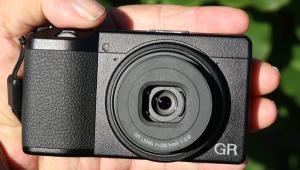
Ricoh recently announced the latest in their series of high quality, ultra-portable digital cameras, the GR III. Smaller than its predecessor, the Ricoh GR III compact camera has a 24-megapixel APS-C format CMOS image sensor, 28mm (equivalent) prime lens and a host of features normally found on professional DSLRs.
Billed as the ultimate camera for street photography, this 9-ounce gem is pocket-size but packs a wallop. We recently got some early hands-on time with the Ricoh GR III compact camera and can attest to that in this review. (Spoiler alert: We liked shooting with the GR III so much, it has earned our coveted Top Clicks award for being one of the best cameras of the year.) Born from a legacy that began years ago with high quality 35mm film cameras which successfully made the leap from analog and into the hands of digital street photographers everywhere, the Ricoh GR compact camera series has long been coveted as the covert camera of choice. Here’s the rundown on the key features followed by our complete hands-on review of the new Ricoh GR III (available now at Amazon for $899).
Ricoh GR III Key Features
• 24-megapixel APS-C-size CMOS sensor
• 28mm (equivalent) f/2.8 fixed focal lens
• P, Av, Tv and M exposure modes
• No physical Anti-Alias filter (simulation optional)
• Sensor-shift image stabilization (3-axis)
• Hybrid AF (image plane phase-matching and contrast detection)
• Full HD (1920x1080) video
• Capacitive touch screen control with touch focus
• Built-in wireless connectivity with WPA2 encryption
• ISO 100 to 102400
• Macro mode to (about) 2.36 inches
• DNG Raw format option (14-bit)
• Magnesium alloy body construction for durability and light weight
 The breadth of features and depth of customization possibilities make the Ricoh GR III the ideal travel camera and the perfect choice for realtors, educators and office workers who are tasked with creating high quality images for company newsletters and social media. And of course, street photographers have reason to celebrate.
Design and Features
Small but comfortable to handle, the Ricoh GR III has clean and simple controls, including front and rear dials and a five-way controller that collectively provide access to all major functions. The Exposure Mode dial on top offers three user-set modes in addition to P, Av, Tv and M. Thankfully, the Movie button is located on the left outside edge where it will never be accidentally triggered.
 Four of the buttons are programmable, including the Movie button and clearly marked Function button. Any of the four can be configured to control one of 31 different features. Additionally, the push-button Adjust dial can access 15 separate feature sets.
There’s a dial on the front, too, so when used in conjunction with the Adjust dial on the back it’s very easy and intuitive to change aperture and shutter speed in Manual, Aperture Priority (Av) or Shutter Priority (Tv) mode.
There is no viewfinder but the 3-inch LCD offers a remarkable range of adjustability including a setting that makes it easier to use in bright daylight. It’s a capacitive touch screen and you’ll find the touch-to-focus option fast and convenient—actually a lifesaver in some instances.
The 28mm (equivalent) f/2.8 prime lens retracts and has a self-closing lens cap. Startup operation is rather quick—Ricoh claims 0.8 sec and I have no reason to doubt it. There is a hot shoe but no built-in flash.

A key feature is the intentional lack of the Anti-Aliasing filter. AA filters are installed in most digital cameras as a countermeasure to the Moiré pattern and “stair-step” effect than can naturally occur from digital sensors. An AA filter actually blurs the image slightly, usually by two pixels. Not having the filter in place means sharper (or at least theoretically sharper) images, but presents the risk of unpleasant Moiré. To overcome this risk, the Ricoh GR III can utilize the built-in sensor-shift shake reduction feature at the user’s option. By slightly nudging the sensor during exposure, the image is blurred the requisite amount to achieve Anti-Aliasing simulation.


I made extensive use of the Macro mode during the camera test. It consistently produced razor sharp results—amazingly sharp, really—and was easy to use. In the Macro mode, the Ricoh GR III focuses as close as 2.4 inches—or about 6 cm.
Small thing, but important to many: the wrist strap can be attached to either side at the top or to the right side at the bottom—your choice of three attachment points. Avid street shooters appreciate this level of personalization. This also means that if you make the unlikely choice of using a neck strap instead of a wrist strap you can hang the camera horizontally or vertically.
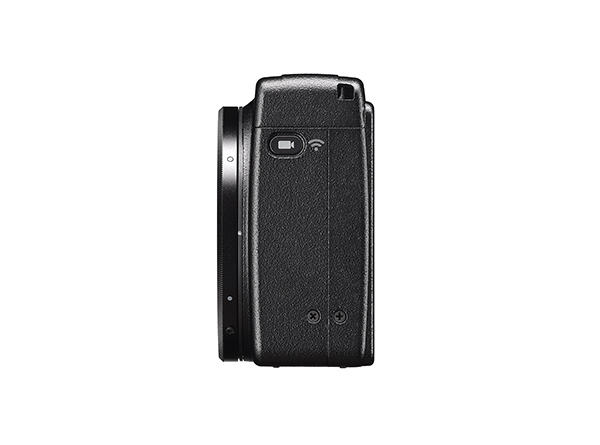
Not to be overlooked, the Ricoh GR III offers Wi-Fi and Bluetooth connectivity as is becoming the custom for high-end compact cameras. Users can transfer images and control the camera remotely.
 Construction
The Ricoh GR III measures 4.3 x 2.4 x 1.3 inches (109.4 x 61.9 x 33.2 mm) and weighs only 9 ounces (257 grams) with battery and SD card in place. It’s tiny enough to hide in one hand if necessary, but large enough to provide stable operation. The body is constructed of sturdy, light weight magnesium alloy. There is no plastic feel. The grip is high-friction simulated leather.
Overall build quality is the highest, and it feels good in the hand.

Operation
One characteristic I’ve found to be consistent throughout the Ricoh GR line is customizability. Compared to previous models, the GR III is a bit easier to customize and the menu system overall is easier to master—or maybe I’m just getting used to it.
What some manufacturers label Image Mode, Ricoh identifies as Image Control. There are 10 different settings, plus two Custom settings that are user-configured. The Ricoh GR III offers the following: Standard, Vivid, Monotone, Soft Monotone, Hard Monotone, Hi-Contrast B&W, Positive Film, Bleach Bypass, Retro, HDR Tone, Custom1 and Custom2.
Sounds like a lot and it is, but they’re quick and easy to set via the Adjust dial. Simply press the dial once and select the style you like from the drop-down list.
But wait, there’s more. Many of the Image Control modes can be further customized individually. You can adjust the following parameters (varies depending on the selected image setting): Saturation, Hue, High/Low Key Adjustment, Contrast, Contrast (Highlight), Contrast (Shadow), Sharpness, Shading, Clarity, Toning, Filter Effect, Grain Effect and HDR Tone Level.
Additionally, Raw shooters can convert DNG files into JPEG within the Ricoh GR III and can adjust the following parameters: Aspect Ratio, JPEG Recorded Pixels, Color Space, White Balance, Image Control, Peripheral Illumination Correction, Sensitivity, High-ISO Noise Reduction and Shadow Correction.
Long story told short, operating the Ricoh GR III can be as simple as On, Point, Shoot—or you can customize and tweak until the proverbial cows come home.

When you power down the Ricoh GR III, a counter appears and displays the number of images you’ve taken that day. There’s room for seven digits; I guess Ricoh’s engineers are prolific picture takers, too.
Performance In the Field
As street photographers have known for several years, Ricoh GR cameras take to the urban landscape in a natural and organic way. The GR III is easy to carry, easy to conceal and quick focusing. It is small and responsive—the rest is up to you. I found it simple and direct when I wanted to change settings, and fast enough to use even after catching the disapproving attention of a potential candid subject.
As mentioned above, I used the Macro mode extensively, mainly because the results knocked my sox off. I also enjoyed configuring and adjusting the Custom Image Control modes. For the most part when street shooting I set Custom 1 to capture in monochrome with fairly high contrast, a bit of extra sharpness and a slight amber tone. I tried several combinations before settling on the one I liked best. Custom 2 was set to high contrast, low saturation color (which looks much better than it sounds now that I read it here).
Another pleasant surprise was the HDR Tone setting from the Image Control menu. With many cameras (and some image editing programs too, for that matter) the generic “HDR” setting produces something unpredictable and crappy. I experimented by shooting several scenes that included dark shadows and very bright highlights. The HDR Tone setting produced detail in both the dark and light areas.

Image Quality and Sharpness
The Ricoh GR III consistently delivered outstanding results. Images were clean and sharp, colors even and bright, and distortion was never a factor. The auto exposure and autofocus mechanisms functioned quickly and accurately, and I never encountered even momentary camera failure. The lack of an AA filter increased acutance (edge sharpness) and in general the results were repeatedly stunning.
Normally when I see a maximum ISO setting of 102400 I view it with the same knowing smile as when I see the 150 mph increment on my Subaru’s speedometer. Even if the car could attain that speed, only a fool would try it. ISO 102400 is 10 stops faster than ISO 100, no? Well, I was pleasantly surprised by the Ricoh GR III’s high ISO performance. Even at the higher settings, it yielded useable images especially in bright light.
Key Accessory
Ricoh offers an accessory wideangle conversion lens that was designed exclusively for use with the GR III. It’s called the GW-4 Wide Conversion Lens and it expands the angle of view to simulate a 21mm ultra-wideangle. Cost is $249.
The Advantage of DNG
As most Shutterbug readers know, DNG is a universal raw image file format created and supported by Adobe. Some cameras, notably Leica, Pentax and Ricoh, can create DNG files natively. Other proprietary raw file formats can be converted to DNG via Adobe’s free DNG conversion program or from within Adobe Camera Raw (ACR).
DNG assures 100% compatibility with Adobe software even if the camera manufacturer substantially alters their unique raw file format or discontinues support of the format altogether.
Conclusion
First off, it’s not just a street photography camera, although it’s certainly excellent for that. It’s also a terrific travel camera because of its compact size, easy operation and full feature set. The 28mm equivalent lens, built-in level and ability to capture great images without flash make it ideal for realtors, too. And let’s not overlook that often-forgotten group, the office workers who get roped into capturing images for their company’s newsletter and social media—they’ll make good use of the GR III as well.
The Ricoh GR III includes just about everything Ricoh has learned about producing high quality cameras that are fully customizable and packed with the features that serious users relish.

The only negative is the price. At $899, it stresses the budget of all but the wealthiest. Dedicated photo enthusiasts, however, will find a way to afford it, and they’ll be very happy that they did.
Full Feature List for the Ricoh GR III
• 24-megapixel APS-C-size CMOS sensor
• 28mm (equivalent) f/2.8 fixed focal lens
• Optional simulated 35mm and 50mm cropping
• P, Av, Tv and M exposure modes (P, A, S & M)
• Optional Burst, Interval and Multi-Exposure
• Face Detection
• EV Compensation +/- 5EV
• Built-in ND filter option
• Built-in Digital Level
• 14-step adjustable White Balance (A-B and C-M axes)
• 10 Image Control settings, plus two Custom Settings
• Multiple fine tuning of Image Control settings
• ISO 100 to 102400
• No physical Anti-Alias filter (simulation optional)
• Senor-shift image stabilization (3-axis)
• Hybrid AF (image plane phase-matching and contrast detection)
• Full HD (1920x1080) video
• Built-in stereo microphone
• 3.0-inch TFT LCD adjustable (Brightness, Saturation, etc.)
• Capacitive touch screen control with touch focus
• Built-in wireless connectivity with WPA2 encryption
• Bluetooth (Low Energy Bluetooth)
• Macro mode to (about) 2.36 inches
• DNG Raw format option (14-bit)
• Built-in Raw development with nine parameter adjustments
• In-camera battery recharge
• About 200 shots per charge
• Magnesium alloy body construction for durability and light weight
• Built-in filter for watching cows come home during customization
• Weight with battery and SD card: 9 ounces (257 grams)
• Dimensions: 4.3 x 2.4 x 1.3 inches (109.4 x 61.9 x 33.2 mm)
—Jon Sienkiewicz


![]()
Get the Latest Photo Tips, News & Reviews from Shutterbug!
| Camera Reviews Other Reviews | Mobile Reviews Photography Reviews Columns | News | Features | How-To | Resources |
 © 2025 Shutterbug
AVTech Media Americas Inc., USA
All rights reserved