- REVIEWS
Camera Reviews 
More Reviews Mobile Reviews Photography Reviews - GALLERIES
- VIDEOS
- BUYER'S GUIDES
Photoshop Tweaks; Fixing Minor Exposure Problems
If you photograph outdoors in daylight you're going to have minor exposure
problems. You simply can't control the light as much as you might like,
or need.
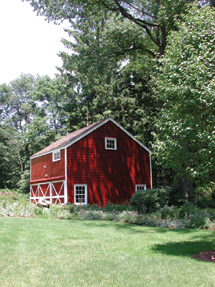
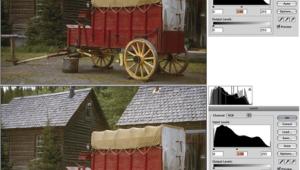
Our example is typical. The red barn is exposed correctly, but the grass is
"hot" and the sky is washed out. Here is how you can correct these
two little faults:
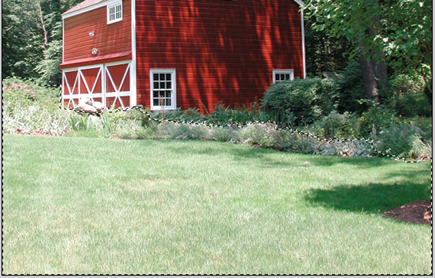
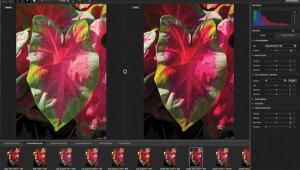
1. First, choose the Lasso tool and draw a selection around
the overexposed grass. Next, go to Select>Feather and set to 10, which softens
the edge of the selection and prevents a hard line from appearing along the
top of the foliage.
 |
|
|
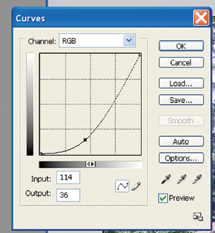
2. Now you're ready to darken the washed-out grass in the foreground. Go to Image>Adjustments>Curves. In the Curves tool, grab the diagonal line and move it into the curve shape shown. This adjustment results in a contrast adjustment of the selected area.
 |
 |
3. To deal with that washed-out sky deselect the grass in
the foreground by going to Select>Deselect. Then choose the Magic Wand tool
and set the Tolerance to 10. This relatively low Tolerance setting should be
adequate since the selected sky is almost pure white with very little tonal
range. At this point you want the Magic Wand selection to "jump over"
the leaves in the trees and perform selections on all of the little pieces of
white sky there. To accomplish this uncheck the Contiguous setting in the tool
bar at the top of the Photoshop window.
Then place the Magic Wand tool in the middle of the large, white sky area and
click with the mouse. The selection is great, except it also selects all the
white-colored portions of the barn as well as some washed-out leaves in the
large tree to the right. In order to deselect these hold down the ALT key and
use the Lasso tool to draw a large circle around those unwanted areas. You should
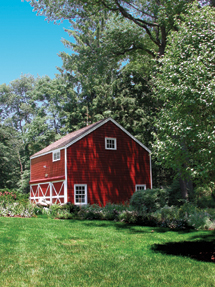
have the sky selection that you want. Now, all you have to do is color it blue.
 |
4. In order to color it blue, choose a light blue and a dark blue in the foreground and background color selection squares using the Swatches palette. Then use the Gradient tool and draw the gradient through the area of the sky selection. Draw the gradient in such a way that the darker blue is at the top and the lighter blue is closer to the ground. These two quick tweaks will give you an image with those exposure problems solved.
 |
To work along you can download the original image from the Instant Links section
of the Shutterbug website (www.shutterbug.com/currentissuelinks/).
For more information on digital imaging, visit my website at: www.colorbat.com.
- Log in or register to post comments


![]()
Get the Latest Photo Tips, News & Reviews from Shutterbug!
| Camera Reviews Other Reviews | Mobile Reviews Photography Reviews Columns | News | Features | How-To | Resources |
 © 2025 Shutterbug
AVTech Media Americas Inc., USA
All rights reserved