Photo Filters Page 3
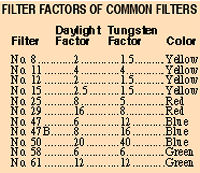
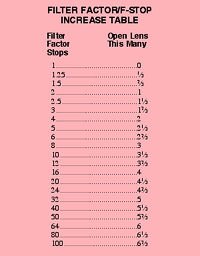
| CC Filters Color-compensating (CC) filters are handy for fine-tuning color balance when precise color rendition is critical. CC filters come in the three additive primary colors (red, green and blue) and their complements (cyan, magenta and yellow), in a number of densities. If you must make very long or very short exposures (as in tungsten-lit studio work at small apertures, or when using automatic electronic-flash units at close flash-to-subject distances), reciprocity failure can cause a color shift with color film. If you shoot a test roll of the same film-emulsion batch as the rolls you'll be using for the actual shoot, you can determine what color corrections are needed to produce perfect color balance under those particular shooting conditions, and use appropriate CC filters to make the corrections. Another good use for CC filters is to remove the cyan cast caused by shooting through cyan-tinted windows often found in trains or airplanes (try a CC30R red filter). Mixed Light Sources Tricolor Tricks If you make three exposures on one frame of film—one through a red filter, one through a green filter and one through a blue filter (i.e., one exposure to each portion of the spectrum)—a natural color image will result. This seems like a complicated way to produce normal color photographs, and it is—if normal color photographs are what you're after. However, if you select a scene that includes both stationary and moving subject matter, this three-filter technique can produce some amazing images. The stationary portions of the scene will appear normal, but the moving portions will take on a rainbow of colors, because their images will be in one place on the film during the red-filter exposure, in another position on the film during the green-filter exposure and in still another position on the film during the blue-filter exposure. Some effective subjects for the three-filter technique include ocean waves breaking on a rocky beach, wind-blown clouds over a landscape, waterfalls, a model with her hair blowing in the wind, and traffic on a busy street. You can use any red, blue, green and red filters for the three-filter technique, but using the Kodak Wratten No. 25 red, No. 58 and No. 47 blue filters simplifies exposure calculations: Meter with no filter, open the lens one stop and make the red-filter exposure, then open the lens another stop and make the green-filter exposure, then the blue-filter exposure. Of course, your camera must be able to make in-register multiple exposures to use this technique, or your images will not be sharp. If your camera can't make in-register multiple exposures, you can still use the technique by taping the three filters in a row and making a cardboard slide to hold them, and a cardboard box that attaches to the camera lens and catches the slide. Open the camera shutter on B, drop the slide past the lens (thus making the three exposures in rapid succession) then close the camera shutter. This device is called a Harris Shutter (after Robert Harris of Harris Photoguide fame, who invented it), and complete directions on how to make and use it can be found in Kodak publication KW-13, Using Filters. You can also use individual colored filters to produce creative color photos. Everyone uses red filters to liven-up a dull sunset, but why not try a green sunset? Use a green filter such as the Kodak Wratten No. 58 or 61, and give the film lots of exposure, since there aren't a lot of green wavelengths present in a sunset (bracketing is wise). You can use a weaker green filter to enhance a foliage scene, or a deep blue filter and slight underexposure to produce a moonlight effect on a sunny day. You can also use colored filters to enhance moods: an orange filter works well for a desert scene or a blue filter for a snow scene. |
- Log in or register to post comments

