- REVIEWS
Camera Reviews 
More Reviews Mobile Reviews Photography Reviews - GALLERIES
- VIDEOS
- BUYER'S GUIDES
Multi-Image Flat-Bed Scanner Techniques; Getting Six (Or More) Scans For The Price Of One
You may not think of Photoshop as being a flat-bed scanner tool, but it's
way ahead of whatever is in second place. Recently we had a customer who wanted
a whole shoebox of family snapshots scanned and converted to digital files.
This could have been a very time-consuming job if it were not for Photoshop
CS and the delightful way it works with all flat-bed scanners.
We use an Epson flat-bed scanner that has more than enough resolution and dynamic
density range for scanning reflective prints. But, scanning a couple of hundred
prints would surely take a long time. So, we decided to use one of the tools
in Photoshop CS.
 |
|
|
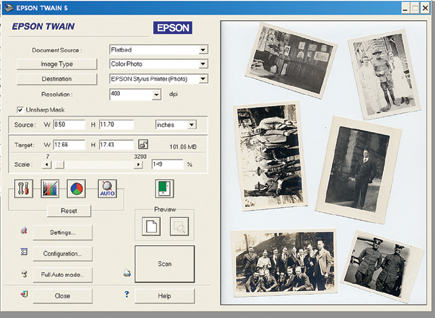
First, I loaded up the scanner with a bunch of little photographs. Then, from within Photoshop I went to File to Import to Epson Twain 5. That brought up the scanner control window inside of Photoshop (#1). For demonstration purposes, I have only put six different pictures on the scanner in Image #1. And, again, for demonstration purposes, I have intentionally put them on very noticeable crooked angles. Make sure they do not touch each other. If they touch, Photoshop gets confused and treats the two touching images as one. In the scanner control portion of the window (to the left of the Preview of the scanner) I set the resolution to 400dpi and set the total data to be collected (Epson calls this the Scale) to about 100MB, or about 1.4x the original size. The scanner defaults to scanning in RGB color.
 |
|
|
After the scan is performed, Epson handed the image off to Photoshop and it looked like Image #2. That's nice, but having to cut out all those individual images and straighten them would take all day. Luckily, Photoshop can do it in a few seconds. But, before proceeding, I decided to convert the image to Grayscale. That would reduce the file size and let the computer work a little faster. After all, the photos were originally all in black and white. Some had yellowed a little over the years, but there's nothing wrong with returning them to their original black and white version. So, I went to Image to Mode to Grayscale (#3).
 |
|
|
|
| |||||||||
- Log in or register to post comments


![]()
Get the Latest Photo Tips, News & Reviews from Shutterbug!
| Camera Reviews Other Reviews | Mobile Reviews Photography Reviews Columns | News | Features | How-To | Resources |
 © 2024 Shutterbug
AVTech Media Americas Inc., USA
All rights reserved