Light Plays
Pumped Up Color

Untitled Document
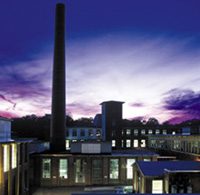
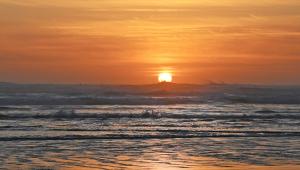
Sometimes the magic comes after the shoot. I relied on the "reciprocity failure" of Fuji Velvia 120 to give this sky image some wild color, then merged it in Photoshop with this long-exposure image of the old factory. By leaving the shutter open for several minutes to capture the sky, the film begins to create a totally alien color palette. The sky image was captured when it was nearly totally dark, yet the long exposure brings out a surprising amount of color and detail. The combination of the two images is the only way to really punch up the color on a classic subject like this.
Photos © 2000, Jay Abend, All Rights Reserved

Well, we're halfway through the year 2001 and I'm finally getting used to the idea of living at the start of a new century. When we're all tucked away in the old photographers home we'll look back on this period as a time of major turmoil and exciting new opportunities in the photo world. There's new technology, new ways to view images, and new ways to take images. What has remained pretty constant is the desire of buyers of photography--magazines, ad agencies, graphic design firms, etc.--to look for the latest and freshest images.

My work is subject to the same scrutiny as any other artist. If I were to stick with the style and look that made me so successful in the 1980s I surely would have a hard time finding any work. Even if I had kept my style static from the '90s I would find more and more clients looking for something newer and fresher. Don't get me wrong. Slavishly following trends and creating a raft of "me-too" images will get your portfolio bounced just as fast as a bunch of amateur snapshots. Like any artist I'm affected by the culture around me. I react to the slow but steady style shift that affects all artistic endeavors. My work has evolved over the years, even though it was hard to notice as it happened.

Recently I assembled a new portfolio for my rep to show to prospective clients. The difference in styles became readily apparent. As I pulled out 10-year-old ads and replaced them with work from 2000 and 2001 I noticed a strong trend that has crept into my work--color. I don't mean bright color, I mean a strong, saturated fluid sense of color that most working pros today have to be able to create if they want to work.

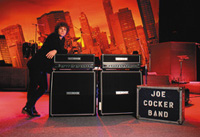
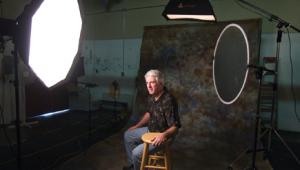
For this staged shot of guitarist Paul Warren I knew that I wanted a really warm shot with lots of background color. We brought his equipment down to a rehearsal stage where Joe Cocker's full stage background was being finished. I asked the lighting director at the rehearsal studio to give me lots of amber gelled tungsten light on the background, but to leave the rest of the room dark. I then lit the foreground with two large Chimera softboxes. I stuck four small strobe heads with red and magenta gels aimed at the floor behind the amplifiers and flight cases. I handheld the shot with a 1/4 sec exposure. This gave me a sharp and neutral subject, warm and wild background color, and just the tiniest bit of motion blur. This shot ran as a magazine ad and looked great in print.

Strong Color Play
I'm not only moving the camera, subject, and lighting during exposure to create movement, but I'm shooting with much more color in all of my images. In the '80s the idea of hot color was usually to introduce a single, strong color element onto a black Formica surface. You know the images I'm talking about--the sushi on the black background, the flute and the rose, the open cans of paint, etc. Strong color, but very well contained and usually tack-sharp. Then the '80s came on strong with a rule-breaking sense of movement, a ridiculous amount of selective focus work, and a total overkill of the fisheye lens. Toward the end of the '80s a new look began to gain popularity that really combined several elements--a strong sense of color with a bit of selective focus and a bit of movement. It's a dreamy, luscious look that works particularly well in print.

Without even realizing it I find that my work has picked up more and more of that look. I've always been a fan of mixing light sources, often combining flash exposure, HMI lighting, and tungsten in one shot. I shoot almost all of my work with a view camera so I've always used swings and tilts to bring my images into focus at times and at other times throw parts of my images out of focus. Let's explore the elements of an image that incorporate color in a fresh and interesting way.

Get The Light Right
First of all you need some lighting. While you could capture this type of image with natural light, I can't imagine how you could do it on a consistent basis. I use flash lighting using focusing spotlights, heads in reflectors, heads in softboxes, and heads with angle narrowing snoots. It doesn't matter what kind of flash you use but you'll do better with a modern pro system backed by a complete array of light modifiers. My HMI light heads, producing daylight-balanced continuous light, are usually used with narrow reflectors and barn doors. They are almost always gelled. My tungsten lighting consists of a bunch of Photogenic MiniSpots, Kliegl 10" Fresnel spotlights, and a couple of theatrical focusing spot units with different pattern masks.

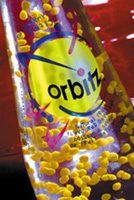
For this shot I wanted really strong color on the weird stuff floating inside the bottle, and really strong mottled color behind the bottles. I discovered that gelling background surfaces and trying to blur the background didn't give me enough definition on the blobs. The solution was to light the bottle with a softbox for exposure one, then hit the blobs with the light of a 10" Kliegl Fresnel (gelled to daylight balance) for exposure 2, and then bounce another 10" Fresnel off of a large crinkled piece of red Mylar for exposure 3. The three images were all shot in camera while I held my breath. Out of a few dozen tries one or two were sharp.

My technique is fairly simple. I figure out how much of the subject I want to keep neutral in color balance and sharp. Those areas get light from the strobe heads. The background and other parts of the set, whether it's a large set or a tiny tabletop, get a mixture of HMI and tungsten. Sometimes I gel the tungsten back to daylight balance, then apply the color gels I want. This gives me a totally daylight-balanced set, which makes it easier to figure out how the finished image will look.

Where does the hot color come in? I almost always gel the background light sources with Rosco gels. By shooting with the strobe head modeling lamps off and the tungsten and HMI light sources on, I can freeze the strobe-lit areas and keep a 1/2 or 1 sec exposure to "burn in" the background color. If I'm hand holding I'll get a bit of motion blur around the outline of the subject, which can look pretty nice. Sometimes I'll swing a light source over the set during the exposure to create a long, blurred shadow. There are lots of ways to accomplish this effect, so it pays to shoot a lot and experiment. Besides the blur and the color I sometimes like a bit of selective focus. On a view camera it's easy--I just tilt the rear standard the "wrong" way to throw the top and bottom of the image out of focus. Once the back is swung I can simply focus on any one point in the image, knowing that most of the rest of the image is going to be soft. You can get a similar effect by using long lenses and very large apertures, but the effect isn't quite as convincing.

As with anything in photography, trying to pump up color is a hit or miss affair. I tend to shoot a lot of film or fill up a lot of flash cards of digital "film" when trying something new. There are any number of ways to create strong color, from jacking the saturation in Photoshop to cross-processing negative film in E-6 chemistry. It pays to have as many bullets in your clip as possible, cause you never know when you're going to need them.


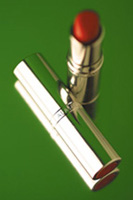
Here's a neat way to blow lots of color into a small product shot without contaminating the product itself. If I had shot this image against a green sheet of Mylar or cardboard I would have given these silver lipstick cases a strong green reflection on practically every surface. I've shot those images in the past and the client is always concerned about the product itself. My trick is to shoot the product on a polished sheet of stainless steel, a front surface mirror, or (as in this case) a sheet of silver poster board. I light the product with a small light box, use a large white reflector card to fill in the shadows, and then hang a large sheet of green Mylar behind the shot. The reflection of the green Mylar is carried in the poster board, the lipstick cases stay mainly neutral, and I get a clean product shot. The only green reflected is in one long reflection on the lipstick tube laying down, which looks "right." I shot this with a bit of selective focus, so the standing lipstick tube is largely soft.

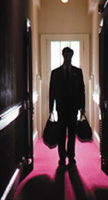
Here is an image that employs a few of my favorite techniques. This picture was shot on assignment for a magazine ad, and the client wanted a very basic silhouette that spoke about "service" at this classic New England Inn. I posed our model in a hallway with bright pink rugs, and buried a bare tube Balcar head behind him. I handheld a 200mm f/2.8 Nikkor lens wide-open with a 1 sec exposure. The flash froze the sharp silhouette image, leaving the shutter open. I let the doorway at the end of the hall blow out to pure white and added some interesting motion blur.

X