Let It Snow, Let It Snow!; Digitally, That Is Page 2
F. Next, be sure that both your original photo and the snow
image are open on your desktop. Drag the snow image over your original photo.
In Photoshop, click on the Move tool (or press the letter "v" on
the keyboard to select it). Then hold down the shift key while you drag the
snow image over on top of your original, then release it. Holding down the shift
key keeps the image you are dragging centered over the photo you are dropping
it onto, so they are both perfectly aligned. Now, all you can see in your original
image is the snow on a black background.
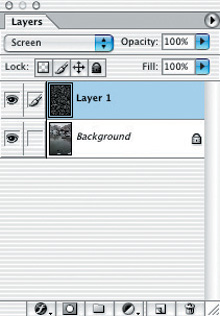
The drag-and-drop adds the snow image to your original as a new layer above
your original background image. The new layer is automatically labeled Layer
1 in the Layers palette, #6.
 |
|
|
G. So how do you get the background picture to show through? With a very simple trick. Go into the Layers palette and change the Blend mode. The Blend mode is shown in the upper left corner of the Layers palette, with a default of Normal. Now, change the Blend mode from Normal to Screen by clicking on the double arrows and choosing Screen from the drop-down menu. Instantly, the black will disappear leaving only the snowflakes drifting down over your original image, which is now visible in the background, #7.
 |
|
|
Blend modes determine how a layer will interact with the layer or layers below it. The Screen mode lets only the lighter parts of the snow layer show through. You might also want to try the Lighten blend mode for a lighter snow effect.
Control Contrast And Snow Size
What if you want more contrast? Or the size of the snow isn't right? In
the Layers palette, simply drag Layer 1 (the snow layer) to the trash can icon
at the lower right of the palette. Go back to the snow only photo, which should
still be open on screen. To adjust the contrast, use levels, curves, or even
the brightness/contrast controls. To change the size and amount of snow, Edit>Fill
with black again, then apply the Pointillize filter with larger or smaller values
for the Cell size.
If you want smaller snowflakes for a low res picture, enlarge your black duplicate
before applying the Pointillize filter, then use the Transform tool on the snow
image only to make it smaller before dragging it over the original. Be sure
to look at your image with the snow effect on screen at the size you plan to
print it. At small print sizes, you need add a heavier amount of the snow effect
to make it visible.
Add Some Motion Blur
On a calm day, the snow falls straight down, as in our example. If you use a
normal or fast shutter speed, the snow will look like it does in #7. However,
if you are photographing in low light and use a slower shutter speed, the snow
flakes will appear slightly blurred. And if there's a little wind, it
may drift at an angle. To add a touch of this sort of blur, use the motion blur
filter.
Proceed as above through E. Then add blur by choosing Filter>Blur>Motion
Blur. In the dialog box, #8, set the amount of blur you want and choose the
angle by dragging the line within the circle or typing in an amount. Here I
chose 90Þ to emulate snow falling straight down with a slow shutter speed.
A distance amount of 12 pixels yielded a realistic degree of blur for this high
res photo. Once you've added the blur, simply drag the snow image over
your original as described earlier. The result, shown in a cropped detail, #9,
is a moody, atmospheric landscape that realistically simulates falling snow.
 |
|
|
Want to take it even further? Try creating your own snowy crystal ball effect--the kind you shake to create a mini snowfall. You could do that by combining the fisheye technique I showed you in the September/October 2004 of this magazine with the snow technique demonstrated here.

It almost takes longer to describe how to add snow than it does to actually
do it. So open up one of your favorite landscapes, cityscapes, or portraits
and let it snow!
Contact
Adobe Systems Inc.
(800) 833-6687
www.adobe.com
- Log in or register to post comments
