How To
Build A Battery Pack For Your Flash

The 20 amp Buss fuses are surprisingly close in size to AA batteries. They fit quite snugly into a Vivitar battery holder. No holder? Fill the rest of the space in the battery cavity with heavy weather stripping foam.

Of all the articles that I have written for Shutterbug, there is one topic that continually generates mail from readers. Whenever I have mentioned my "homemade battery packs" for Vivitar 283 and 285 flash units, the mail pours in. Sick of poky alkalines, short-lived NiCds? Well Vivitar owners, here we go.

To build one for your own flash you'll only need a handful of parts:
· 6v gel cell or lead acid battery 1.2-4amps
· 2 conductor connectors--male and female (2 each)
· 6v 500-900 mAh power supply (wall wart)
· 18-14 gauge speaker wire
· 20amp Buss fuses (2)
· Heat shrink tubing (assorted)

First A Disclaimer: You can hurt yourself or your equipment if you proceed carelessly. While we're dealing with low voltages here, wiring the battery pack up incorrectly can cause your flash to grenade very quickly, which can be quite dangerous. Also, if you depend upon your gear for your living or are just plain serious about your photography, think hard about purchasing a commercially available battery pack. I have been building my own battery packs for the past 15 years with terrific results.

Here are your parts, less a readily available 6v power supply for use as a charger (check your attic). My total cost at the hardware store was around $15.

I first built my own battery pack for a flash that had no external battery options. My Osram BCS-44 flash units packed a punch, but had no support from the external battery manufacturers. Since I was stuck with a great flash unit that drained NiCds in about 50 flashes, I took matters into my own hands. I unscrewed every screw I could find on the flash, gently cracked the case, and found the + and - terminals for the battery compartment. Adding a short pigtail and a Radio Shack Molex connector, I now had a way to patch in an external battery. I quickly learned the maximum limits for battery power. While 1.2, 2.3, 3.5, and 4amp 6v batteries worked great, a small motorcycle battery produced such a strong jolt that I overheated the flash caps and actually melted the plastic case. (I went back to a smaller battery and still use the unit today--15 years later.)

I have since used this method to build high capacity battery packs for my passel of Vivitar 283 and 285 flash units. I use these mostly on light stands or super clamps when doing location interiors--always on manual. With fresh NiCds the flashes will be dragging seriously by the time I'm done Polaroiding and ready to shoot film. These ubiquitous Vivitar 283 and 285 flash units have been favorites of photographers for years. If you hunt through the pages of Shutterbug you can find them used for pretty short money and they're nearly indestructible. Obviously you can use this technique on virtually any flash unit, but I would start on an inexpensive and relatively beat up one. A very small unit will need smaller power supplies, so it really pays to use an older flash that you can kill if you mess up and not be too upset.

It's not pretty, but it works. The cable comes off the battery holder and sticks through the battery door. To really make for a neat installation you can cut a notch in the battery compartment door.

A correctly functioning Vivitar 283 or 285 will recycle with alkaline batteries in about 8 sec; about 6 sec with 500 mAh NiCds; and around 5 sec with high capacity 1100 mAh NiCds. While other high capacity AA batteries like 1300 mAh NiMH batteries will give you slightly better battery life and virtually no battery "memory," they still won't do much better than 5 sec and give you about 50 flashes or so before the recycle time begins to drag. (Ever ask a lot of people all dressed up at a wedding or other family function to wait until your orange light came back on? Even 12 sec can feel like an eternity.)

If your work includes any kind of fast action location work like weddings, photojournalism, or fast paced people or fashion, then 5 sec won't cut it, let alone the 10-12 sec that depleted batteries will deliver. By experimenting with a few different batteries, I found that I could buy 2-4amp gel cell batteries that would deliver 2 sec recycling for hundreds of flashes. For years I had been paying around $22 for a 3.2amp gel cell at specialty electronic stores. I recharged them with a simple 6v 500 mAh "wall wart" and built my own connecting cables. The other day I was shopping for a few pieces for my studio security system at the local hardware store and ran into these excellent Panasonic LC-RB064P sealed lead acid cells for around $8.91. While lead acid batteries don't have quite the life span of gel cells, they're very cheap and can be recharged quickly using a standard motorcycle 6v battery charger available at any auto parts store. I still prefer to slow charge my batteries, so I just rummaged around in my junk box in the corner of the studio and pulled out a beefy 6v 700 mAh wall wart and fashioned a plug. If you don't have a junk box with the remnants of all of your dustbusters, cordless phones, and desktop adding machines, you can buy the cheapest adapter at your local electronics store. If you're fancier, most electronics stores will carry a decent "smart" charger for 6v gel cells that will give you LED confirmation of charging status and auto shutoff for around $30.

Here is the completed cable assembly--use plenty of heat shrink tubing or good electrical tape to ensure that the cable will be durable.

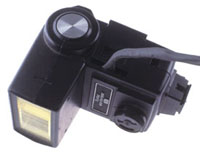
Once you have a battery and a charger, you'll need to figure out how to get your power into the flash unit. The external connections on most shoe mount flash units are for high voltage battery packs like the Lumedyne Mincycler or the Dyna-Lite Jackrabbit. We're only using 6v, so we'll need to get the power into the low voltage taps. The easiest and most reversible method is to simply sacrifice a battery holder and fashion a cable. For cable I have used everything from heavy-duty monster cable to regular old 18 gauge zip cord. The heavy cable will pass more current and give you slightly faster recycle times, but it can be a pain to use.

On a 283/285, the easiest way to get the power from your cable into the unit is to pass it through the battery compartment. Since the removable battery holders that sit in the battery compartment can still be ordered from Vivitar, it's easy to get a couple of spares. How to get the juice to the metal terminals at the bottom of the battery cavity? Simple, find yourself a couple of 20amp Buss fuses. (I use Cooper Bussman BP/FRN-R-20 20amp fuses.) These are almost exactly the same size as standard AA batteries, and they have a neat recess at one end, which is a perfect place to solder on the cable. First I figure out where the fuses must go. On a 283 they must sit in the two slots on the battery holder which sit nearest to the back of the flash unit. Once I have my polarity figured out, I slip the + and - side of the cable through the battery holder so when complete the cable will sit toward the front of the flash unit. A hot screwdriver tip will melt enough plastic away from the side of the battery holder to allow the wire to sit flush when the holder is reinserted into the battery cavity. (Remember we're getting spares for these holders.)

I found this Radio Shack charger in a box full of wall wart adapters; 6v at 700 mAh gives me a decent overnight recharger. Check your drawers and I'm sure you'll have something compatible.

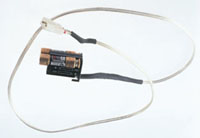
With the fuses inserted into the holder and a recess melted in the plastic, it's time to carefully slip the holder into the battery cavity. Once it is pushed down all the way just slide the battery door as far as you can go. I stick a couple of pieces of gaffer tape over the door and leave it at that. If you're looking for a slicker installation you can drill or melt the appropriate cutout to allow the cable to stick out of the battery compartment through the closed door. If you're neat and clean about it, you'll be able to switch back and forth from NiCds to the lead acid supply with no problem. If your flash doesn't have a battery holder, then you can place the fuses over the terminals which deliver + and - to the flash, then stuff the rest of the cavity with black weather stripping foam. When it seems very tight, close the battery compartment as far as you can and rubber band or tape it shut. It's not the most elegant solution, but it works.

Since you'll want to carry the battery in your pocket or on your belt, fashion yourself a decent 4' long cord. If it's too long you'll slow down recycling time and your shooting style, so figure out your ideal length and give yourself a little bit of excess. I hard wire the cable into the battery holder and put a connector at the end of the cable. I put the same gender connector at the end of the battery charger, then put a very short pigtail on the battery itself with the opposite gender connector. For decent cheap connectors get yourself a few packages of the Radio Shack 2 conductor Molex connector, part No. 274-222, a bargain at 99 cents a package. I like to heat shrink the ends of the cables and then heat shrink the cable to the connector. If you are really careful about your crimping and heat shrinking, your rig should last forever.

Here is the finished setup. I added a cordura bag that holds the battery on my belt, and the 4' speaker wire works out just fine. Recycle time is less than 2 sec for about 500 full power flashes, 1000 on auto.

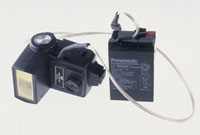
Once you have everything together, get a voltmeter and very carefully check your polarity. The battery comes from the store with a little bit of juice in it, certainly enough to test. I always set the + side of the Molex connector as the "pointy" side, the - side as flat. Hook up your cable and place the ends of the voltmeter on the ends of the fuses. The fuse end that is located in the + side of the holder should be touching the red wire of the voltmeter. With an uncharged battery you should see positive 4-6v. If you see any negative voltage--stop. Rewire your cable to get it right. Hooking up this kind of power backward will blow your flash to bits in a fraction of a second.

Assuming that your connectors on the cable, battery, and charger have the correct polarity, it's time to charge your battery up. First charge will take a good 12-18 hours with an inexpensive wall wart, so if you need fast recycling look into a quick charger or motorcycle battery charger. Once the battery is charged it's time to hook everything up. When you first flip the switch you should hear the familiar whine as the flash charges up. On my Vivitar flashes with a freshly charged battery I'm getting 1.5 sec recycling on manual, instant recycling on auto, and 300-400 full power flashes. After a few dozen flashes the recycle time will slow down to around 2-2.5 sec, but you'll get hundreds of flashes with that kind of performance.

Obviously with a seat of the pants solution like this you are sacrificing some utility. You have no idea when the battery is recharged, you don't know how much juice is left in your battery, and you have no snazzy factory made hookup cables. You certainly do have frugality on your side. Assuming that you pick up a 6v battery at the hardware store like I did, the whole rig, cable, wall wart power supply, connectors, heat shrink, and battery can be purchased for only $25. If you already have some power supplies hidden in a drawer and some spare speaker wire and a few electrical supplies, you can fashion the whole thing for what it cost me--$15.63 plus tax.

I have about six of these packs, and I tend to use them when I am setting up a location shot where I need some small flash units positioned off-camera. I found a bunch of small cordura cases with belt hooks intended for small point-and-shoot cameras that fit this battery perfectly. My friendly local camera shop let me have all six of them for $2. I hang the batteries on the light stands and hook slaves up to the flash units. With the high capacity batteries hooked up I can set all the flash units on manual and shoot all day without worrying about changing NiCds or waiting for the little flashes to catch up with my AC powered studio flash units.

While not the perfect pro solution, a heavy-duty battery and a little ingenuity will yield a pretty bulletproof flash rig. For those of you who have digital cameras or camcorders that seem to kill batteries, the same techniques apply. I sacrificed an AC power supply to hook up a 4.8v security battery to my Sharp digital camcorder, and now I can shoot all day without changing batteries. My digital cameras also can shoot forever, and they are easy to fashion a cable since they have simply 6v power connections right on the back of the camera. If you can hunt around and find the catalogs of some surplus electronics stores, you may be able to find batteries and chargers for a couple of dollars each. (But if you do--let me know.) If you take your time and make sure that every connection is done meticulously the system will work well and last for years.

COMMENTS
krempfast123ltd's picture
dgh's picture

Do not use speaker wire. Speaker has an impedance which is another word for resistance which can cause heat and might start a fire. There are several good coiled cords you can buy for this.

X