Fun With Photoshop
Creating Digitally Enhanced Portraits

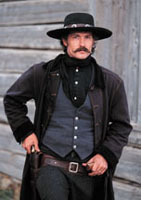
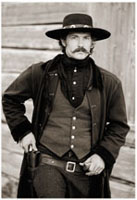
The "old time" look of this portrait (right) was created in Photoshop 5.0 by changing the color picture into a duotone. The vignetted edge was created in about 2 sec in Actions.
Photos © 1998, Rick Sammon, All Rights Reserved

Quick question: most of Ansel Adams' landscape posters are a) color or b) black and white? Take your time. Think about this master's medium. Before you answer, also consider the type of pictures that sell.

If you answered black and white, you are not alone. Most people make the same mistake. You see, this is a trick question. Most of Ansel Adams' posters are actually duotones--images printed with two or more colors for a broader tonal range. In many cases, duotones (slightly tinted pictures) have more impact than black and white pictures because they have rich and subtle colors.

Duotones. So why the heck, you might be asking, is this guy talking about landscape posters in an article about portraiture? My editor is probably asking the same question. The reason? Simple. Duotones, as well as tritones (three colors), and quadtones (four colors) are an effective way to make an original color or gray scale portrait more dramatic. (Photoshop 5.0, by the way, uses the term duotone for duotones, tritones, and quadtones.) So, thanks to Photoshop 5.0, you can still shoot your portraits on color film, then create original duotones works of art in the digital darkroom (after you convert your color pictures to gray scale images).

In Photoshop 5.0, duotones are easy to create. How easy? Well, all you have to do is load one of a dozen preset combinations and, presto, you're a duotone master. Sure, there's more you can do to enhance duotones even further, like adjusting the individual curves of the colors, but telling you all the duotone possibilities would take up several pages of this magazine. So, for now, I'll just say this: experiment, check out the endless possibilities, play with the curves, add filters, adjust curves/levels. Have fun.

Tritones, duotones, and quadtones, have a broader tone range than black and white images. This tritone portrait (right) took just a few minutes to create in Photoshop 5.0. The vignetted edges add to the "wild west" feel of the portrait.

To get back to Ansel Adams for a moment: follow his advice on making a fine-art print--keep making the work print (in this case on your screen and then on your printer) until you know the image is a fine-art image (or the best image you can make, in your judgment).

Edges.
Here's more on Ansel Adams. He suggests, in his book, The Print (Little, Brown, and Company, $21.95), that most pictures can be enhanced by darkening the edges. In Photoshop 5.0, darkening the edges of a portrait is easy. All you have to do is select the burn tool and run the brush around the frame of your picture. Experiment with different brush sizes and different levels of pressure. You need to judge if the edges are too dark or too light--or just right.

Another way-cool Photoshop 5.0 edge effect is the vignette effect, which is becoming more and more popular in editorial and advertising work. Here's what you do. Select the area of the image you want to vignette--go to Actions, go to Vignette, then go to Play. The Action of vignetting happens in a flash. Of course, you could use the Eraser to create a similar effect, but it would take you much longer.

A popular add-on edge program is Photo Graphics Edges (Auto F/X Corporation). This program offers creative Photoshoppers dozens of edges in different patterns and shapes that can enhance and frame a picture. Like a belly button, there are "inies" and "outies" in this program: in the Inset mode, your picture is framed with a black border around the edges; in the Outset mode, your picture "bleeds" to the edge of the frame.

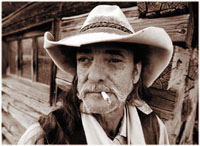
Just about any portrait can be enhanced by "playing" with the edges. A preset edge in a program called Photo Graphic Edges was used to create the rustic feel of this portrait.

Highlighting The Subject. As long as I'm talking about darkening parts of the scene, I'd like to share with you a shooting technique of photographer Chris Rainier, Ansel Adams' last assistant. Rainier often lights his portraits with a flash/power pack/umbrella setup and underexposes the surrounding area by about two stops to highlight the subject. This lighting technique makes the subject stand out from the background. Definitely a very effective photo technique.

With Photoshop 5.0, however, you can leave your heavy-duty lighting gear at home (but still take your on-camera flash) because with the burn tool you can darken the area around the subject in a few short minutes. Again, experiment with brush size and pressure.

The opposite of the burn effect, the dodge effect, is super easy to use, too. Simply select the dodge tool to lighten areas, such as a subject's eyes. Don't overuse this or any other tool. Otherwise, your picture will look fake.

Basics. Perhaps I should have started this article with a look at the basic Photoshop 5.0 tools available for enhancing portraits, but I wanted to get the duotone point across right away--for those who might have tuned out. You just gotta check out these duotones.

As far as the basics go, you can do anything that pops into your mind: correct and change color, brightness, hue, saturation, and so on. You can correct the entire image or just part of an image. For example, say your subject's face is a bit too dark and a bit too magenta. All you do is select the subject's face (with the magnetic lasso) and then make your adjustments on the slider bars. Only the selected area is changed. Kinda neat, don't you think?

Many Photoshoppers use the brightness, contrast, hue, saturation, and color sliders to fix their pictures. For more creative and exact control, I'd suggest using Levels or, if you are really into digital imaging, Curves. For example, Curves allow you to control individual values. They are really "where it's at" if you are serious about enhancing your portraits. Take the time to learn 'em. You'll be glad you made the investment.
Photoshop Filters. Say you shot a portrait on an overcast day. Although the flat lighting was flattering to your subject, you now want a more dramatic effect. Again, Photoshop 5.0 to the rescue. Go to Filters, then to Render, and then click on Lighting Effect. Now, you can create and control the direction of lighting. In an instant, for example, you can create dramatic sidelighting, which can be flattering for portraiture. You'll find lots of other way-cool effects in Lighting Effect. Check 'em out.

Most scanned slides and prints need sharpening. In Photoshop 5.0, most pros use the Unsharp Mask filter to sharpen their images. For printing on a desktop printer, 100 percent sharpening produces improved results; when work is submitted to a magazine for publication, 40 percent sharpening is often recommended. (Oversharpening an image for publication makes the image, especially a portrait, look too coarse.)

Want to be an artist? Create portraits that look like they were painted or drawn on watercolor paper, canvas, sandstone, and more? Then check out the Artistic effects in Filters. At the click of your mouse, you can add brush, pencil, pen, and crayon strokes to your portrait, turning your portrait into an original work of art. The effects are endless because you can control the length and pressure of the stroke.

The list of amazing ways in which you can enhance your portraits goes on and on because there are literally thousands of effects in Photoshop. Sure, at first glance, Photoshop 5.0 may seem overwhelming--especially when it comes to learning how to calibrate your monitor or learning about resolution and file size. But don't be intimidated by all the stuff you have to learn, and equally as important, remember. Take it one step at a time. In the beginning, learn one technique a day. In a month, you'll know 30 (or 31) times more stuff than you knew when you began. In four months, if you stick to your plan of learning one technique a day, you'll know more than 100 techniques.

Just imagine the possibilities. You may never look at one of your portraits in the same light, so to speak, again.

The pictures used for this article were shot in Cody, Wyoming on Kodak Elite chrome 100, scanned with a Polaroid Sprint Scan 35 Plus, and opened in Photoshop 5.0 on a Power Macintosh 6500/225. Only minor color and brightness adjustments were made to the original pictures. Images were sharpened 40 percent using the Unsharp Mask filter. Prints were made on an Epson PhotoEX printer.

X