- REVIEWS
Camera Reviews 
More Reviews Mobile Reviews Photography Reviews - GALLERIES
- VIDEOS
- BUYER'S GUIDES
Fix White Balance for Photos with Perfect Color (VIDEO)

We’ve all captured photos that would be truly outstanding, other than the fact that colors are way off. That’s sort of like saying you’d be a great dancer if you didn’t have bad legs.
Incorrect White Balance occurs for a variety of reasons, but the important point is that this problem is easy to fix during the editing process. In the Photoshop tutorial below you’ll learn how to make things right in barely eight minutes.
Skyler Ewing is an accomplished wildlife photographer and a popular image-editing instructor. In today’s episode she demonstrates how easy it is to fix White Balance in post. She also demonstrates that Custom White Balance is equally straightforward if you follow her simple advice.

Ewing begins by pulling up an image of a pretty seaside scene. The problem is that the blue tones are far too heavy, making the shot appear underexposed. She walks you the step-by-step rehabilitation process, and after examining her before and after photos we think you’ll agree there’s an impressive difference.
As you’ll see, the Raw file in question is straight out of the camera, and all the magic occurs with Ewing’s White Balance adjustments. Photoshop’s Blend Modes are the key to this process, and Ewing explains how they work before jumping into the edit.
The first step is duplicating the background layer. Then Ewing changes the default Blend Mode option from Normal to Difference in the panel’s dropdown menu. Don’t be alarmed when your image turns black at this point; that’s exactly what’s supposed to happen.
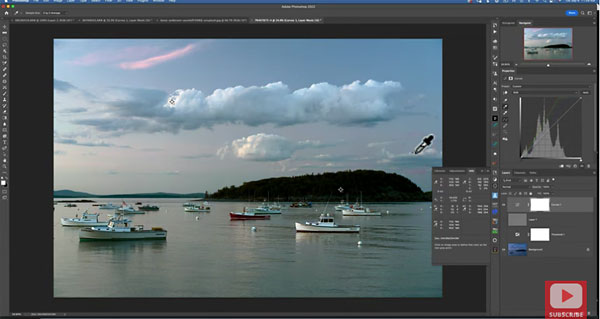
From there, the remainder of the editing technique is easy and comprehensible. And the results are outstanding,
You can find more editing and shooting tips on Ewing’s YouTube channel. So pay a visit and subscribe.
And check out another Photoshop tutorial we posted, explaining how to use three artistic filters to transform ho-hum images into really special photos.
- Log in or register to post comments


![]()
Get the Latest Photo Tips, News & Reviews from Shutterbug!
| Camera Reviews Other Reviews | Mobile Reviews Photography Reviews Columns | News | Features | How-To | Resources |
 © 2025 Shutterbug
AVTech Media Americas Inc., USA
All rights reserved