Desaturation: A Simple but Powerful Image Adjustment Tool

| All Photos © 2006, George Schaub, All Rights Reserved |
Another easy effect is toning, the creation of a monochrome image with a color cast. This harkens back to the "old" days of chemical toning, chiefly in warm (brown or amber) casts, though you certainly can try just about any color you want for the effect. You can access toning after desaturation by re-opening the Hue/Saturation control (in Photoshop) and clicking ON in the Colorize box. Then use the hue slider to find the tone you want. You can also play with the depth of the color by using the saturation slider.
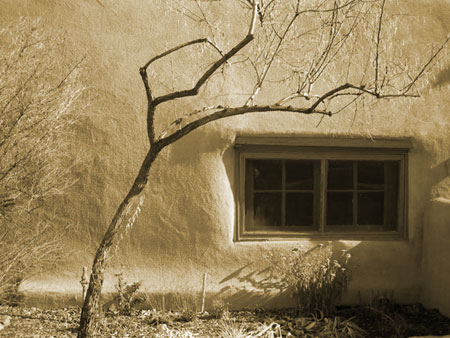
This photograph of an adobe wall was made in color and then desaturated. Using the hue/saturation control with the colorize box checked a sepia tone was added using the hue slider. Some programs have a one click "sepia" or "old photo" option.
 |
 |
There are also ways to selectively reduce saturation or to emphasize or de-emphasize one color in an image. One is to work with the hue/saturation control to pick or select one color and then to make the changes as you wish. This degree of color control can yield some great effects.
In this shot I opened the hue/saturation control and where it says Master clicked on the drop down menu. I selected red, and then moved the cursor into the image and clicked on the red flowers. This made a selection of that color range. I then moved the saturation slider all the way to left, effectively removing the color red from the scene. To add to the mood I then clicked the drop down menu back to Master and slightly desaturated the entire image.
 |
 |
An advanced technique is to work with desaturation using Layers and Layer Masks. A Layer is a type of filter that affects all the image information beneath it (on the Layer palette). A Layer Mask is a way of "cutting through" or erasing that Layer to reveal what is beneath it. This allows you to become very selective about what will have color and what will become less saturated.
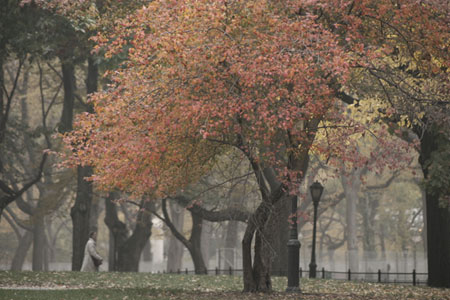
In this Central Park, NYC scene I wanted to have just one color, the bright fall tree in the foreground, come through with rich color. The first step was to create a new Layer using (in Photoshop) Layer>Adjustment Layer>Hue/Saturation. I then desaturated the entire scene using the saturation slider moved all the way to the left. Because I used an Adjustment Layer I had a Layer Mask with which to work. I then chose the Paint Brush from the Tool Box and used a soft-edged brush. I then used the brush to "cut back" to the full color Layer beneath in the area of the foreground tree.
 |
 |
Once you get a handle on working with the desaturation technique you'll find many images in your archives that will benefit from these effects. While not every photo will lend itself to full or partial desaturation, you'll be able to control color in ways that fire your imagination and lead to many interpretations of your work.


