- REVIEWS
Camera Reviews 
More Reviews Mobile Reviews Photography Reviews - GALLERIES
- VIDEOS
- BUYER'S GUIDES
Decisions About Compositions

A camera enforces a “framing” of the world before you. While you can choose various aspect ratios (from standard to panoramic, from 3:4 to 6:19) the fact remains that you always have to choose what to include and what to leave out of the photo. It’s like constructing a box and deciding what to put inside it. Making those decisions often involves utilizing certain compositional guidelines and tools that artists have used in the past, although like any rules they “are made to be broken.” When deciding which guidelines to apply always remember that content rules, and that context helps tell the tale.
When considering composition, think about how much of the scene you want to include in the frame.
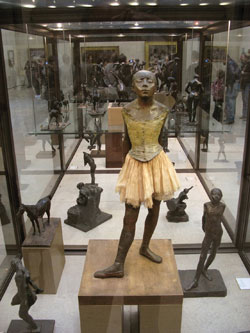
Photographic composition has a lot to do with what you include in the frame—and often as much about what you choose to exclude. Decisions include content and context, and how each serves to reinforce the other. Photo (#1) was part of a series made inside the Musée d’Orsay in Paris and includes the statue, the case in which it stood and the reflections of the hall around it, showing both “content and context” in the framing.
All Photos © George Schaub
Always ask: How does my composition highlight the main subject or idea of this photograph?
The viewer should be able to make some sense of the main subject or idea that spurred you to make the picture. Knowing what the subject or idea is will guide you in how you frame, expose and compose the picture. Photo (#2) was made as part of an essay on a historical rail yard and includes elements of the steam engine and the sheds around it. While the engine has center stage, the buildings create both interesting background forms and the context of the working rail yard.

Think about image effects. What image effects will be most effective for the photo?
The two main “image effects” in photography are how you use the shutter speed settings to depict motion and how you use aperture settings to establish the relationship of foreground to background through focus—what’s sharp and unsharp in the frame. Every photograph relies on these effects to serve as the foundation or context of what is being depicted.
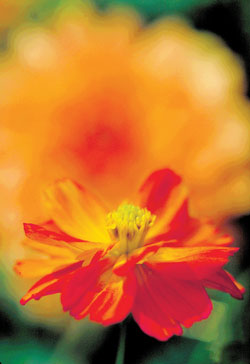
Using shutter speed and aperture settings in creative ways for each photo puts incredible interpretive power in your hands. This handheld, panned, long shutter speed (1/4 sec) shot of a streetcar (#3) uses a slow shutter speed to depict energy and motion. This close-up of a flower (#4) uses a shallow depth of field and wide aperture to create a painterly counterpoint background to the intricate details of the flower.

Remember that your eyes and the camera “see” differently.
There can be a difference between what you see in your mind’s eye when you take the picture and what the camera might record. One of the most important ways to get successful results is to understand that you can use camera settings to interpret a subject and not just record it. Creative settings are poetry to the camera’s prose. In this photo of young Kallie Polgrean (#5) a soft focus, low contrast and high-key effect was used. Creative interpretation takes practice and experience, and trying out different settings and approaches to making pictures. Learning about all the tools your camera affords is the first step, but it also takes understanding how much potential for beauty each moment holds and how camera settings can reveal it.

Take the time to appreciate the qualities of light.
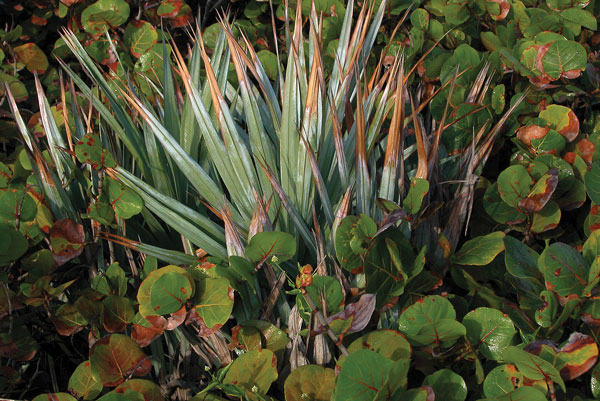
The mood created by light has a profound influence on the final image. Some important considerations include the contrast in the scene (the range between the lighter and darker areas), the direction of light and how light can influence the intensity of color. A shaft of light coming from camera left illuminated the undergrowth in the Everglades, bringing a warm tone and crispness that reveals all of the texture in the plants and the glistening dew on the leaves (#6). This fall scene is all about the reflective quality of light (#7), enhanced with a warm white balance (WB) setting (Cloudy White Balance preset). The character of the light adds to our sense of place (our ability to imagine being present when the image was made) and reinforces the subject matter.

Study the color of light.
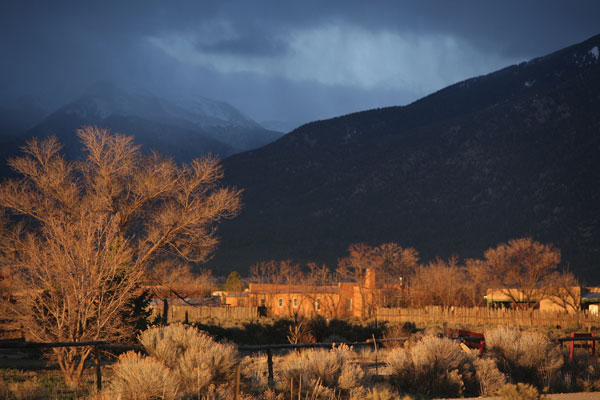
As light from the sun passes through the atmosphere it is subject to scatter and reflection and often reaches us with a colorcast. This can be seen in the bluish cast of light in distant mountains and the amber glow that graces our late afternoons. In photo (#8) the last shafts of light streak from the west illuminating the ground while the mountains are bathed in blue, a magical combination that combines 2 color casts of light in 1 frame.
There are numerous color controls in your camera, but to be able to use them to their fullest potential you should first appreciate how the color of light can have a strong effect on your images. That way you can use light in a way that enhances each and every frame.
Work objectively, think subjectively.
Photography is both a subjective and objective experience. The objective side is in measuring the light and understanding the tools for manipulating it; the subjective side is in deciding how to manipulate those tools to serve the look of your image.
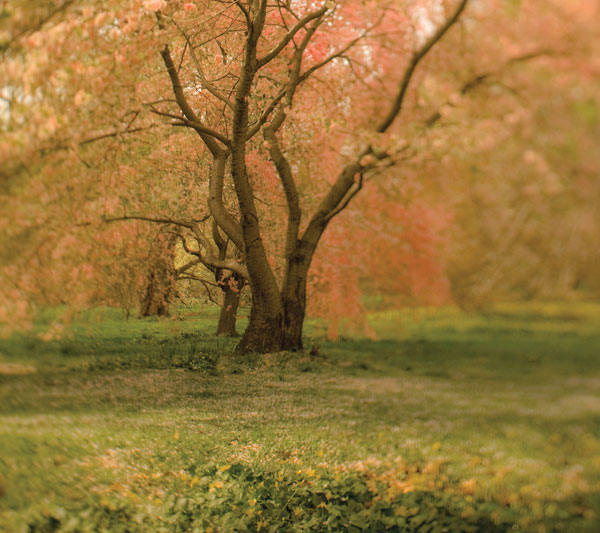
You could think of photography as blending science and art. The scientific side requires you to learn the difference between how you and the camera perceive and handle light, the limits of the recording material and how various image effects are achieved. The artistic side is how you apply those considerations to your photographs and how you use them to interpret the scene. Both of these images are subjective interpretation: the spring foliage photo (#9) was made through a Lensbaby (www.lensbaby.com) optic with a low contrast and +1 exposure setting; the snow scene (#10) was made using a high contrast and -1 exposure setting in the camera. Both are interpretations of the scenes, a subjective vision using objective tools.

Consider using “classical” compositional tools.
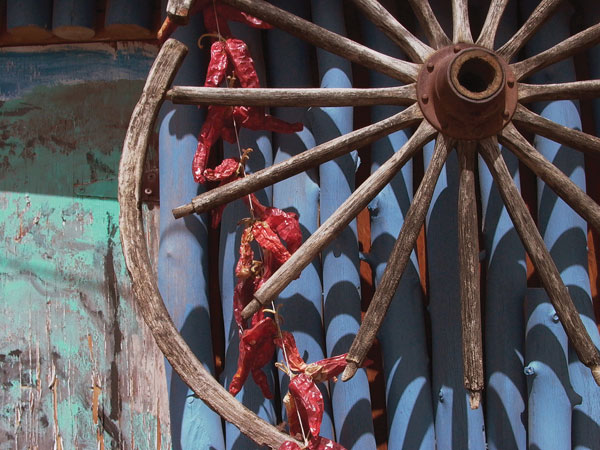
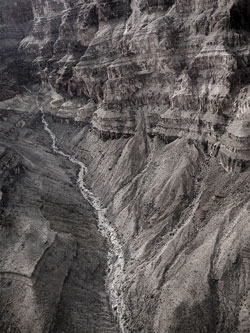
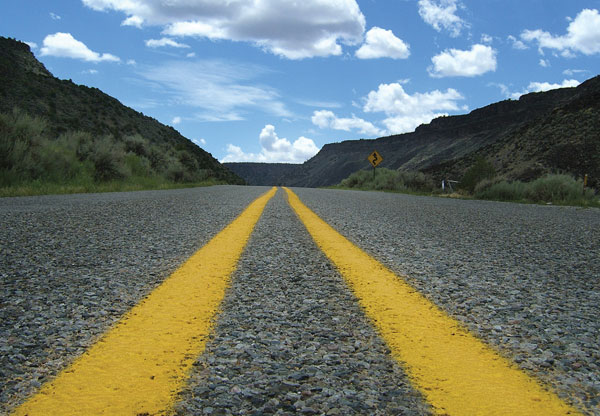
Certain shapes and lines have always been considered effective compositional tools. They catch the eye by providing iconic forms, lead the viewer into and through the frame and provide a visual context for the content in the image. Among these tools are strong shapes (triangles, semi-circles, repeating forms) and lines. The S-curve and the leading line or lines that brings the eye through the frame or out to a vanishing point on the horizon. These shapes and lines add a dynamic sense of dimension to a photo.
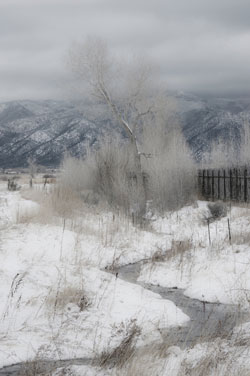
Here are some examples: Repeating shapes are illustrated in the metal objects and hot air balloons, (#11 and #12). The semi-circular shape of a wagon wheel is countered by the vertical lines on the wall behind it, (#13). A small river runs along steep canyon walls and leads the eye through the frame, (#14). A double yellow line stretches down the road and vanishes at the horizon line, (#15). An S-curve is formed by a stream in this wintery landscape, (#16).


Practice composition using “still” subjects.
Static subjects allow for time to consider the interplay of shapes and lines. Take the time to set your camera on a tripod and work with color, lines and forms to create a sense of balance within the frame. Each of us has our own “internal” sense of composition—take the time to find yours.
A subject as seemingly mundane as this dockside scene contains an intricate group of forms, colors and lines, (#17). This black and white image is a study in both formal arrangement and wide tonal range, (#18). This warehouse along an industrial canal is framed in classical compositional manner and is a study in balance and line. The entire composition seems to act as a brace on the edges of the frame, (#19).


Work with directional light.
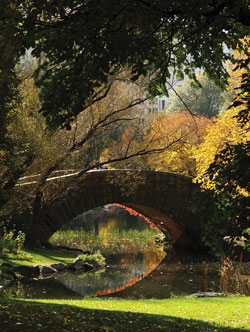
Light from the sun is absorbed and reflected, dispersed and diffused and moves in and around objects and subjects, both animate and inanimate. Though light is derived from that one source it has a direction, an angle at which it strikes those objects that change their character and meaning. As photographers we should not be passive in our observation and use of light; rather, we can move to change our point of view in relation to it and wait out the light as it moves. It takes patience to do this but it is an effective way to achieve images that resonate with a special presence. This late day photo in New York’s Central Park (#20) highlights the colors of fall, the sweep of the footbridge and its reflection.
Use light to enhance texture.
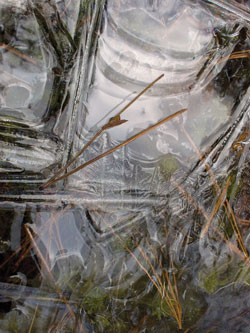
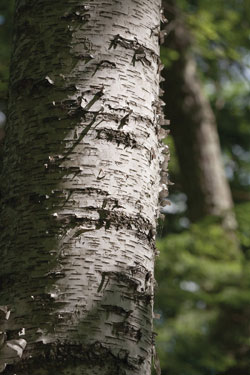
When lit from directly above, the texture of any subject is subdued. Lit from the side, however, each difference in surface topography is emphasized; each fiber in a weave is revealed. Known as cross lighting or side lighting, this strong angle of light is used to emphasize detail and surface texture. Cross lighting occurs early or late in the day, when the sun is low in the sky. It skims across a surface and offers selective illumination, defining shadow, thus shape, on any object, such as in this close-up of a frozen pond surface that shows how ice “feels” (#21), and this cross lighting that emphasizes every textural element in the bark of this tree (#22).
Choose backlighting to enhance color.
Consider this photo of trees blazing with the bright colors of autumn, (#23). When photographed with the light falling on the leaves, the colors are revealed, but move so that the leaves sit between you and the light source and the color really pops. Think of a stained glass window in a cathedral, where the view from the outside is so much less brilliant than that inside the church. You wouldn’t think of only photographing those windows from the outside—think the same way about any translucent subject and you’ll be amazed at the results.

Look for reflective fill.
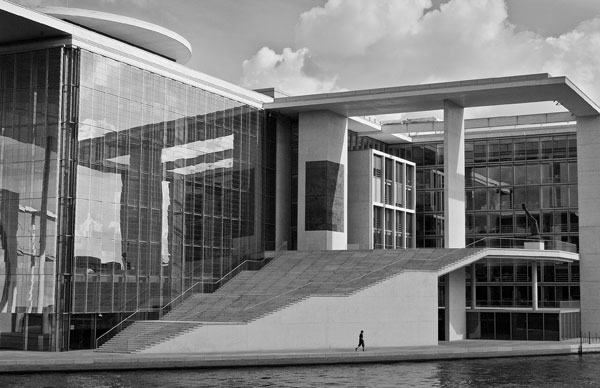
Reflective fill is any light that bounces off a surface to add light to areas that would otherwise sit in shadow. You can see reflective fill in cities with glass and steel skyscrapers; in fact, they often provide the only daylight into the canyons they create. The same goes for narrow slot canyons in the West, where light bounces from a shaft of light on an opposite wall to suffuse the canyon with a soft glow. Or it could simply be a white wall on the sunny side of the street. This photo of government buildings in Berlin (#24) was made at a time when light reflecting off the glass panels filled shadow areas that would otherwise be too dark and lose detail. Shooting this scene without reflective fill would create an entirely different image.
Try these compositional exercises:
1. Look at your own work and seek out forms. Begin to recognize how they play a part in your compositions.
2. When you shoot, arrange subjects in the frame so that they create simple geometric forms. Try “bracing the box” with form and line.
3. Move around your subject and appreciate how different points of view alter the dynamic interplay of shadow and light.
4. See how depth of field (what’s sharp and unsharp) alters your main subject’s relationship with the rest of the image.


![]()
Get the Latest Photo Tips, News & Reviews from Shutterbug!
| Camera Reviews Other Reviews | Mobile Reviews Photography Reviews Columns | News | Features | How-To | Resources |
 © 2025 Shutterbug
AVTech Media Americas Inc., USA
All rights reserved