Break The Rules
7 Tips For The Modern Portrait Photographer
The word "portrait" has had a fairly strict definition for ages. From the days of Rembrandt and Carravagio through modern photographic masters like Richard Avedon and Irving Penn, the portrait has remained a constant. While techniques and technology have changed, the concept is timeless. Although new media like the Internet have drastically altered the way many of us view images, the demand for fresh and original image-makers hasn't waned. Today, in the commercial and editorial photography worlds, the term "portrait" is being pushed, pulled, and massaged in an effort to break through the visual clutter of modern life. While classic portraits like those shot of high-school seniors, babies, and brides have changed little in the past 35 years, those shooting for magazines have found themselves reinventing their portrait techniques at least once a decade. Today, clients demand innovative and interesting techniques for photographing people. The editorial shooter must combine color, movement, and selective focus techniques while still trying to communicate the essence of their subjects. This is not to say that a conventionally produced portrait is somehow undesirable. But if you want your work to look fresh you need to keep up with the trends. While I approach each people photography assignment with flight cases full of equipment, a medium format camera, and plenty of Fuji Velvia roll film, you can create dynamic images with practically any equipment. Here are a few tips for capturing people on film using exciting new techniques. 1. Change Your Light Source.
|
|||
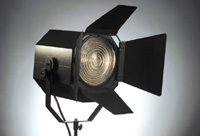
The '70s clich of backlighting a subject with a strong light source, creating that halo of backlit hair, is pretty outdated today. A more contemporary look actually borrows from the classic glamour portraits of the '40s and '50s. I have a couple of old Kliegl 10" Fresnel lights that have been converted from their original 2K tungsten bulbs to modern Balcar flash heads. This allows me to add that focused directional light of the Fresnel but still get the daylight-balanced, action-stopping capabilities of flash lighting. The Fresnel light source has a sharp focused quality of light with soft, luminous edges. It's a gorgeous light that can't be reproduced with barn doors or snoots. 2. Use Color. |
|||
3. Keep It Moving. In my own work I often like to use a studio flash for foreground lighting and then let the ambient lighting of the background work into the rest of the scene. With a handheld medium format camera I usually shoot at f/16 with a 1 or 2 sec exposure. This gives me the crisp portrait in the foreground and the slightly blurry background. I like this effect a lot. For 35mm users this is called slow synch. Remember, aperture controls flash coverage while shutter speed handles the ambient exposure. |
|||
4. Use The Golden Rule.
Whether you're shooting portraits for your own amusement, for friends and family, or for a fee, there comes a time when you need to look at things differently. Everyone falls into ruts, and even the best photographers often need a stiff kick in the rump to incorporate some fresh ideas into their work. The key is to keep your eyes open and take some chances. |
|||
5. Develop An Artistic Eye.
I've taken advantage of settings for pictures of people that were as mundane as an empty parking lot or as exotic as the gleaming Stuttgart airport. It's all about your eye as an artist. Think your best portrait of a particular individual is up against a white wall? Go for it. Think the best setting is the roof of the tallest building in town? Why not? I'm usually guilty of dragging clients all over to use the one perfect location. Sometimes it works, sometimes it doesn't, but you'll never infuse your portraits with a sense of life unless you try something new. 6. Shift Focus. |
|||
Of course I would be horrified if the school photographer had decided to be a cutting-edge editorial photographer and shoot a panoramic image with my son stuck in the corner. Likewise I would be equally disappointed if my son seemed unaware that he was being photographed, captured in an animated conversation with some off-camera observer. For editorial and advertising photography, many of these things lead to a more effective image. Shifting the focus of the image from the subject to the environment can be really interesting. I often push my subject to one end of the frame and include more of the environment. I figure as long as the image is crisp enough the Art Director or editor can always crop out the extraneous material. Usually what happens is the image looks so "right" that it runs as I intended. Another great way to shift the focus of a portrait is to have the subject interacting with an off-camera person. I often position an Art Director or assistant off-camera, then have the subject strike up a conversation. This way I get a little bit of spontaneity into what would otherwise be a pretty typical posed portrait. |
|||
7. Fill It! In order to do this right you'll need some sort of high-powered flash unit. When I first started out I only had some Vivitar on-camera flash units. While they did the trick when I aimed them directly at the person, they didn't have enough punch to do it into an umbrella or softbox. Using high-speed film won't solve the problem, since your exposure for the ambient (daylight) light source will be too high for flash synch. I've found that with moderate speed film like Fuji Provia (EI 100) you need at least 400 ws of power. I always bring my Balcar P2 battery-powered kit with me, which I use with 1600 ws heads. Exposure is critical, as is the direction of the ambient light source. If you've got direct sunlight right on your subject's face, no amount of additional flash will help. Putting the sun directly behind your subject is one solution, but then you're stuck with that backlit look. I like to find some naturally occurring shade, like the shadow of a building or a tree, or to simply create my own shadow with a large black card. If your only flash is an on-camera unit, fear not. I've created some really terrific fill-flash shots by positioning the subject in between the sun and my camera. By shooting from within the shadow cast by the subject I ensure that no direct sunlight hits the lens, and I've created a dramatic backlit portrait. Without a source of light in front of the subject I also have a total silhouette. On-camera flash works great, since the harshness of the direct flash is muted by the overall correct exposure of the rest of the scene. You can accomplish this effect even better with a large collapsible silver reflector, but I like the portability of the on-camera flash. |
|||
The Old Made New--Fresnel's
Spotlight Comeback! While you can do a decent job with inexpensive flood lights from the hardware store, if you really want to create, you need light sources that are easily controllable. Even devices as simple as the age-old barn doors can make a standard light head extremely controllable. I like a mix of barn doors, grid spots, and snoots to control the light output of my flash heads. |
|||
A really old-fashioned light source that is making a tremendous comeback is the venerable Fresnel spotlight. You can find old Kliegl, Colortran, Altman, and Mole-Richardson models at most large photography shops. All come stocked with tungsten light sources ranging from 200 to 5000w. In order to make them usable for my type of work I have had my Fresnels converted to accept modern studio flash heads. This gives me action stopping exposure times and true daylight color temperature. All of the major flash manufacturers make a focusing Fresnel light, and Calumet lists a universal Fresnel unit that can accept light heads from a number of different manufacturers. Since good lighting is also
about where not to put light, you'll want to have a few gobos
around. Gobo today is a fancy word for black foamcore. I have a bunch
of beat up pieces of black foamcore that I take on every shoot. With foamcore,
a few light stands, and some black gaffer tape you can tame any wild light
source. |
