Available Light Portraits
10 Secrets To Photographing People Using Minimum Equipment
It should come as no surprise to you to discover that there are few--maybe no--real secrets in photography. Instead, what you find are informed opinions based on experience blended with some stylistic preferences. The recipe for producing available light portraits is well-known and includes a few basic ingredients: fast film, fast lenses, and slow shutter speeds. That's it. You can sprinkle in some reflectors and add a dash of camera supports, but the main components remain the same. It's the creativity you use in blending all of the elements of available light portraiture together that creates pleasant variations. Some photographers prefer softly lit images often diffused with filters, but you may prefer sharper, more saturated images. The choice is up to you. If there's any secret at all, it's learning how to see the light falling on your subject, especially the range of shadows and highlights within the scene--the chiaroscuro. Learning to see light is not difficult but does take a bit of practice. That practice should take the form of periodically creating new images and taking the time to analyze those photographs after you've made them. Purchase a good loupe and critically examine your slides and contact sheets. Use a grease pencil to circle the frame numbers of the best images found on the contact sheets made from your color or black and white negatives. To see the effects of your lighting choices, make prints or digitize the images onto a Photo CD disc to view them at higher magnifications. Perhaps an image could have been greatly improved by moving your subject or yourself a few inches to the left or right. Make a mental note to make these kinds of changes next time. You should view the suggestions that follow as just that; suggestions that you can use for your own explorations of what tools and techniques can be combined to produce an available light portrait of a friend or family member. |
|||
Fast Like A Dodge Viper Or Like A Yugo? Whether used in an automotive of photographic terms, "fast" is a relative term. Even within photography, "fast" has different meanings to different people, so let's take a time out and define that term along with a look at some of the other tools you'll need. One of the first things you'll notice is that "fast," used within the context of making available light portraits, has far different technical constraints than when photographing nature or sports. While you can use ISO 1000--or faster--film for special effects, chances are that your film requirements for a typical available light portrait are less stringent. Under all but the most demanding lighting conditions, any manufacturer's ISO 200 or 400 negative or slide film will be considered "fast" enough. For my own portrait work, I use mostly Agfa and Kodak slide and negative film and have a particular affection for Kodak's now discontinued Ektapress 200 Plus color negative film. When I heard it was no longer going to be produced, I purchased a 50-roll pack and tucked it away in my refrigerator just for available light portraits. I like the film's modest contrast, relatively fast speed, and ability to deal with mixed light situations--the bane of all available light photography. When that's used up, I'll switch to Kodak's new Supra series of films that I have been testing. Fast Lenses. My favorite lens for indoor available light photography may be an 85mm f/2.8 Carl Zeiss, but I still like to use zooms because you rarely have the kind of choices for camera locations and positions that you have under studio conditions. I prefer to allow my subject to remain comfortable in one position, while I contort my body into Houdini-like positions to find a camera angle that works best for me. Outdoors my favorite lens is the highly underrated 135mm focal length, particularly a Carl Zeiss 135mm f/2.8. While Contax makes faster lenses, they are more expensive and heavier than I prefer to use, but you should use whatever works for you. Lens hoods are important to reduce flare problems because even with today's lenses, it's easy to find yourself shooting in less than perfect lighting conditions. A single Domke F2 bag holds all of the cameras, lenses, film, and filters I need for available light portraits. |
|||
Slow Shutter Speeds. While I have a green Bogen 3205G tripod and an olive drab Gitzo Safaripod monopod, I limit my use of tripods and other camera supports to those situations that require me to shoot with longer lenses. While photographing people, I often find myself twisted into positions that require I hand hold the camera, but I'm not getting any younger and my ability to hold slow shutter speeds consistently is not quite as good as it was a few years ago. This means I'm more than likely to choose a faster film than I might have used a few years ago. Fortunately that fits well with the excellent design of contemporary fast color negative and slide films. Tips On Improving Your Available Light Portraits. The best way to improve your photography is to practice. Make sure that you shoot a roll or two of film each week so you get to the point where you don't have to think about how to operate your equipment: You just use it to create images. If you've found that when working in the shade, you need to dial in some plus exposure compensation, make a note of that for the future. Don't worry about producing masterpieces each time you go out; use your camera as a sketch pad to explore possibilities and don't be afraid of making mistakes. Sometimes these "sketches" will be successful, sometimes not, but don't worry about it and learn from your analysis of the images. As Yoda says, "There is no try, just do." The suggestions I'm about to give are hardly secrets and may be information and ideas that you already know but may be tucked into the back of your mind, languishing and waiting to be jogged. Here's that jog: Look For Indoor Locations Where The Best Light Is Found. While it seems obvious, many photographs are taken in locations because that's where the photographer or their subject decides to make it. This may work great for an interesting looking location but for portraits made where the subject is the person--not the location--place them where the light is best. If a background is unattractive, work with wide-open apertures to soften and blur the background and focus attention on your subject. In my home, my favorite place to shoot portraits is, believe it or not, the kitchen. The walls are painted a soft white color and there's a bay window providing north light that can be modulated by opening and closing mini-blinds in each window. You may have a similar location in your home, and never thought a kitchen or other unlikely location would be a great place to make a portrait or two. Think about it now. |
|||
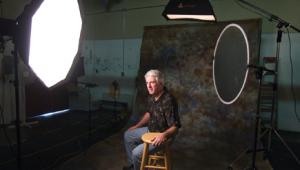
Search For Interesting Locations. Not too long ago, there was a discussion on CompuServe's Photography Forum asking what inspires people to create new images. For me, it is new things. It can be a new camera, new lens, new kind of film, or just a new area to make photographs. While traveling around my state, I look for and make notes about locations that look like they would be a fun place to make new images. Even better are those locations that can serve as a location for a portrait session. You can even go looking for portrait locations on purpose. Recently I went to a state park that has a large lake looking for a beach-like location for swimsuit photographs only to find water levels at an all-time high and the beach underwater. I had my Minolta Product 20 camera with me, and while walking around the lake's edge saw some spots that, while not beach-like, would still produce interesting photographs. Keep Your Lighting Tools Simple. The late Edward De-Croce once advised me to work with as few light control devices as possible. I try to do that because the less time spent working with my gear, the more time I can spend putting my subject at ease. These days most all my people photography is done with natural light using a single reflector or light diffuser. I use one of F.J. Westcott's 30" double-sided Illuminators that collapses to the size of a large pizza and is the perfect size for available light portraits. I also like to work with Adorama's versatile Five-in-One reflector kit, which is available in 22, 32, and 42" versions. I use the 32" size because it makes a compact package when collapsed, but is big enough to work with a single portrait subject. The kit is built around a basic frame covered in translucent material that can be used to take hot spots of a portrait subject's face, and two sets of reversible "skins" that offer silver/gold and black/white reflective surfaces. When used in combination with one of Westcott's Illuminator Arms, you can attach either reflector to a light stand and control where you want it be. Having the reflector on a light stand is extremely useful when working alone with your subject, but if an assistant is available I prefer to use them instead. It's much easier to talk to an assistant from camera position and get them to move the reflector rather than walking back to the light stand to make an adjustment, but assistants aren't always available. Reflectors can also be anywhere you find them. When I was testing a Kodak DCS digital field camera, I handed the camera over to photojournalist Barry Staver to make a portrait of me using the available light coming through the window at the diner where we were having breakfast. To add some light into my eyes, Staver grabbed a menu and placed it on the table in front of me--just out of camera range. Sometimes you need to subdue light on a subject's face or "scrim" a hot spot. For that I use an ancient 42" square translucent flat Reflectasol umbrella. |
|||
Metering The Light. All my cameras have built-in meters, and some even have spot meters, but I still like to work with a handheld meter when photographing people. My current meter is a Gossen Luna-Star F2. It's small and light and takes the incident reading I prefer to make when creating portraits. The meter will also measure reflected light as well as making corded or non-corded flash meter readings. Not bad for a light meter that weighs a little over 4 oz. While working with a portrait subject, I like to measure the light on both sides of a person's face to determine the lighting ratio. There are all kinds of rules of thumb telling you what the ideal ratio is, but Italian Renaissance painting techniques used lighting ratios that would make some photographer's hair stand on end, yet created art that has transcended the centuries. The "right" ratio will vary depending on the shape of the subject's face and the look that you want to produce for the final image. Watch The Background. It's so easy to become so enthralled by the person you are photographing that you forget about the background you placed them--or they placed themselves--in. There's an old portrait photographer's expression that says, "If you watch the background, the foreground will take care of itself." Nowhere is this more true than in making available light portraits. Busy, ugly backgrounds can be thrown out of focus by using longer lenses and wider apertures, but it's not uncommon to have to clean up an outdoor site before you can create a portrait. While you can always digitally remove beer cans and fast food wrappers, taking the time to clean up the trash in an area before you make an outdoor portrait leaves it clean for everybody else, too. Talk To Your Subject. Many years ago, I asked photographer Jay Perskie what was the worst thing I could do when photographing people. I expected him to give me some tips about avoiding technical problems, but his answer surprised me. "If you don't talk to the people--relate to them as human beings--you're never going make a good portrait." Twenty-five years later, I haven't forgotten that advice and I'd like to pass it on to you. Using a handheld meter provides you with a way to interact with your subject. While taking a meter reading you should also take the time to talk to your subject and reassure them that they look great. |
|||
Photographing people combines elements of psychology as much as camera technology and how you interact with your subject--personally--will have more to do with the success of your session than the camera, lens, and film that you use. Manufacturers/Distributors |


