The Art Of Photographic Recreation
How To Make An Image From The Minds Eye

Photos @ 2003 David B. Brooks, All Rights Reserved

Many times, when I have been out driving, whether looking for pictures or not, I often catch a glimpse of an image as I pass along the road. I'll stop, go back, get out my camera and make some exposures. At other times, if without a camera, I might catch a quick impression of a picture and that becomes a remembered perception in my mind. Then, I'll go back later with a camera to where I visualized the picture. Sometimes I'll make exposures if I can capture that scene in a way that is reminiscent of what I remembered seeing.

As time has progressed I have grown increasingly frustrated by what I am able to capture with a camera because it does not recreate what inspired me to make a picture in the first place. This doesn't happen because of my lack of ability to use my camera effectively. In all modesty, I believe my knowledge and skills have increased over the years. But over those same years I have come to realize how limited a camera can be in capturing the pictures that reflect our inner perception of a scene, our remembrance of inspiration.

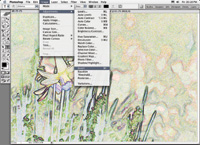
Among Photoshop's filter resources on the main menu bar are several I have found useful for creating image variations, including Note Paper and Emboss in the Sketch folder, as well as Glowing Edges in the Stylize folder. I use the latter most frequently after modifying it with Image Adjustments.

The French philosopher Roland Barthes, in Camera Lucida: Reflections On Photography, discussed this dilemma of photography. In that work he made one very revealing distinction between photography and other creative visual arts. That difference expressed by Barthes, put simply, is that photography is linked directly and permanently to its subject, while all other creations of visual representation are the result of a visual perception of the subject followed by the conscious direction of the mind. This "direction of the mind" controls how the artist's hand creates the picture. Although the camera is indeed under the conscious control of the photographer, it, unlike drawing and painting, records the subject by embedding reflected light directly onto the physical media of the photographic process. This irrevocably ties the image and subject together.

A painter, for instance, can produce a picture solely from memory by putting on canvas what is in the mind's eye. A photographer cannot make a picture of just what is in his or her mind, the "remembered perceptions." A photographer must have the subject in front of his or her camera, and if what the camera sees differs from the photographer's perception of what the subject is, so will the resulting photograph differ from how the scene was first seen and then remembered in the mind's eye.

The Glowing Edges filter effect is most useful after the image has been Inverted. Then, if the resulting colors are likely to adversely affect the final composite, apply Desaturate to make it a gray scale. This serves to outline detail and add texture and detail to the layered composite.

At the time Barthes reflected on photography, the process was still limited to physical media like film, which captures the effects of focused light and records an image in silver or dye, one that is forever bound to its supporting substrate. But once an image could be either scanned or made directly with a digital camera a photograph became information, data that could be re-arranged and manipulated endlessly. When this occurred, the irrevocable bond tying a photograph to its subject was broken. That freedom makes it possible to "rewrite" a photograph to match any perception a photographer might have in the mind's eye.

With this revelation, it became my goal to recreate the images I have taken to look more like the fleeting glimpses of scenes as I visualized them, "recreating" photographs to become the pictures in my memory, in my mind's eye.

The following story is about the journey I take, beginning with a literal image of a subject, and ending, often after many detours and side trips, at a destination that's more like a personal, mental perception than what a camera lens records. Your point of departure and your destination will be different than mine, but by following some of the paths I have explored you can create a journey that will reach your own personal destination, and hopefully close to your personal perceptions--what's in your mind's eye.

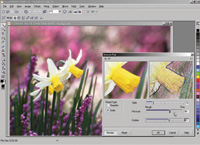
Corel's PHOTO-PAINT has a large selection of potentially useful filter effects listed under the main menu Effects. In the Art Strokes folder in the main menu Effects drop-down, the one that I have found most unusual and useful is Sketch Pad. This filter converts sharply defined image edges to a dark outline and reproduces smoother image tones with the appearance of a finely applied colored pencil rendering.

The Tools For The Journey
If memory serves me, the popularity of special effects camera lens filters peaked by about 1980. It took a much shorter time for computer digital image filters to reach their zenith and all but the most practical to largely fade from the marketplace. Most filters made for a camera lens or an image-editing application that produce a "special effect" I think, are used once or twice and soon forgotten, like one-song wonders on the music pop charts. But among all the glittering glass are a few rough diamonds, which, with a little thoughtful consideration and careful polishing, can become glittering gems in a toolbox for imaginative image recreation. Because digital image filters each have a single, identifiable effect, their signature modification of a photographic image is immediately apparent and readily recognized. The filter, in essence, presumes much or most of what the photographer has to say by using it. It is a bit like the songwriter who gets in a rut and repeats the same few licks in every song--you soon know the sound by heart, and have little appetite for more of the same.

If there is a secret to creating effective recreations, it is to have a good-sized toolbox of "filter" gems and then to use them selectively and in different combinations, each suited to the unique character of the original photograph you are recreating. My approach is to use several filters on an image to create different versions of the original, then to copy and paste different combinations of these variations to produce a layered image. I then work with varying transparency levels and layer effects and blend together. This results in a complex balance that recreates the "look" of the image in my mind's eye. Very often I will try numerous combinations in different order and with different transparency levels or effects. I apply these to the numerous layers before I find a combination that "works."

Synthetik's Studio Artist 2.0 is an imaging corollary of a music synthesizer. By referencing the color and brightness of pixels in a photographic image file, it will then paint the image stroke by stroke on a new canvas with one of 1500 brushes in the selection included with the application. Some of the brushes mimic naturalistic pencils, pens, and paintbrush effects, while others render a photograph as if painted by a fanciful, imaginary tool. After using Studio Artist for over two years, out of the 1500 brushes and effects available I have worked with just a small portion.

The Computer Applications Used To Recreate Photographs
Adobe's Photoshop or Elements (www.adobe.com) is my choice as the core editing application to do the final composite processing. The Filters the program provides also are an excellent resource. Another image-editing application that is both capable and contains a large selection of filters that in part differ significantly from the Photoshop selection is Corel's PHOTO-PAINT. My primary application to create the variations of saved files to composite however, is Synthetik Software Inc.'s Studio Artist 2.0 (www.synthetik.com), which for some is not an option as it is a Mac-only application. For PC users, Painter 8 (information about both Painter 8 and PHOTO-PAINT 11 is available at www.corel.com) is quite rich and powerful in producing the kinds of modifications to a photographic image that work well in composite, layered recreations.
Producing Image Effect Variations
After choosing an image file you want to recreate, the first step in the process is to decide what your final print image size will be and then re-size a copy of the file. For instance, if you want to produce a print with an image size of 11x14", I would suggest planning on a resolution of 300dpi for the print image. However, special digital effects applied to that high a resolution produce much too fine a result and will not be readily apparent in the final print. I recommend using Photoshop's Image Size with Resample turned on to reduce the image resolution to 100dpi. Then after all of the processing and layer compositing is completed, use Photoshop's Image Size with Resample turned on to increase the resolution back to 300dpi.

Corel's Painter 8 was one of the first computer paint applications designed to mimic natural media effects. The earliest versions I explored many years ago demanded a lot of freehand work and required learning an excessively complex set of tools. In the latest version since Corel has owned Painter, the interface has been simplified and is more intuitive. In addition, this latest version of Painter provides both automated and hand-controlled clone brush effects.

The next step in the process is to produce a set of image effects variations of the 100dpi file. After an effect is applied use Save As and add the name of the effect to the file name and save the file in a "resource" folder.

I have found that there are three general modifications required. The first is an image effect that produces a definition of the basic shapes in the original. The second is an effect that replicates the colors and brightness of the original by means of a relatively fine texture. And the third is created by larger and bolder "strokes" of interpreting the colors and tones of the original. In some instances two of these functions can be combined. Then again, some original images need four variations to build a satisfactory recreation. Because the process is very much one of trial and error, like putting together a puzzle, I may make many more special effects variations than I will actually use. And, because each original is unique in content, the blended recreation elements will be equally unique as a combination of different composite layers. The more recreations you produce the more you learn about the process and it gets easier. The more you engage in the process the more recreations work as images of your mind's eye.
Putting The Variations Into Layers And Blending
Although I prefer to work with Photoshop or Elements to put the image variations together by blending the layers to recreate a photographic image, Corel's PHOTO-PAINT or any other image-editing application that has layer support can be used. Regardless of what application you use, be prepared to use lots of patience. Even after making dozens of recreations I am often frustrated and occasionally completely disappointed because I cannot find a combination and balance of image blends that works for me. It is not just putting a certain combination of special effects image variations together, but also trying them in different order.
So, if you have made six or a dozen variations and tried every combination and order imaginable, sometimes you have to go back and make even more special effects variations to discover the one that almost magically provides the balance of effects that finally works.

Rarely will the simple blending of two layers result in a completely satisfactory recreation. Usually I find there is something lacking. The effect may be too bold. (In that case I find that adding another layer might "soften" it and make the texture more complex and interesting.) Or, using only two layers does not fill in enough visual information to be representative of or define the shapes of the subject.

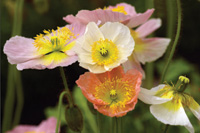
My recommendation is not to be too easily satisfied. Even if you have blended two or three layers into a composite that is interesting and satisfying, use Save As and a new file name like "Poppies-X1.tif," and start over again with a different combination from your folder of image effects variations. Then once you have made a number of different layered and blended composites save each as file name-X1, X2, X3, etc. Then you can compare them one against the other and you may find the one that works best is X4.

Finishing And Printing Recreation Files
Very often the result of blending layers to make a composite image produces an image file that may not fully utilize the gamut of what can be reproduced in a print. This usually requires a Levels adjustment, and possibly a mid-tone correction to lighten or darken the image. In addition, some overall saturation is often lost in the blending and you will need to use Hue/Saturation to restore the color intensity. Less frequently you will find a need to use Curves to increase contrast or even change the relative brightness at some level of tone density. Usually this is fairly minor image tweaking similar to fine-tuning a digital camera image or a scan made from film to make an ideal print image.

Once your recreation image file is finalized in color, tone, and contrast, you should restore the resolution using the Image/Image Size dialog with Resample clicked on and change the resolution from 100 to 300dpi. Please note that only after the resolution is restored should you apply any image sharpening. I have generally found a moderate amount of the Unsharp Mask option will bring out and better define the texture detail in the image. However, don't overdo the sharpening or the result will be a harsh, noisy-looking print image.

You can print a recreation image file in the same manner as any digital photograph. Be aware, however, that the work you have done on the image might make it print differently than a "straight" digital photograph. My suggestion is to try a matte, natural, fiber-based paper for ink jet printing with the recreations you produce. You may very well agree with my taste and see recreation images look best on an exhibition style of printing paper.

Producing Image Effect Variations
(Left) Once you have re-sized your original photo file, 11x14" by 100dpi for instance, save it as a newly named file to your desktop, and be sure from then on to avoid making any changes to the original. Use Save As and a modified file name once your special effects variation is applied. This becomes a distinct file that you will use as the layers to blend together in a composite. (Right) One of the filter variations I nearly always use is Photoshop's Filter/Stylize/Glowing Edges. And, I usually Invert the Glowing Edges image effect so the subject and detail is outlined in black or dark tones. With some subjects, like softly lit portraits, the Glowing Edges effect is much too distinct and strong. Instead, to serve a similar purpose I use the Filter/Sketch/Note Paper. With photographs that have large areas of smooth tones, sparse detail, and little or no texture, Filter/Sketch/Bas Relief can also be useful.
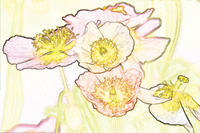
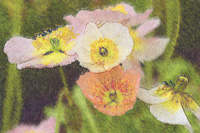
(Left) Another filter effect that provides a similar function of defining the shapes in a photographic subject, but more subtly and with an addition of fine texture, is the Corel PHOTO-PAINT Effect/Sketch Pad. The Sketch Pad effect often works well when the Glowing Edges outline is too bold. (Right) Studio Artist 2.0 also offers several automatic paint selection "patches" which will define the edges of strongly contrasted shapes in a photograph. The Preset/New Fun Stuff and Category/Autopaint 1, with the Patch/Soft Edge Rougher 1, functioned remarkably well to outline and detail this photograph of poppies. On other subjects with less distinguished shapes and colors in the original photograph it is usually less effective. And unlike the filters in Photoshop or PHOTO-PAINT, Studio Artist will take many minutes instead of a few seconds to auto-paint an effect on a blank canvas.
(Left) Studio Artist 2.0's wealth of different "paint patches" or filters is richest in effects that paint with moderate to bold strokes. The Preset/New Fun Stuff, Category/Autopaint 1, Patch/Orient Paint Wet 1 is a good example of a moderate effect that preserves the broader elements and colors of a photograph but with flourishing strokes that have a look between a watercolor and oil paint media. (Right) An example of a Studio Artist rendering that offers a bold and a distinctly styled rendering of the original image is the Preset/Default, Category/General, Patch/Creamy Dream Paint. This interpretation is so distorting that the identification of the subject content is almost entirely lost. However, blended with more representational image effects, the subject's identity can be recaptured while maintaining some of the stylized effect.
(Left) Corel's Painter 8 is somewhat like Studio Artist, offering a diverse selection of Clone brush effects that are quite interpretive. Painter also provides an added dimension--making the application of the effect selective by allowing you to manually apply the brushed Clone information on the new canvas by hand with a mouse or tablet pen. Thus you can paint in just what you want from the original photograph and leave portions of the canvas unpainted. Or, you can choose to use alternate brush effects to paint in different parts of the canvas. (Right) The first step in putting two special effects variations together is selecting one to open in Photoshop to become the base or background layer. Because this layer is the foundation it essentially remains constant. I would suggest starting with a special effects variation that contains much of the color and tone of the original.
"Putting The Variations Into Layers And Blending"
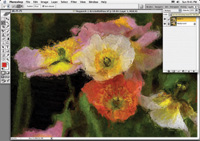
(Left) To create your second layer use the menu bar command Edit/Paste. Then open the Layers Palette on screen. You will see that there are two layers. The one that is highlighted at the top is the one you just created by using the Paste command. At the top of the Layers Palette window there are two control tabs. The one on the left is the Mode drop-down, which has numerous possibilities you may want to experiment with, but the only one other than Normal I have found particularly useful is Multiply. Click on it and see what happens to your image. The background variation and the one you just pasted together are now blended together. Another way to blend is to leave the Mode Normal and then use the Opacity slider at the top right of the Layers Palette window to make Layer 1 that you have pasted in partly transparent so the background layer is partially seen through. This effectively mixes the two images together. (Right) Once a satisfactory blending level is achieved between two special effects layers the resulting image may be too dark or light. You can go to the menu bar Layer/Merge Visible to make the two layers one. Then open the Image/Levels dialog to tighten any space without image data at either end of the gamut. Then adjust the mid-tone triangle on the slide under the histogram to left or right to lighten or darken the image.

X