ACDSee Pro v. 5 For Windows: Raw Conversion, Image Editing Plus Free Online Storage

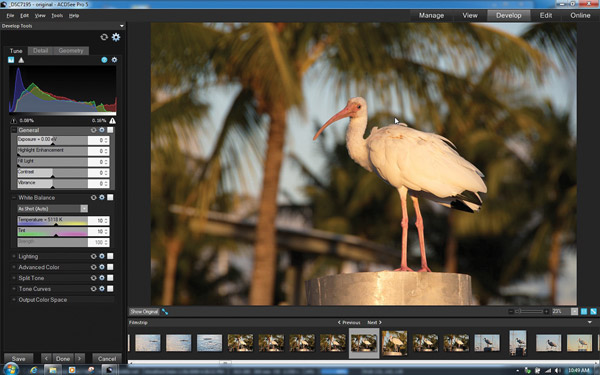
The latest iteration of ACDSee Pro for Windows presents a slightly revamped interface, with 5 key modules, each with its own set of Menu commands. You enter the program in Manage mode where you can import images from any media or device onto your working drive and catalog them at that time or catalog and work with existing files in place, without importing them. All popular formats, including 16-bit Raw from numerous cameras, are supported for import and export, but not DNG export. If you move image files after cataloging or working on them, do so from within ACDSee to ensure that all linked files, notably XMP metadata, are moved together.
The Manage screen is essentially the jumping off point. Select a folder from the panel on the left; view the thumbnails and select images for subsequent processing by dropping them in to the Image Basket (images can be added to this panel from any location). You can define what information attaches to the thumbnails. I chose EXIF data. Too much information and it becomes overly cluttered while limiting how many thumbnails can be seen at a glance. Additional data is optionally shown on the right. The program lets you assign and search using user-defined categories, ratings, color-coded labels and tags. Searches can be even more extensive.

All Photos © Jack Neubart


You can also burn CDs and DVDs from here, geotag images, create PDFs and slideshows, print images and contact sheets, as well as upload images to an FTP site or several popular image sharing sites and e-mail images (register the program to enable the online features). Or you could even send the image to an external editor.
If you double-click on an image, you’re whisked to the View module, where you see a larger view. Options (preferences) can be found in any module, under the Tools menu. So far, so good.
The Raw Converter
The heart of ACDSee lies in the Develop module, which is a fairly robust Raw converter. There are many key groups of settings, beginning with Tune. To reveal settings under these respective panels, you can click on and expand individual groups (keeps the screen tidy), or expand all at once.
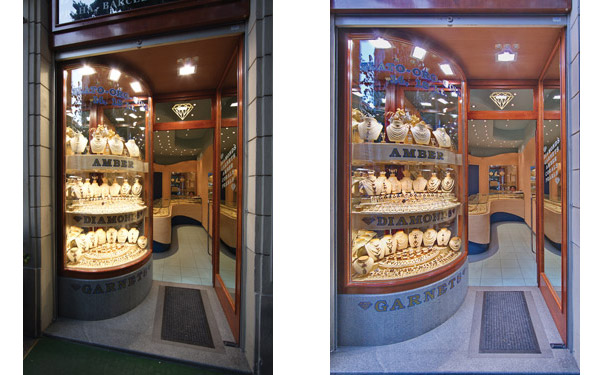
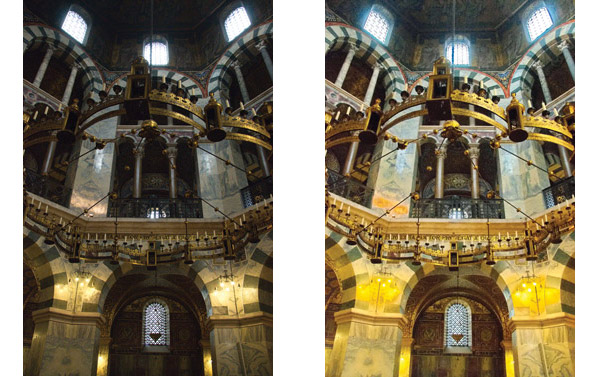
The Tune panel addresses exposure, contrast and color. We first encounter the General group. It consists of the usual opening volley for tonal control: exposure, highlight enhancement (recovery), fill light, contrast and vibrance. Two other group settings, White Balance and Tone Curves, are par for the course. There’s also a Split Tone group (new to v.5), which I used to selectively warm up shadows in overcast scenes, rather than artificially distort tones.
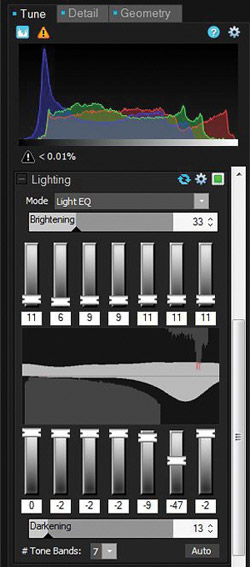
But what really caught my eye are the Lighting and Advanced Color settings. Lighting is ACDSee’s brand of single-exposure HDR to control tonal contrast. There are 3 ways to approach this. Basic simply governs highlights, midtones and shadows via sliders. The Advanced mode is a graphic representation, also with sliders. Be careful of the Auto button in Lighting: it has a shadow bias and tends to overexpose.
I often prefer the Light EQ settings. This is analogous to a graphic equalizer for audio (hence the “EQ” designation), with a choice between 2 and 9 “channels” (tone bands) each for brighten and darken, via sliders, plus a graphic representation. You can adjust tones directly on the graph—or the image itself—via a context-sensitive controller, by mousing up/down to brighten/darken values. You can also input numerical values.
(Tip: Use the Light EQ sliders first, look for highlighted areas in the graph denoting clipping along with the clipping indicator above the histogram. Then adjust individual bands as needed. I use this together with Tone Curves and the General group of settings to control tonal contrast—all in Develop mode.)
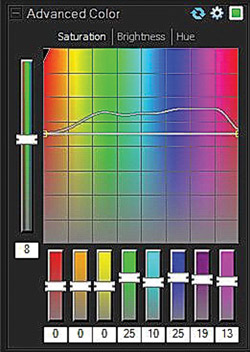
Advanced Color lets you adjust Saturation, Brightness and Hue. Here you can adjust all colors uniformly as well as individually and, as in Lighting, you can mouse over areas of the image to be adjusted.
One thing you’ll note is that each group features 3 icons: one to reset to default settings; one for Presets governing that group; and one to turn the group on or off (a quick and easy way to temporarily undo without actually negating your efforts). There is also a Menu Undo (Redo) function, but this gets grayed out after you switch pictures or modules. Undo (Redo) is still the only option to retrace your steps while working on any picture in Develop mode.
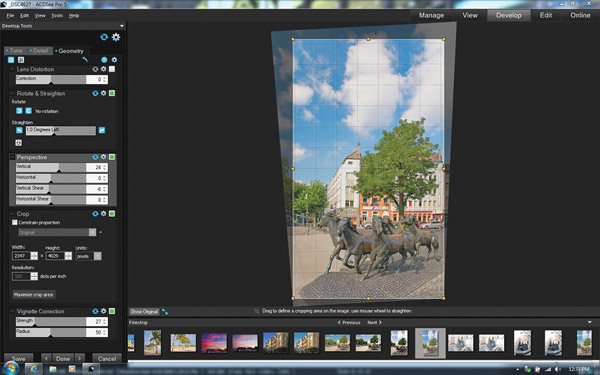
The next 2 groups are Detail (sharpening, NR, color fringing) and Geometry (distortion, rotation, perspective, cropping, vignetting). Here you find the usual fare, with a couple of exceptions. While chromatic aberration appears to be adequately addressed, the Defringe settings could have been simplified with a straightforward check box for purple fringing. And NR settings are minimalist, if effective (but only to a point at this stage). I found the vertical/horizontal shear adjustments to be a welcome addition to perspective control.




Presets are always a useful tool, though few are provided. Still, you can fashion your own to govern a broader group of settings or for individual palettes/groups. I found it best to exclude geometric settings, as well as NR and chromatic aberration/defringing from the overall Presets (but I did include sharpening). Those excluded settings should be addressed as needed or in Presets targeting specific lenses/focal lengths.
Set preferences in Options to automatically save the nondestructive Raw adjustments in Develop mode. Even before using Save As, as a further precaution against losing your work, click “Done”, which stores all Develop settings. (Note: The program sometimes lost settings when I failed to take this step—so better safe than sorry.)
Pixel-Level Editing
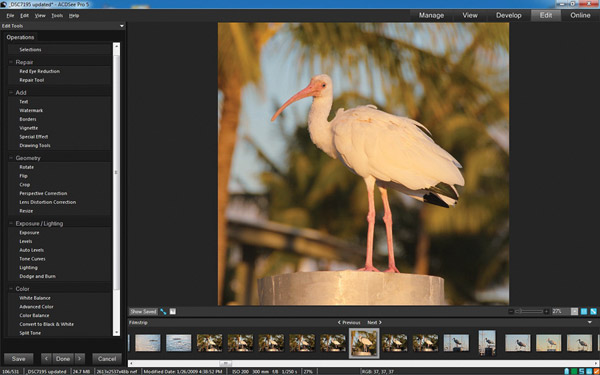
There is yet another facet to ACDSee Pro 5: where the fun takes place, and some serious editing as well. Once you start to make adjustments in Edit, you can’t simply leave without either saving or discarding the changes made. While there are no Presets governing all actions in Edit mode, this module does let you customize Presets for individual settings (but Presets don’t cross over between modules).
Many of the parameters are similar to their Develop counterparts, but may vary in degree. And you’ll find tools here that are not provided in Develop, for instance, the Repair tool for healing and cloning, and the Selections tool, which offers a Magic Wand, Freehand Lasso and Marquee, but lacks a Magnetic Lasso. The program does not highlight the Magic Wand selection effectively, so the best recourse once a Magic Wand selection is made is to hit the Preview button to see the selection more clearly. To facilitate editing the image, you can render the selection invisible by clicking on the “Hide Selection” icon that appears to the left of the zoom settings toward the bottom of the screen (highly recommended when using the Magic Wand).
Adding text, watermarks, vignettes, special effects and borders should be the very last steps, since any subsequent editing will affect these enhancements. For instance, changing distortion or perspective after adding a border or vignette would distort the entire image.
Select Edit settings can be undone by clicking Reset. In some instances, you can click Apply to lock in the changes made, so you’re free to experiment further without doing any lasting damage. Reset won’t affect the image afterward, but you can still Undo these changes in their entirety.


Conclusions
There is no mystery to using ACDSee Pro 5. It’s largely straightforward and doesn’t try to overwhelm you with a hodgepodge of vague settings. Print support extends to contact sheets—a nice touch, seeing that Photoshop has hidden or discarded that option. Add to that all those nice refinements I already mentioned, especially those that control local tones and colors.
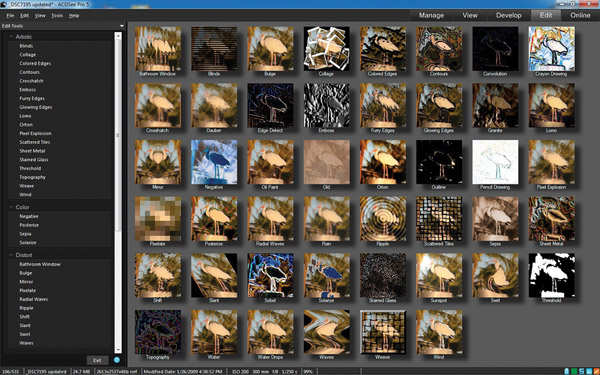
Edit mode adds some spice with, among other things, text and watermarks that blend into the image. And the generous array of special effects goes a long way toward grabbing the viewer’s attention—definitely worth exploring.
Although I was disappointed by the dearth of starting Presets, I found it easy enough to create my own. In the end, I had Presets tailored to most lighting situations, to the point where I could click on any picture, select a Preset and move on. If it wasn’t the final step, it at least put me in the ballpark so that I could return and finesse the image later, selecting it from the Image Basket.
ACDSee Pro lacks support for layers, so you can’t create composites or do complex blending operations. And I’ve encountered memory problems that forced me to close and relaunch the program to free up resources. Faster operations would also be appreciated.


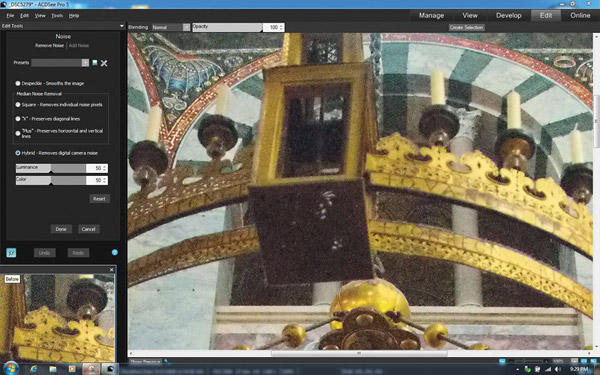
The Noise Removal algorithms leave something to be desired. Images remain gritty despite cranking up NR Luminance levels as high as they will go in both Develop and Edit. That said, at least the image doesn’t turn to mush as you do so.
One of my favorite Lightroom/ACR tools, Clarity, is missing. And there is no graduated filter or adjustment brush, although the Dodge-And-Burn tool in Edit could work toward that end, if applied carefully (but keep in mind that you’re now working on a TIFF or JPEG, not on the Raw image).
Perhaps I’m expecting too much, but I really would have liked lens profiles to automatically deal with lens corrections. Lens profiles are not always perfect, but they’re a useful starting point—and certainly a time-saver.
Despite a few misgivings, I found ACDSee Pro 5 for Windows to be an admirable imaging application. Pro 5 is fundamentally uncomplicated, with a user-friendly, largely intuitive interface and has the basic essentials. It also adds some intriguing tools that you can really sink your teeth into. And the palette of effects adds an entertaining side. Best of all, Raw conversion and pixel-level editing are practically all under one roof, so there’s no need to buy two separate applications.
In the final analysis, ACDSee Pro 5 certainly helped me reinterpret and bring out qualities in images that I missed before. This may not be my ultimate choice, but for those of you who want to get going right out of the gate, this is a good starting point.
Price: $239. More info and system requirements: (www.acdsee.com)
ACDSee Pro For Mac And ACDSee 14 For Windows

- Log in or register to post comments


