- REVIEWS
Camera Reviews 
More Reviews Mobile Reviews Photography Reviews - GALLERIES
- VIDEOS
- BUYER'S GUIDES
5 Pieces of Photo Gear Every Photographer Should Try

When getting started in photography, it's easy to get enamored with all the enticing equipment out there and go on a spending spree, listening to everything everyone suggests you need in the process. However, most of the photo gear people say you "absolutely need" to be a successful photographer isn't as important as they may make it seem, and it's critical to develop your own workflow of tools.
At Lensrentals.com, we encourage this approach, by offering a large variety of gear that people can affordably rent to help find out if it is something suited to their needs. Outside of renting, a huge part of what we do is figuring out what photographers’ goals are and helping them make the gear choices that would be best for them. Through countless calls with customers, we've come up with a list of five things we think everyone should give a try at some point in their photography careers.
1. Macro Lenses
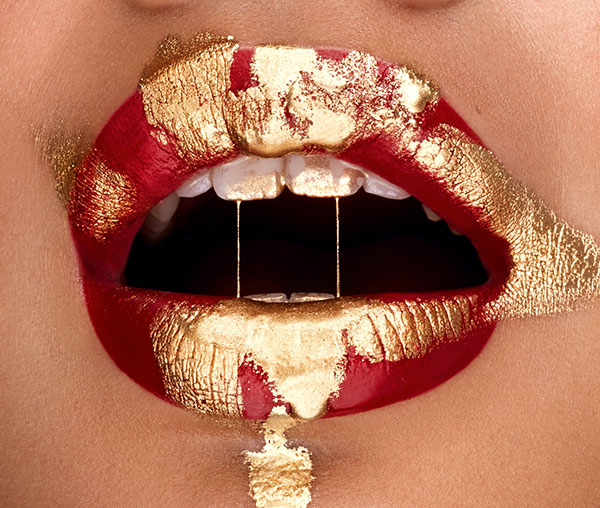
It's easy to write off macro photography as based around a specialty lens that has no practical purpose unless you're shooting detailed shots of bugs’ eyes and flowers. What some new photographers might not realize is that using a macro lens can produce interesting results in a broad range of photography genres.
As a beauty photographer, my absolute favorite lens is the Canon 100mm f/2.8L IS Macro but Canon also make the more affordable 100mm f/2.8 Macro, and I use both lenses to create some interesting macro shots of makeup, and details on a subject’s face. With macro photography, you'll quickly discover an entirely new world for your photographic eye, and will likely become obsessed with the detail your camera can capture, along with the resolution power while shooting everyday objects.
2. Prime Lenses with Low Apertures
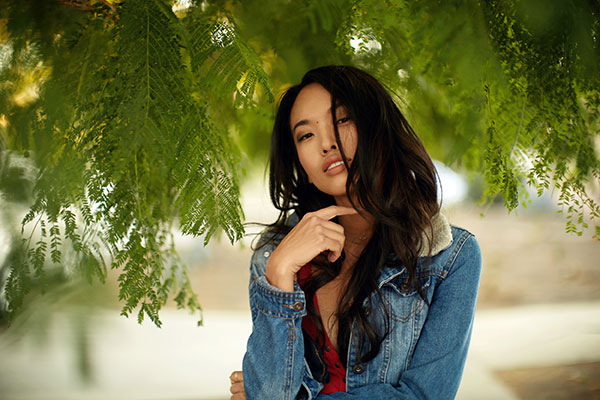
When it comes to photography, most people will use zoom lenses for their practicality. With the ability to change the focal length with a quick twist of the wrist, zooms can be handy when you need to get the shot. On the other hand, the biggest advantage to prime lenses is the incredibly wide apertures that are available. While this is advantageous in low light settings, allowing more light to pass through the lens onto the sensor, you're also able to have more control of your depth of field, giving you the ability to achieve a painterly effect to your images.
While the shallow depth-of-field look is usually shot on location, I also love to use it in the studio to create a dreamlike feel in my images. Among the two lenses I love the most for this look are the Canon 85mm f/1.2L II and the Nikon 105mm f/1.4E. With their ability to open extremely wide, you're able to get a depth of field that is only a centimeter or two in focus. The result is an otherwordly feeling in the images that captures the attention of your viewer.
3. ND Filters
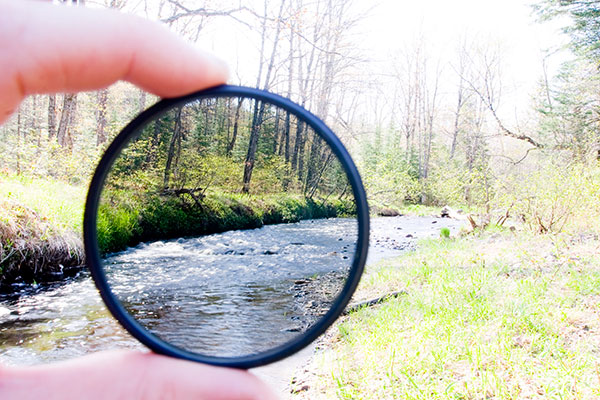
We’ve done a lot of testing on filters on our own blog, finding that most UV filters will actually soften your lenses, but there is one filter in particular that we really love, and that is the Neutral Density Filter. The best way I’ve always described Neutral Density (ND) filters is sunglasses for your camera lens. Why would you need sunglasses for your camera? Well, there are a lot of really interesting ways to use them.
The most obvious is slowing down your shutter speed to capture movement in a unique way. You see this most often in shots of rivers, streams and waterfalls. ND filters can turn those harsh splashes into silky smooth colors and tones. Another reason to use an ND filter is to block out some of the sun’s hard exposure ratings. I do this most often when using strobes on location, allowing me to have light control, as well as opening up my aperture to pull some shallow depth of field. I’ve talked about this as well, in a previous blog article.
Neutral Density Filters come in two varieties - Regular and Variable. Regular ND filters will block out a certain amount of light, usually measured in stops of light. These are the recommendation we give if you’re looking to do extremely long exposures and want to get the best sharpness out of your lenses. Variable ND filters allow you to adjust the level of exposure by twisting the outer ring on the filter. These are what we recommend to those who want the most versatility out of their ND systems.
4. Off-Camera Lighting
If you've used lighting in the past, you'll learn pretty quickly that those lights will work best when away from the camera system. Bringing your lighting off camera will allow you to have better control and create more interesting results.
The idea of using off-camera lighting can be a nerve-racking experience, especially to those who are used to using just natural light in their workflow. But the experience can also be incredibly rewarding with the eye-catching images you can produce. Off-camera lighting gives you more control and can be easily used both on location and in a studio.
When it comes to lighting equipment, it's hard to argue that there is a better off-camera system than the Profoto B1X strobe. With Profoto B1X having wireless control built-in, high-speed sync, and 500Ws of power, it's quite an incredible tool for photographers both shooting on location and in a studio. The fact that the B1X has a hot-swappable battery system only adds to the feature set of an already incredible lighting device.
5. Screen Calibrator
One of the most essential tools a serious photographer can have is a correctly calibrated monitor. When working with images, you need to have an understanding of color and how your monitor is displaying those colors. That’s why having an effective screen calibrator is crucial.
An argument that some people make against screen calibration is "Why would I calibrate my monitor when none of my clients calibrate theirs?" It's a valid argument, in some ways, but has some flaws. The reason to calibrate, aside from having an accurate workflow, is for the rule of averages. Some monitors are warmer in tone than others, while others are cooler in tone. Properly calibrating your monitor means your images will be optimized for most screens out there. Maintaining an accurate color on your monitor(s) is an essential step in your workflow. When it comes to screen calibration systems, the most beloved are the color management tools provided by X-Rite Color. To maintain good color accuracy, you'll want to calibrate your monitor once a month or so, as calibration can fade and lose accuracy over time.
So, what do you think? Anything you think should be added to the list? Feel free to provide your insight and recommendations in the comments below. You should also check out this video from Michael Sasser on "8 Pieces of Software Every Photographer Should Use."
- Log in or register to post comments


![]()
Get the Latest Photo Tips, News & Reviews from Shutterbug!
| Camera Reviews Other Reviews | Mobile Reviews Photography Reviews Columns | News | Features | How-To | Resources |
 © 2025 Shutterbug
AVTech Media Americas Inc., USA
All rights reserved