Digital Still Life Photography: Art, Business & Style
Having worked with Steve in the past, and knowing him for many years, we are always pleased to feature his photography and writing. Recently a new book of his came across our desk (ISBN: 978-1-4547-0327-3, published by Pixiq, www.pixiq.com, 272 pages, $29.95) and we are happy to offer an excerpt of just a few pages of the tip and technique filled volume here. This is one book where Steve’s personality, experience, and expertise certainly comes through in each and every well-illustrated page.—Editor



All Photos © Steve Sint
Monofilament
Sold in sewing shops and sporting goods stores (as fishing line), monofilament is an extremely thin, clear nylon thread that basically disappears once you are a few feet away from it. Let’s say you have to photograph a pocketbook, and you want the handle to stand up instead of having it drape over the bag. You can string a piece of monofilament through the handle and tie it to something above the pocketbook and outside the frame of the photograph. I use a piece of 1x2 lumber supported by two light stands—one on either side of my tabletop set. Because the monofilament will be invisible, no one will ever know how you made that handle stand up. Monofilament to the rescue!
As another example, I had to do a head shot of a columnist who covered the world news. The concept given to me was him spinning a globe on his pointer finger like basketball stars do with a basketball. Needless to say, he couldn’t do that, or at least not long enough to get a picture of it while he also looked at the camera and smiled. Although his face is cropped out of the image shown here because I don’t have a signed model release, you can see I managed it.
I solved the problem by taping two pieces of monofilament from the globe, one running to a cross bar above the set and the second running from the bottom of the globe and taped to the floor. I spun the globe, he brought his finger up until it just touched the bottom of it, I dragged my shutter a bit to show that it was moving, and voilá, I had the shot. Monofilament to the rescue!
For the record, now that we’re in the digital age, it would be simple to clone out the monofilament altogether, but my original use of this image only ran 2x2 inches, so the monofilament was invisible. I did not clone it out for use here, because I want you to see it for illustration purposes.
Last but not least, I wanted to float an orange slice over an arrangement of blue glass bottles, and I used a long piece of monofilament that was sewn through the orange rind so it exited the rind at the ten o’clock and two o’clock positions with the ends attached to an overhead crossbar with two bits of tape. I used two strands of monofilament so the orange slice wouldn’t spin—monofilament to the rescue one more time!
Opaque Or Translucent Acrylic?
Before you read any farther, let’s get something out of the way. I often use the words acrylic, acrylic plastic, plastic, and even Plexiglas® interchangeably! That’s because, generally speaking, for studio photography purposes they are all the same thing, and they can be used interchangeably. Some manufacturers of acrylic plastics trademark the name of their products, such as Plexiglas® or Lucite® (which is a clear acrylic), but don’t get hung up on a brand name. Instead, I find it more useful to focus on the word that describes a particular acrylic’s properties, such as opaque or translucent. Regardless of what you call it, or which type you choose to use, it’s a good material to use for backgrounds and diffusers (if it’s translucent) for still life photography.
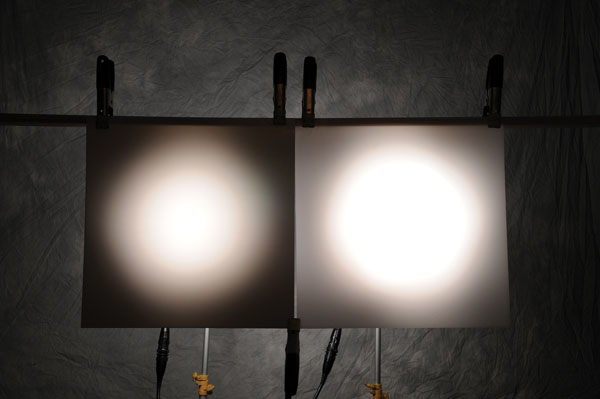
Because both of the images of the light table model shown use white translucent acrylic for their backgrounds, I thought this might be the time to mention the difference between opaque and translucent acrylic as a background. While opaque white plastic will transmit light through it, the edge of your light’s pattern (behind the acrylic) will be contained, but if you choose to use white translucent acrylic instead, the edge of your light’s pattern will spread more. Neither of these different properties is better than the other, but realizing the difference between them offers you more control. Look at the two images of a light behind a piece of white acrylic.

Making An Acrylic Surface Non-Reflective
All acrylic plastics have a very glossy surface, and glossy surfaces create reflections. But what if you want a translucent surface that is not glossy, a surface that doesn’t create reflections? While I have found this technique to only work successfully on white (translucent or opaque) acrylic surfaces, it is worth mentioning. You can have one side of your acrylic sheet sandblasted or chemically etched. This process will turn its reflective surface into a matte surface. I mention having it done to only one side, because acrylic plastic is expensive and having one side glossy and one side matte can double its usefulness.
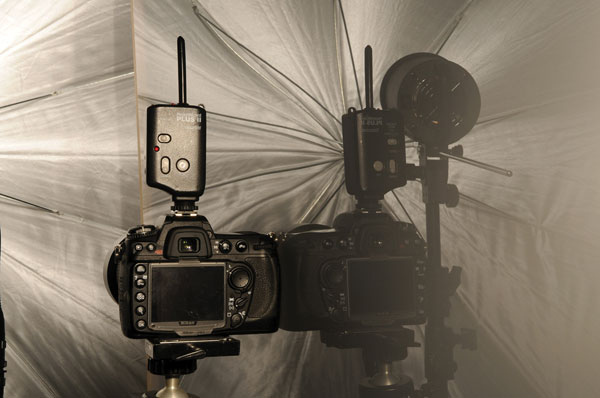
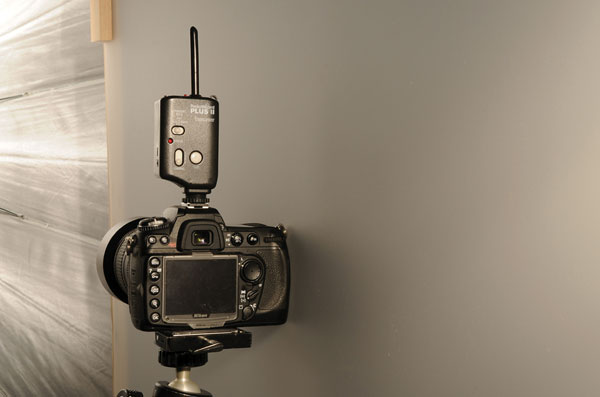
Look at the two images to see the difference in the reflections on a glossy acrylic surface (A) and a sandblasted (or chemically etched) surface (B).
Black Mirror Surfaces
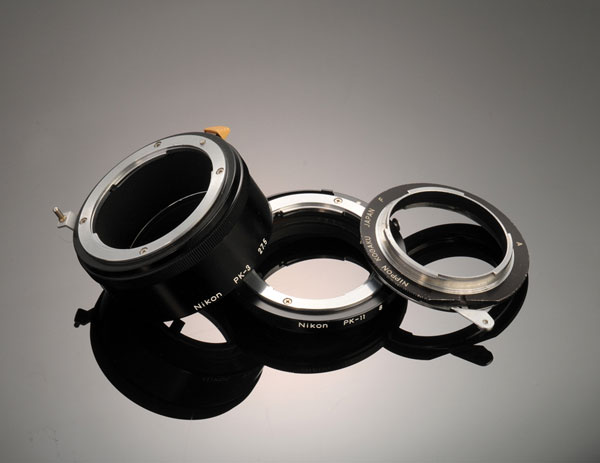
Inexperienced photographers often think any black background is a perfect choice for almost any still life subject, but I strongly disagree. While black might work for an occasional portrait, in my opinion, the color black is too dead for still life photography. This is especially true for almost all reflective subjects, because black backgrounds often reflect into parts of the subject, creating dead spots on them. However, if you mix the glossy, reflective surface of acrylic with the color black, I think you can create images that are extremely dramatic. I call these very special images “black mirror photographs,” and the high-tech feel of the resulting images makes this concept well worth exploring. When I employ this technique, I use a piece of black opaque acrylic, but there is also a semi-transparent (not translucent) black acrylic called “smoke.” That could possibly be used over a silver or gold show card to add an interesting creative effect. (A show card is a non-archival, less expensive version of a matte board.)
All surfaces, be they part of the background or part of a subject, can be loosely divided into two categories. I have often called them active and passive surfaces. Examples of active surfaces are acrylic, glass, shiny metal, and water. Examples of passive surfaces are velvet, wool, felt, and even flocking paper. Obviously, the two types of surfaces respond differently to light.
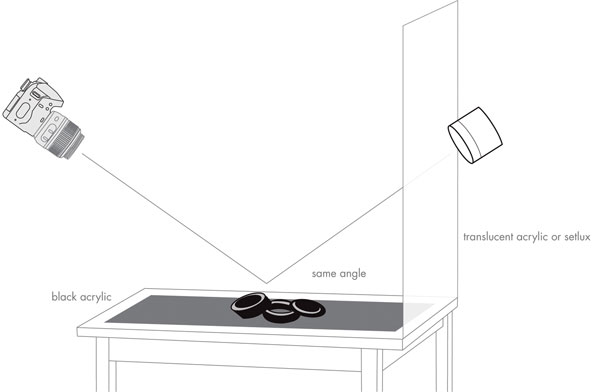
For an active surface to reflect light into the camera’s lens, a light that is at an equal-but-opposite angle to the lens’ axis must hit it. This rule is called “the angle of incidence is equal to the angle of reflection.” The concept is the same as why a pool ball bounces off the side rail cushion and its direction is dependent upon the angle at which it hit the cushion to begin with. To get a piece of opaque black acrylic to become a black mirror, we’ll need a light above and behind the subject we are shooting and it will also be helpful if we diffuse this light source so that the reflected light spreads and becomes more pleasing to the eye. Look at the accompanying diagram to understand this. Look at the two black mirror still life images. By slightly changing the position of the light behind a diffusion screen at the rear of the set, you can change the position and intensity of the light’s reflection on the black acrylic background beneath the image’s subject(s).

Author Bio
Steve Sint (stevesint.com) has photographed over 4000 weddings, taken over 2 million photographs, and captured over 1 million portraits for his own studio and others in the New York metropolitan area. As a commercial photographer he has photographed tens of thousands of executives and still life subjects. His client list includes the American Broadcasting Company, Time Inc., Hearst Publications, Yves St. Laurent, AT&T, NCR, National Semiconductor, Miller Freeman Publishing, Sony, MacGroupUS, and Hachette-Filipacchi Magazines. His photographs have appeared on the covers of over 60 national magazines including Life, Omni, Stereo Review, and Modern Photography. He has also authored seven books on photography including his most recent: Digital Still Life Photography: Art, Business, and Style (excerpted here), Digital Wedding Photography: Art, Business, and Style, and Digital Portrait Photography: Art, Business, and Style. Sint lives on the outskirts of New York City and teaches professional photography workshops, classes, plus produces video tutorials (www.setshoptutorials.com).

Where To Buy
All of Steve Sint’s books are available on the web from Amazon (amazon.com) and Barnes and Noble (barnesandnoble.com) and at fine brick-and-mortar book and camera stores everywhere.
- Log in or register to post comments
